Modify some key components to improve training
Next, complete the setup of the ML-NPC object to enable a character for machine learning using Unity ML Agents.
Configure the NPC Ray Perception Sensor 3D component
First, add a Ray Perception Sensor 3D component. This will cast 3D rays into the scene to inform your character about any nearby enemies or obstacles. The rays are cast at regular intervals. The results will form part of the inputs to the neural network.
Open the Level_DevSummit2022 scene. Navigate to the Assets/#DevSummit2022/Scenes directory in the Project panel and double-click the Level_DevSummit2022 scene file.
Select the ML-NPC object by going to the Level-DevSummit2022->AgentsSettings->ML-NPC, as per Figure 1.
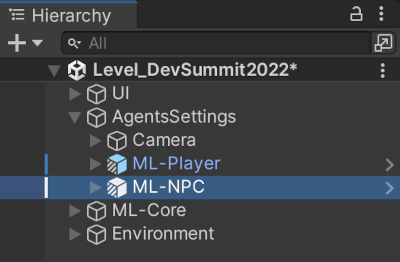 Figure 1. Click on ML-NPC in the Hierarchy panel
In the Inspector window (usually on the right) click the Add Component button at the bottom, as per Figure 2. Notice the 2 warnings in the Inspector as below:
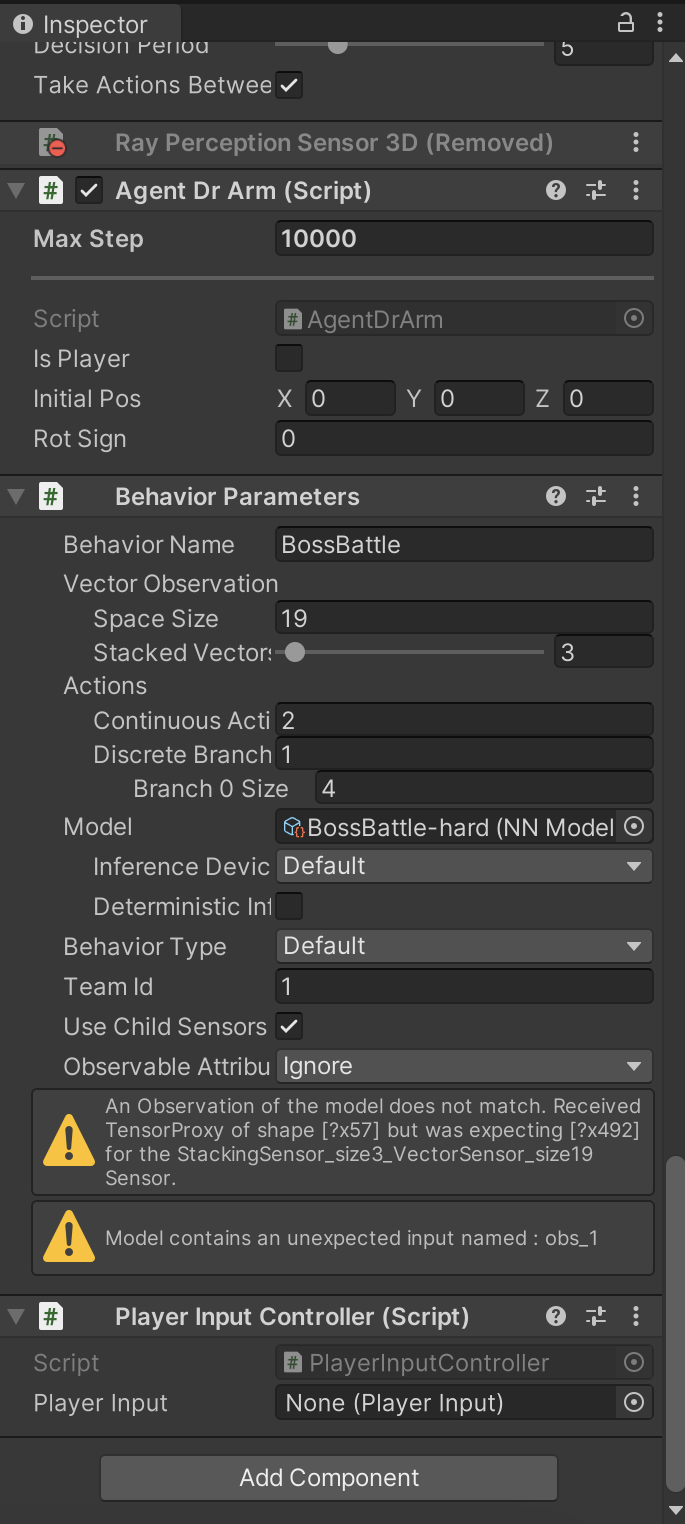 Figure 2. The Ray Perception Sensor 3D component is missing
Now type ray in the filter edit box, to narrow down the search. From the filtered list, double-click on Ray Perception Sensor 3D to add this component to the ML-NPC object.
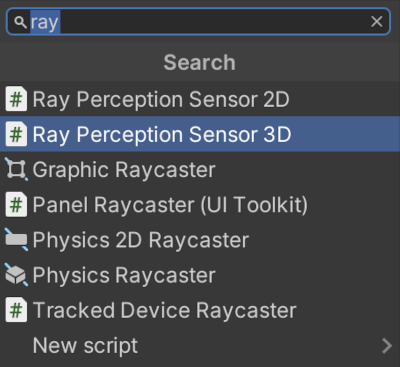 Figure 3. Ray Perception Sensor 3D
Notice that by adding the Ray Perception Sensor 3D component, the Model contains…. warning message has now disappeared.
Change some properties to complete this component’s set-up. Start by giving the sensor a sensible name:
- Set the Sensor Name property to “NPCRayPerceptionSensor”
Now tell the sensor what type of objects it should detect (i.e. which objects will get hit by each raycast)
- Add 2 elements to the Detectable Tags array and name them as follows:
- “Player”
- “Collide”
- Add 2 elements to the Detectable Tags array and name them as follows:
Now setup the rays. Ray casts are relatively costly so only use as many as you think will be needed for the situation. Some good numbers for this situation are:
- Set Rays Per Direction to “20”
- Set Max Ray Degrees to “180”
- Set Ray Length to “30”
- Set Stacked Ray Traces to “3”
Notice how the An Observation of the model… warning message has now disappeared.
Finally, set a positional offset for the rays because they are currently cast along the ground. (This can cause some rays to squeeze between the floor and walls and therefore not hit anything, leaving the character unaware of the walls.) The rays will start and finish around waist height:
- Set Start Vertical Offset to “1”
- Set End Vertical Offset to “1”
Save the scene by using CTRL-S or the menu option File->Save
The fully configured component, with the correct properties updated, should look like this:
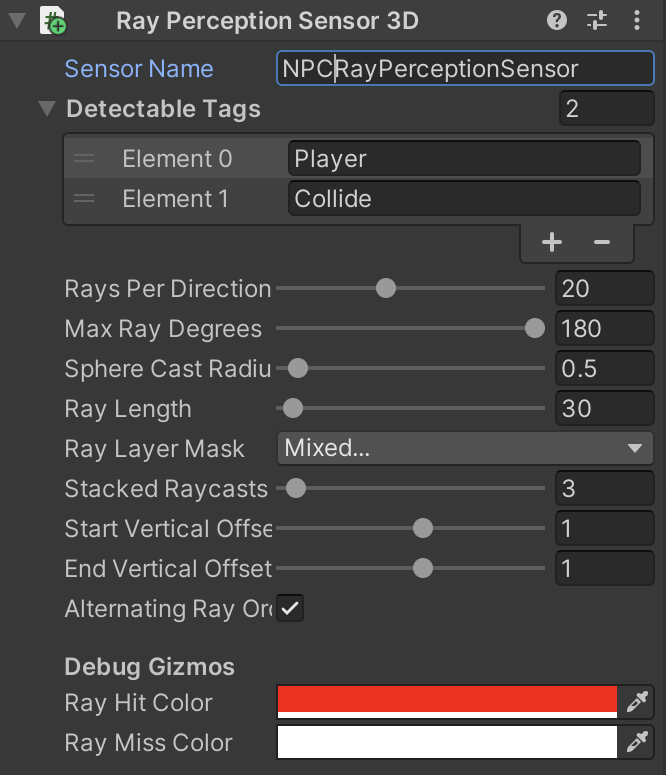 Figure 4. Working Ray Perception Sensor 3D
Script modifications
Edit AgentDrArm.cs
Both characters have the AgentDrArm script component. The script behaves slightly differently depending on whether the character is currently player-controlled. During training, both characters are controlled by the AI. AgentDrArm is derived from the Unity ML Agents Agent class - the machine learning “brain”.
Let’s add some code to make the character aware of health statistics for itself and the other character. These statistics are observations that are passed into each character’s ML Agent. The observations are fed into the neural network. The number of observations must fit within the limit set in the BehaviourParameters component. We also need to implement our reward system (described earlier).
With the ML-NPC still selected, in the Inspector, on the right, scroll until you see the Agent Dr Arm (Script). To the right are 3 vertical dots. Click them to pop-up the context menu and select the Edit Script option, at the bottom.
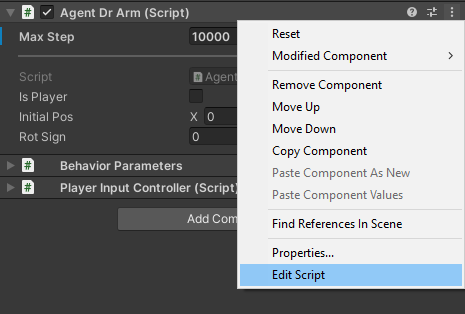 Figure 5. Agent Dr Arm menu
Your preferred code editor should launch and open the file AgentDrArm.cs:
using Player;
using PlayerInput;
using UnityEngine;
using Unity.MLAgents;
using Unity.MLAgents.Sensors;
using Unity.MLAgents.Actuators;
using Unity.MLAgents.Policies;
using static BattleEnvController;

public enum Team
{
    Player = 0,
    NPC = 1
}

public class AgentDrArm : Agent
{
    [SerializeField] bool _isPlayer;

    [HideInInspector]
    public Team team;
    EnvironmentParameters m_ResetParams;
    BehaviorParameters m_BehaviorParameters;
    [HideInInspector]
    public bool enableBattle = true;

    ...
}
In the script, scroll down to the CollectObservations() method. This method collates information that is key to the reinforcement learning process to help the ML Agent make good decisions. Various bits of state information are returned as a list of observations, such as:
Roll/dodge flag (is the character currently rolling/dodging)
Is the character firing a weapon?
Is the opponent firing a weapon?
To add to that, look for // WORKSHOP TODO: at line 145 and uncomment the 3 lines of code for Health, Stamina, and Mana observations.
// WORKSHOP TODO: Uncomment the Health Stamina and Mana code below
//sensor.AddObservation(_manager.Stats.CurrentHealth / _manager.Stats.MaxHealth);
//sensor.AddObservation(_manager.Stats.CurrentStamina / _manager.Stats.MaxStamina);
//sensor.AddObservation(_manager.Stats.CurrentMana / _manager.Stats.MaxMana);
You are adding values to the observations about the current character’s:
Current health as a value between 0 and 1 (maximum health)
Current stamina as a value between 0 and 1 (maximum stamina)
Current mana as a value between 0 and 1 (maximum mana)
Now do the same again at line 172. Again look for // WORKSHOP TODO:. Add the same 3 values again. (This time they are for the opponent character, so each character is using the information from both characters.)
// WORKSHOP TODO: Uncomment the Health, Stamina and Mana code below
//sensor.AddObservation(_enemyManager.Stats.CurrentHealth / _enemyManager.Stats.MaxHealth);
//sensor.AddObservation(_enemyManager.Stats.CurrentStamina / _enemyManager.Stats.MaxStamina);
//sensor.AddObservation(_enemyManager.Stats.CurrentMana / _enemyManager.Stats.MaxMana);
Now scroll down to the OnActionReceived() method. This is called every time the ML Agent takes an action.
Again look for // WORKSHOP TODO: on line 188 inside the function OnActionReceived. Uncomment the line below it, which uses the m_Existential value that is calculated in the Initialize() function based on the Agent property MaxStep. It is effectively a small penalty (a negative reward) applied every time an action is taken. The longer it takes to win, the smaller the reward will be.
// WORKSHOP TODO: Uncomment the code below
//AddReward(-m_Existential);
In addition to applying the reward value, an action needs to be performed. OnActionReceived is given the results of the neural network which are the action buffers. The action buffers are mapped directly to the character controls for moving (forward/back and left/right), rolling and attack actions. These are applied in the function ApplyMlMovement (called via ActAgent). The AI character is able to perform the same actions as the human player.
- Remember to save the changes
Edit BattleEnvController.cs
- Select the AgentsSettings object, in the Hierarchy tab, on the left.
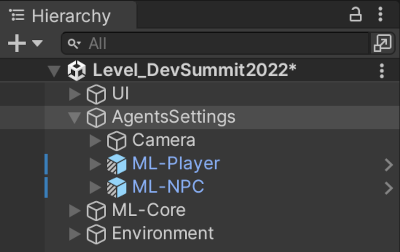 Figure 7. Agent Settings
- In the Inspector, scroll until you see the Battle Environment Controller (Script). To the right are 3 vertical dots. Click on them to open the context menu and select the Edit Script menu, at the bottom.
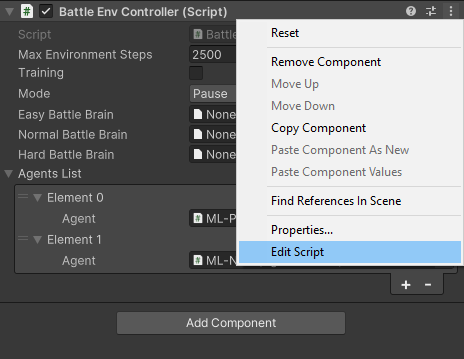 Figure 8. Battle Environment Controller menu
This will open the script Assets/Scripts/MlAgents/BattleEnvController.cs:
using Character;
using System.Collections;
using System.Collections.Generic;
using System;
using Unity.MLAgents;
using Unity.MLAgents.Policies;
using Unity.Barracuda;
using UnityEngine;

public class BattleEnvController : MonoBehaviour
{
    [SerializeField]
    [System.Serializable]
    public class PlayerInfo
    {
        public AgentDrArm Agent;
        [HideInInspector]
        public Vector3 StartingPos;
        [HideInInspector]
        public Quaternion StartingRot;
    }

    ...
}
The battle environment controller script
BattleEnvController is a high level manager that manages game state and adjusts accordingly. One of its jobs is to look out for game over conditions such as when a character wins. The following sections take you through some of the areas of the script.
Switching between brains based on the difficulty level
Go to Line 47 of BattleEnvController.cs, where you will see a BattleMode enumeration class to keep track of the difficulty level being fought.
This is used to determine which “brain” is used to make decisions - the brain is switched based on the difficulty level.
public enum BattleMode
{
    Easy,
    Normal,
    Hard,
    Demo,
    Pause,
    Default
}
Go to the Update() method at line 106. This is being called each frame, but it is only the begin, end, and pause that are detected here. If the mode changes (line 108) then it’s necessary to configure the agent and put the correct brain in.
void Update()
{
    if (mode != BattleMode.Default)
    {
        foreach (var item in AgentsList)
        {
            configureAgent(mode, item.Agent);
        }
        mode = BattleMode.Default;
    }
}
Check for game over
Go to line 118, to the FixedUpdate() method. This largely checks for end conditions, i.e. if the battle is over. If a character has died, the battle is over and we give the appropriate win or lose reward depending on which character died. We give the reward around line 150.
float reward = item.Agent.Win();
if (item.Agent.team == Team.Player)
{
    // Player wins
    playerReward = reward;
}
else
{
    // NPC wins
    NPCReward = reward;
}
The training
When training the model (line 165) the end of the battle (or ML episode) is tracked and a message is put out to log who won/lost. The scene then gets reset.
if (Training)
{
    switch (retEpisode)
    {
        case 1:
            Debug.Log("[End Episode] Player win at step " + m_ResetTimer + ".  (player reward: " + playerReward + ", NPC reward: " + NPCReward + ")");
            break;
        case 2:
            Debug.Log("[End Episode] Player lose at step " + m_ResetTimer + ". (player reward: " + playerReward + ", NPC reward: " + NPCReward + ")");
            break;
    }
    ResetScene();
}
There is also a time limit for each battle. (Players can take as long as they want in a real battle, but during training this time limit prevents the characters from just standing around forever - after a timeout, they both lose.)
Reset between each battle
Regardless of who lost, the scene is reset for the next training iteration.
Go to the ResetScene() method at line 244. Here, during training (line 254), the start position is varied so that characters don’t always start from the exact same place. This allows the AI to learn to attack from any position. Character start positions are shifted randomly by a few meters so they start from slightly different places each time.
if (Training)
{
    var randomPos = UnityEngine.Random.Range(-4f, 4f);
    var newStartPos = item.StartingPos + new Vector3(randomPos, 0f, randomPos);
    var rot = item.Agent.rotSign * UnityEngine.Random.Range(80.0f, 100.0f);
    var newRot = Quaternion.Euler(0, rot, 0);
    item.Agent.transform.SetPositionAndRotation(newStartPos, newRot);
}
Player character does not need an AI brain
At line 213 there is the configureAgent() method. The battle (line 215) is enabled if not paused. For the player character (if not demo or training), the brain is turned off by setting it to null.
Otherwise, the brain is set appropriately (from line 223) for the difficulty setting (below). In demo mode, the normal brain is used, and when paused the brain is removed to avoid odd behavior.
switch (mode)
{
    case BattleMode.Easy:
        agent.SetModel("BossBattle", easyBattleBrain, inferenceDevice);
        break;
    case BattleMode.Normal:
        agent.SetModel("BossBattle", normalBattleBrain, inferenceDevice);
        break;
    case BattleMode.Hard:
        agent.SetModel("BossBattle", hardBattleBrain, inferenceDevice);
        break;
    case BattleMode.Demo:
        agent.SetModel("BossBattle", normalBattleBrain, inferenceDevice);
        break;
    case BattleMode.Pause:
        agent.SetModel("BossBattle", null, InferenceDevice.Default);
        break;
}
The next section looks at the training phase, which requires Python and some additional packages.