Build a Hands-Free Selfie Android Application with MediaPipe
Introduction
Set up the Development Environment
Manage Camera Permissions
Integrate MediaPipe solutions
Manage UI state with ViewModel
Use SharedFlow to View Events
Use StateFlow to View Controller States
Mediate flows to trigger photo capture
Avoid duplicate photo capture requests
Next Steps
Build a Hands-Free Selfie Android Application with MediaPipe
Connect your device to your machine with a USB data cable
If this is your first time running and debugging Android apps, follow the guidance on the Android Developer website. See Set up a device for development , and check that you have completed these steps:
You have followed the instructions Enable USB debugging on your device .
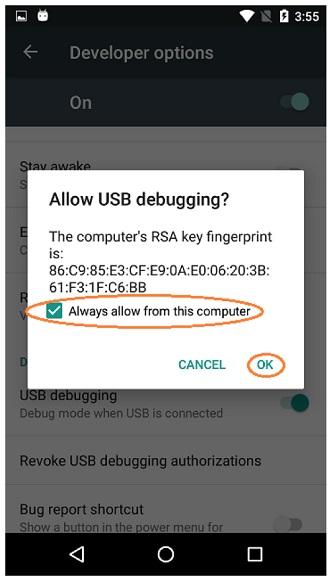
You have confirmed that you have enabled USB debugging by tapping OK on your device when the Allow USB debugging dialog appears, and that you have checked Always allow from this computer. See Figure 6.
 Figure 6: Allow USB Debugging.
Make sure that your device model name and SDK version correctly show up in the top-right toolbar.
Click the Run button to build and run the app.
After a while, you should see a notification of a successful build in Android Studio and the new app will be displayed on your Android device.
However, you will also see that the app shows a black screen while printing error messages in your Logcat , which looks like this:
2024-11-20 11:15:00.398 18782-18818 Camera2CameraImpl       com.example.holisticselfiedemo      E  Camera reopening attempted for 10000ms without success.
2024-11-20 11:30:13.560   667-707   BufferQueueProducer     pid-667                              E  [SurfaceView - com.example.holisticselfiedemo/com.example.holisticselfiedemo.MainActivity#0](id:29b00000283,api:4,p:2657,c:667) queueBuffer: BufferQueue has been abandoned
2024-11-20 11:36:13.100 20487-20499 isticselfiedem          com.example.holisticselfiedemo      E  Failed to read message from agent control socket! Retrying: Bad file descriptor
2024-11-20 11:43:03.408  2709-3807  PackageManager          pid-2709                             E  Permission android.permission.CAMERA isn't requested by package com.example.holisticselfiedemo
This is the expected behavior from having not yet correctly configured the app’s permissions. See Permissions on the Android Developer website. Android OS restricts the app’s access to camera features due to privacy constraints.
Request camera permission at runtime
Navigate to
manifest.xmlin yourappsub-project’ssrc/mainpath.Declare the camera hardware, and set the permissions by inserting the following lines into the
<manifest>element, ensuring that it is declared outside and above the<application>element:
    <uses-feature
        android:name="android.hardware.camera"
        android:required="true" />
    <uses-permission android:name="android.permission.CAMERA" />
- Navigate to
strings.xmlin yourappsub-project’ssrc/main/res/valuespath.
Insert the following lines of text resources, which you will use at a later stage:
    <string name="permission_request_camera_message">Camera permission is required to recognize face and hands</string>
    <string name="permission_request_camera_rationale">To grant Camera permission to this app, please go to system settings</string>
- Navigate to
MainActivity.ktand add the following permission-related values to companion object:
        // Permissions
        private val PERMISSIONS_REQUIRED = arrayOf(Manifest.permission.CAMERA)
        private const val REQUEST_CODE_CAMERA_PERMISSION = 233
- Add a new method named
hasPermissions()to check on runtime whether the camera permission has been granted:
    private fun hasPermissions(context: Context) = PERMISSIONS_REQUIRED.all {
        ContextCompat.checkSelfPermission(context, it) == PackageManager.PERMISSION_GRANTED
    }
- Add a condition check in on the
onCreate()wrappingsetupCamera()method, to request camera permission on runtime:
        if (!hasPermissions(baseContext)) {
            requestPermissions(
                arrayOf(Manifest.permission.CAMERA),
                REQUEST_CODE_CAMERA_PERMISSION
            )
        } else {
            setupCamera()
        }
- Override the
onRequestPermissionsResultmethod to handle permission request results:
    override fun onRequestPermissionsResult(
        requestCode: Int,
        permissions: Array<out String>,
        grantResults: IntArray
    ) {
        when (requestCode) {
            REQUEST_CODE_CAMERA_PERMISSION -> {
                if (PackageManager.PERMISSION_GRANTED == grantResults.getOrNull(0)) {
                    setupCamera()
                } else {
                    val messageResId =
                        if (shouldShowRequestPermissionRationale(Manifest.permission.CAMERA))
                            R.string.permission_request_camera_rationale
                        else
                            R.string.permission_request_camera_message
                    Toast.makeText(baseContext, getString(messageResId), Toast.LENGTH_LONG).show()
                }
            }
            else -> super.onRequestPermissionsResult(requestCode, permissions, grantResults)
        }
    }
Verify camera permission
Rebuild and run the app. Now you should see a dialog pop up requesting camera permissions.
Depending on your Android OS version, tap Allow or While using the app().
You should then see your own face in the camera preview. Good job!
You might need to restart the app to ensure that the permission change takes effect.
In the next section, you will learn how to integrate MediaPipe vision solutions.