Learn how to deploy Spark on AWS Graviton2
Deploy a single node of Spark
Apache Spark is an open-source, distributed processing system used for big data workloads. It utilizes in-memory caching and optimized query execution for fast queries against data of any size. Spark is a fast and general engine for large-scale data processing.
You can deploy Spark on AWS Graviton processors using Terraform. In this learning path, you will deploy Spark on a single AWS EC2 instance. If you are new to Terraform, you should look at Automate AWS EC2 instance creation using Terraform before starting this Learning Path.
Before you begin
You should have the prerequisite tools installed before starting the learning path.
Any computer which has the required tools installed can be used for this section. The computer can be your desktop or laptop computer or a virtual machine with the required tools.
You will need an AWS account to complete this learning path. Create an account if you don’t have one.
Before you begin you will also need:
- An AWS access key ID and secret access key
- An SSH key pair
The instructions to create the keys are below.
Acquire AWS Access Credentials
The installation of Terraform on your desktop or laptop needs to communicate with AWS. Thus, Terraform needs to be able to authenticate with AWS.
To generate and configure the Access key ID and Secret access key, follow this guide .
Generate a SSH key-pair
Generate the SSH key-pair (public key, private key) using ssh-keygen to use for AWS EC2 access. To generate the key-pair, follow this
guide
.
If you already have an SSH key-pair present in the ~/.ssh directory, you can skip this step.
Create an AWS EC2 instance using Terraform
Using a text editor, save the code below in a file called main.tf.
provider "aws" {
  region = "us-east-2" // Update AWS region if required
}

locals {
  common_tags = {
    Name = "Spark_TEST"
  }
}

resource "aws_default_vpc" "main" {
  tags = local.common_tags
}

resource "aws_instance" "Spark_TEST" {
  ami             = "ami-0ca2eafa23bc3dd01" // AMI ID for Ubuntu 22.04 on Arm in the us-east-2 region
  instance_type   = "t4g.small"             // Arm-based instance. Requires an Arm Linux distribution.
  security_groups = [aws_security_group.TerraformSecurity.name]
  key_name        = aws_key_pair.developer.key_name

  tags = local.common_tags
}

// Obtain the public IP address of the developer machine to grant access in the security group
data "http" "developer_public_ip" {
  url = "http://ipv4.icanhazip.com"
}

resource "aws_security_group" "TerraformSecurity" {
  name        = "TerraformSecurity"
  description = "Allow inbound traffic"
  vpc_id      = aws_default_vpc.main.id

  ingress {
    description = "Jupyter Notebook"
    from_port   = 8888
    to_port     = 8888
    protocol    = "tcp"
    cidr_blocks = ["${chomp(data.http.developer_public_ip.response_body)}/32"]
  }
  ingress {
    description = "SSH"
    from_port   = 22
    to_port     = 22
    protocol    = "tcp"
    cidr_blocks = ["${chomp(data.http.developer_public_ip.response_body)}/32"]
  }
  egress {
    from_port   = 0
    to_port     = 0
    protocol    = "-1"
    cidr_blocks = ["0.0.0.0/0"]
  }

  tags = local.common_tags
}

output "Master_public_IP" {
  value = [aws_instance.Spark_TEST.public_ip]
}

resource "aws_key_pair" "developer" {
  key_name   = "developer_id_rsa"
  public_key = file("~/.ssh/id_rsa.pub")
}

// Generate Ansible inventory file in tmp
resource "local_file" "inventory" {
  depends_on = [aws_instance.Spark_TEST]
  filename   = "/tmp/inventory"
  content    = << EOF
  [db_master]
  ${aws_instance.Spark_TEST.public_ip}
  [all:vars]
  ansible_connection=ssh
  ansible_user=ubuntu
  EOF
}
Make the changes listed below in main.tf to match your account settings.
- In the
providersection, update the value to use your preferred AWS region. - (optional) In the
aws_instancesection, change the ami value to your preferred Linux distribution. The AMI ID for Ubuntu 22.04 on Arm in the us-east-2 region isami-0ca2eafa23bc3dd01so no change is needed if you want to use Ubuntu AMI in us-east-2. The AMI ID values are region specific and need to be changed if you use another AWS region. Use the AWS EC2 console to find an AMI ID or refer to Find a Linux AMI .
The instance type is t4g.small. This is an Arm-based instance and requires an Arm Linux distribution.
The inventory file is automatically generated and need not to be changed.
Terraform Commands
Use Terraform to deploy the main.tf file.
Create the cluster using Terraform
Run the following terraform commands to deploy the AWS cluster. terraform init to initialize the Terraform deployment. This command downloads the dependencies required for AWS.
terraform init    # initializes the Terraform deployment and downloads the dependencies required for AWS
terraform plan    # creates an prints execution plan
terraform apply   # applies the execution plan and creates all AWS resources
Answer yes to the prompt to confirm you want to create AWS resources.
The public IP address will be different, but the output should be similar to:
        Outputs:

Master_public_IP = [
  "18.217.147.103",
]
You can configure Spark either manually or by using Ansible. Choose one way and proceed using the steps outlined below.
Configure Spark manually
SSH to the instance
Login to the deployed instance, using SSH to the public IP of the AWS EC2 instance.
ssh ubuntu@Master_public_IP
Installation of required dependencies on AWS EC2 instance
For deploying Spark on AWS graviton2, you need to install the tools and dependencies shown below on your EC2 instance:
sudo apt-get update
sudo apt install openjdk-11-jdk python3-pip -y
pip3 install jupyter pyspark
export PATH=/home/ubuntu/.local/bin:$PATH
Running Jupyter Notebook
Use the command below to run a Jupyter notebook on the instance:
jupyter notebook --ip="0.0.0.0"
For a successful launch, Jupyter prints the URLs containing a token to access the notebook. You need to replace the IP address in the URL with the external IP address of the instance (Master_public_IP) and paste it in your browser:
    To access the notebook, open this file in a browser:
        file:///home/ubuntu/.local/share/jupyter/runtime/nbserver-15874-open.html
    Or copy and paste one of these URLs:
        http://ip-172-31-5-191:8888/?token=392463586bee6e1aa974cd254db8cee79f27ce9334ee22fa
     or http://127.0.0.1:8888/?token=392463586bee6e1aa974cd254db8cee79f27ce9334ee22fa
Configure Spark by Ansible
Using a text editor, save the code below to a file called spark.yaml. This is the YAML file for the Ansible playbook to install Spark and the required dependencies.
- name: Spark config
  hosts: all
  become: true
  become_user: root
  become_method: sudo
  tasks:
    - name: Update the Instance & Install Dependencies
      apt:
        name:
          - openjdk-11-jdk
          - python3-pip
        update_cache: 'yes'
    - name: Install Jupyter and PySpark
      pip:
        name:
          - jupyter
          - pyspark
    - name: Creating a Jupyter service file
      copy:
        dest: /etc/systemd/system/jupyter.service
        content: |

          [Unit]
          Description=Jupyter Notebook Server

          [Service]
          User=ubuntu
          WorkingDirectory=/home/ubuntu/
          ExecStart= jupyter notebook --ip="0.0.0.0"
          Restart=always

          [Install]
          WantedBy=multi-user.target

    - name: Start service Jupyter
      systemd:
        name: jupyter.service
        state: restarted
    - name: Jupyter Notebook Server URL
      become_user: ubuntu
      shell: jupyter notebook list
      register: command_output
    - debug:
        var: command_output.stdout_lines
Ansible Commands
Run the playbook using the ansible-playbook command:
ANSIBLE_HOST_KEY_CHECKING=False ansible-playbook spark.yaml -i /tmp/inventory
Deployment may take a few minutes. For a successful launch, Ansible prints the URL containing a token to access the notebook. You need to replace the IP address in the URL with the external IP address of the instance (Master_public_IP) and paste it in your browser to connect with the Jupyter notebook:
        TASK [debug] *******************************************************************
ok: [34.205.127.53] => {
    "command_output.stdout_lines": [
        "Currently running servers:",
        "http://0.0.0.0:8888/?token=2df97b91c6695850cb091de073b1e1f2a4c34d81107d51db :: /home/ubuntu"
    ]
}

PLAY RECAP *********************************************************************
34.205.127.53              : ok=7    changed=2    unreachable=0    failed=0    skipped=0    rescued=0    ignored=0
Running Jupyter Notebook
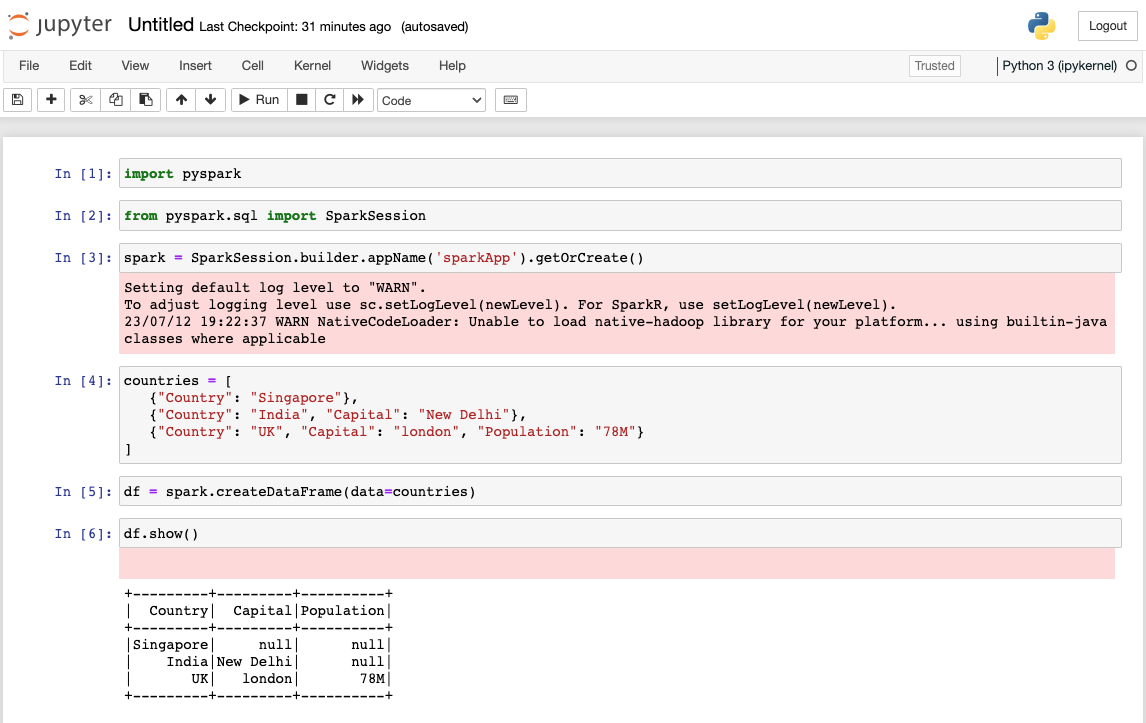
Run the below code line by line in the Jupyter notebook:
import pyspark
from pyspark.sql import SparkSession
spark = SparkSession.builder.appName('sparkApp').getOrCreate()
countries = [
   {"Country": "Singapore"},
   {"Country": "India", "Capital": "New Delhi"},
   {"Country": "UK", "Capital": "london", "Population": "78M"}
]
df = spark.createDataFrame(data=countries)
The Spark log level is set to warning by default and so you may find warnings when executing the code. Shown below is the interface of Jupyter notebook:
You have successfully deployed Spark on an AWS EC2 instance running on Graviton processors.
Clean up resources
Run terraform destroy to delete all resources created.
terraform destroy