Run a Large Language Model (LLM) chatbot with PyTorch using KleidiAI on Arm servers
Introduction
Run a Large Language model (LLM) chatbot on Arm servers
Chatbot with Streamlit Frontend
Next Steps
Run a Large Language Model (LLM) chatbot with PyTorch using KleidiAI on Arm servers
In this section, you will learn how to configure and run the chatbot server as a backend service and create a Streamlit-based frontend. This setup enables communication with the chatbot through a web interface accessible in your browser.
Activate the Virtual Environment to install dependencies
Activate the Python virtual environment you have used in the previous section, in case it is deactivated:
source torch_env/bin/activate
Install Additional Tools
Install the additional packages:
pip3 install openai==1.45.0
Roll back httpx to a version before 0.28 to prevent a “proxies” error with Streamlit
pip3 install httpx==0.27.2
Running LLM Inference Backend Server
Start the LLM Inference Backend Server in a new terminal window:
cd torchchat
LD_PRELOAD=/usr/lib/aarch64-linux-gnu/libtcmalloc.so.4 TORCHINDUCTOR_CPP_WRAPPER=1 TORCHINDUCTOR_FREEZING=1 OMP_NUM_THREADS=16 python3 torchchat.py server llama3.1 --dso-path exportedModels/llama3.1.so
The output while the backend server starts looks like this:
        Using device=cpu
Loading model...
Time to load model: 0.13 seconds
-----------------------------------------------------------
 * Serving Flask app 'server'
 * Debug mode: off
WARNING: This is a development server. Do not use it in a production deployment. Use a production WSGI server instead.
 * Running on http://127.0.0.1:5000
Press CTRL+C to quit
Running Streamlit frontend server
Within you activated venv, start the Streamlit frontend server:
cd torchchat
streamlit run browser/browser.py
The output while the streamlit frontend server starts looks like this:
        Collecting usage statistics. To deactivate, set browser.gatherUsageStats to false.

  You can now view your Streamlit app in your browser.

  Local URL: http://localhost:8501
  Network URL: http://10.0.2.29:8501
  External URL: http://3.86.224.131:8501
Accessing the Streamlit frontend using browser
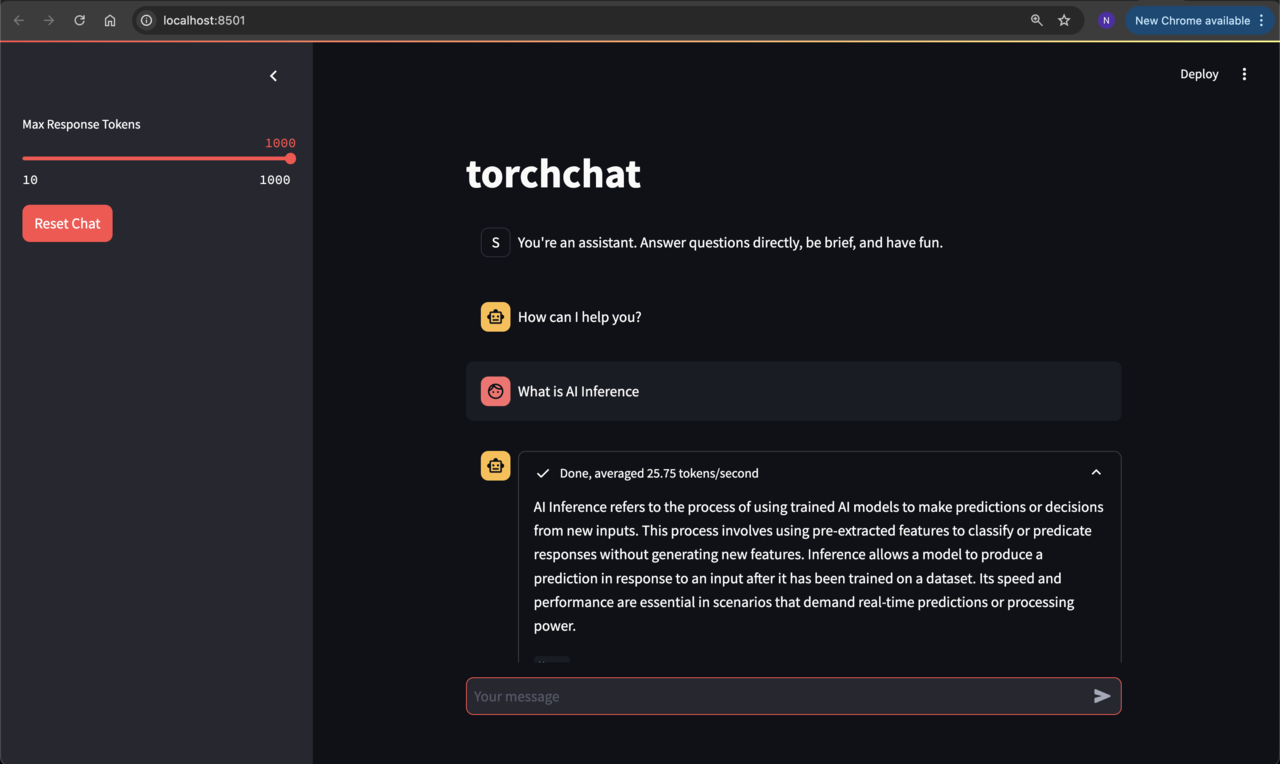
Open the local URL from the link above in a browser and you should see the chatbot running:

If you are running a server in the cloud, the local URL may not connect when starting the frontend server. If this happens, stop the frontend server and reconnect to your instance using port forwarding (see code below). After reconnecting, activate the venv and start the Streamlit frontend server.
# Replace with your .pem file and machine's public IP
ssh -i /path/to/your/key.pem -L 8501:localhost:8501 ubuntu@<your-ec2-public-ip>
source torch_env/bin/activate
cd torchchat
streamlit run browser/browser.py