Optimize application performance with CPU affinity
Introduction
Understand thread pinning and CPU affinity
Create a CPU-intensive program
Pin threads to cores with taskset
Set CPU affinity in source code
Next Steps
Optimize application performance with CPU affinity
Setup
This Learning Path works on any Arm Linux system with four or more CPU cores.
For example, you can use an AWS Graviton 3 m7g.4xlarge instance running Ubuntu 24.04 LTS, based on the Arm Neoverse V1 architecture.
If you’re unfamiliar with creating a cloud instance, see Get started with Arm-based cloud instances .
The m7g.4xlarge instance has a uniform processor architecture, so there’s no difference in memory or CPU core performance across the cores.
On Linux, check this with the following command:
lscpu | grep -i numa
For the m7g.4xlarge, all 16 cores are in the same NUMA node:
        NUMA node(s):                            1
NUMA node0 CPU(s):                       0-15
You’ll first learn how to pin threads using the taskset utility available in Linux.
This utility sets or retrieves the CPU affinity of a running process or sets the affinity of a process about to be launched. This approach doesn’t require any modifications to the source code.
Install prerequisites
Run the following commands to install the required packages:
sudo apt update && sudo apt install g++ cmake python3-venv python-is-python3 -y
Install Google’s microbenchmarking support library:
git clone https://github.com/google/benchmark.git
cd benchmark
cmake -E make_directory "build"
cmake -E chdir "build" cmake -DBENCHMARK_DOWNLOAD_DEPENDENCIES=on -DCMAKE_BUILD_TYPE=Release ../
sudo cmake --build "build" --config Release --target install -j $(nproc)
If you have issues building and installing, visit the Benchmark repository .
Finally, install the Linux perf utility for measuring performance. See the Linux Perf install guide as you may need to build from source.
Create a CPU-intensive example program
To demonstrate CPU affinity, you’ll create a program that heavily utilizes all available CPU cores. This example repeatedly calculates the Leibniz equation to compute the value of Pi. This is a computationally inefficient algorithm to calculate Pi, and the work is split across many threads.
Create a file named use_all_cores.cpp with the code below. This program spawns multiple threads that calculate Pi using the Leibniz formula:
#include <vector>
#include <iostream>
#include <chrono>
#include <thread>
#include <future>

using namespace std;


double multiplethreaded_leibniz(int terms, bool use_all_cores){

    int NUM_THREADS = 2; // use 2 cores by default
    if (use_all_cores){
        NUM_THREADS = std::thread::hardware_concurrency(); // for example, 16 for a 16-core, single-threaded processor
    }
    std::vector<double> partial_results(NUM_THREADS);

    auto calculation = [&](int thread_id){
        // Lambda function that does the calculation of the Leibniz equation
        double denominator = 0.0;
        double term = 0.0;

        for (int i = thread_id; i < terms; i += NUM_THREADS){
            if (i % 32768 == 0){
                this_thread::sleep_for(std::chrono::nanoseconds(20));
            }
            denominator = (2*i) + 1;
            if (i%2==0){
                partial_results[thread_id] += (1/denominator);
            } else{
                partial_results[thread_id] -= (1/denominator);
            }
        }
    };

    std::vector<thread> threads;
    for (int i = 0; i < NUM_THREADS; i++){
        threads.push_back(std::thread(calculation, i));
    }

    for (auto& thread: threads){
        thread.join();
    }

    // Accumulate and return final result
    double final_result = 0.0;
    for (auto& partial_result: partial_results){
        final_result += partial_result;
    }
    final_result = final_result * 4;

    return final_result;
}

int main(){

    double result = 0.0;

    auto start = std::chrono::steady_clock::now();
    for (int i = 0; i < 5; i++){
        result = multiplethreaded_leibniz((1<<29),true);
        std::cout << "iteration\t" << i << std::endl;
    }
    auto end = std::chrono::steady_clock::now();

    auto duration = std::chrono::duration_cast<chrono::milliseconds>(end-start);
    std::this_thread::sleep_for(chrono::seconds(5)); // Wait until Python script has finished before printing Answer
    std::cout << "Answer = " << result << "\t5 iterations took " << duration.count() << " milliseconds" << std::endl;

    return 0;
}
Compile the program with the following command:
g++ -O2 --std=c++11 use_all_cores.cpp -o prog
Observe CPU utilization
Observe how the compiled program utilizes CPU cores. In a separate terminal, use the top utility to view the utilization of each core:
top -d 0.1
Press the number 1 to view per-core utilization.
Then run the program in the other terminal:
./prog
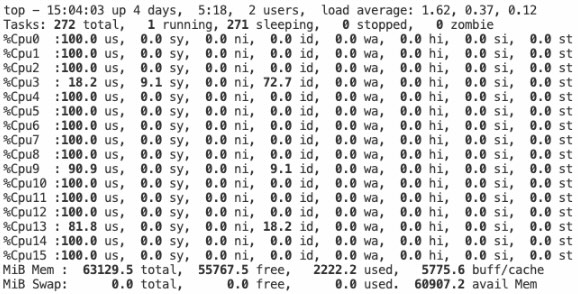 CPU utilization showing all cores being used
All cores on your system are periodically utilized up to 100% and then drop to idle until the program exits.
What you’ve accomplished and what’s next
In this section, you’ve:
- Set up an AWS Graviton 3 instance and installed the required tools
- Created a multi-threaded program that heavily utilizes all available CPU cores
- Observed how the program distributes work across cores using the
toputility
In the next section, you’ll learn how to bind this program to specific CPU cores when running alongside a single-threaded Python script.