Simulate OpenBMC and UEFI pre-silicon on Neoverse RD-V3
Introduction
What are OpenBMC and UEFI?
Set up the development environment for OpenBMC and UEFI
Run OpenBMC and host UEFI simulation on RD-V3 FVP
Monitor and control the host CPU using OpenBMC SOL and web UI
Customize IPMI commands in OpenBMC
Next Steps
Simulate OpenBMC and UEFI pre-silicon on Neoverse RD-V3
Customize IPMI commands in OpenBMC
With the host console accessible through OpenBMC, you can extend platform management by implementing a custom IPMI command handler.
The Intelligent Platform Management Interface ( IPMI ) is a standardized protocol for out-of-band server management, even when the operating system is not running. In OpenBMC, IPMI support is built-in and can be extended with custom handlers through the D-Bus and IPMI infrastructure.
In this section, you implement a custom IPMI command handler that returns a simple string response. You write the handler in C++, package it with a BitBake recipe, build it into the OpenBMC image, and test it with ipmitool in the FVP simulation environment.
Step 1: Create a BitBake recipe
Create a new file named phosphor-ipmi-example.bb in the same folder.
touch ~/openbmc/meta-evb/meta-evb-arm/meta-evb-fvp-base/recipes-phosphor/ipmi/phosphor-ipmi-example.bb
Paste the following content into the file:
SUMMARY = "Custom IPMI commands"
LICENSE = "CLOSED"
PR = "r1"
SRC_URI = "file://fvp-ipmi.cpp"
S = "${UNPACKDIR}"

DEPENDS += "phosphor-ipmi-host sdbusplus systemd"
TARGET_CXXFLAGS += " -std=c++23"
TARGET_LDFLAGS += " -lsystemd -lsdbusplus"

do_compile() {
    ${CXX} ${TARGET_CXXFLAGS} -fPIC -shared     -o libmyipmi.so ${UNPACKDIR}/fvp-ipmi.cpp     -I${STAGING_INCDIR} -L${STAGING_LIBDIR}     ${TARGET_LDFLAGS}
}

do_install() {
    install -d ${D}${libdir}/ipmid-providers
    install -m 0644 libmyipmi.so ${D}${libdir}/ipmid-providers/
}

FILES:${PN} += "${libdir}/ipmid-providers/libmyipmi.so"
Step 2: Create a custom IPMI handler
Create a folder phosphor-ipmi-example at the same path, and add a new file called fvp-ipmi.cpp:
mkdir ~/openbmc/meta-evb/meta-evb-arm/meta-evb-fvp-base/recipes-phosphor/ipmi/phosphor-ipmi-example
touch ~/openbmc/meta-evb/meta-evb-arm/meta-evb-fvp-base/recipes-phosphor/ipmi/phosphor-ipmi-example/fvp-ipmi.cpp
Add the following contents to fvp-ipmi.cpp:
#include <ipmid/api.hpp>
#include <ipmid/utils.hpp>
#include <string>

// Example handler: return a string
ipmi::RspType<std::string> myIpmiCommand() {
    std::string reply = "Hello from OpenBMC IPMI!";
    return ipmi::responseSuccess(reply);
}

void register_my_ipmi() __attribute__((constructor));
void register_my_ipmi() {
    ipmi::registerHandler(
        ipmi::prioOemBase,
        0x30,                   // NetFn code
        0x20,                   // command code
        ipmi::Privilege::Admin,
        myIpmiCommand
    );
}
This function registers a custom IPMI handler with NetFn 0x30 and command 0x20.
When invoked, it returns the ASCII string "Hello from OpenBMC IPMI!".
At runtime, the string is encoded as hexadecimal bytes and returned in the IPMI response. You will observe this with ipmitool raw and by decoding the output.
Step 3: Add to build configuration
To test the IPMI command, add ipmitool and phosphor-ipmi-example to your build configuration. Edit fvp.conf at:
~/openbmc/meta-evb/meta-evb-arm/meta-evb-fvp-base/conf/machine/fvp.conf
Append the following packages:
IMAGE_INSTALL:append = "\
    phosphor-ipmi-example     ipmitool "
Rebuild the OpenBMC image with your IPMI handler included
cd ~/openbmc
source setup fvp
bitbake obmc-phosphor-image
After the build completes, the generated image contains both ipmitool and phosphor-ipmi-example
For details about the final image configuration, inspect the generated FVP configuration file at:
~/openbmc/build/fvp/tmp/deploy/images/fvp/obmc-phosphor-image-fvp.fvpconf
Step 4: Verify the IPMI command in simulation
After launching the FVP simulation and logging into the OpenBMC console, run the following command to invoke your custom IPMI handler
ipmitool raw 0x30 0x20
This command invokes your custom IPMI handler registered under
- NetFn:
0x30(OEM function) - Command:
0x20
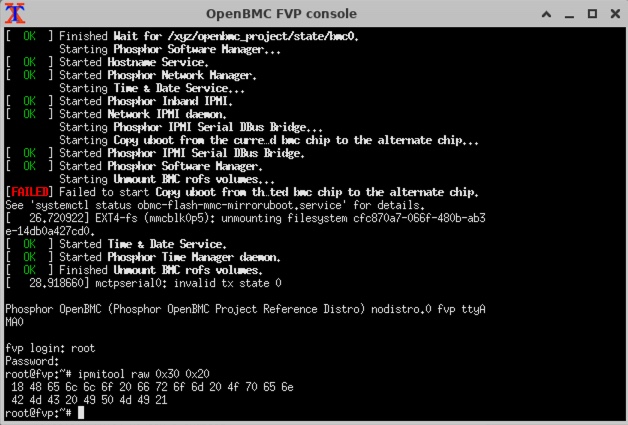
You should see a response similar to
        root@fvp:~# ipmitool raw 0x30 0x20
 18 48 65 6c 6c 6f 20 66 72 6f 6d 20 4f 70 65 6e
 42 4d 43 20 49 50 4d 49 21
This response is a sequence of hexadecimal bytes returned by the BMC
- The first byte indicates the length of the payload — in this case
0x18, 24 bytes - The remaining 24 bytes are the data payload, encoded as ASCII
 OpenBMC IPMI command output
To decode the message, copy the payload portion (excluding the first byte) and run
echo "48 65 6c 6c 6f 20 66 72 6f 6d 20 4f 70 65 6e 42 4d 43 20 49 50 4d 49 21" | tr -d ' ' | xxd -r -p
The output is
Hello from OpenBMC IPMI!
This confirms that the custom string returned by your myIpmiCommand() function has been correctly encoded and transmitted using IPMI:
std::string reply = "Hello from OpenBMC IPMI!";
return ipmi::responseSuccess(reply);
The response from ipmitool raw confirms that your custom IPMI handler was:
- Successfully compiled and included in the OpenBMC image
- Properly registered to respond to NetFn
0x30and command0x20 - Executed correctly in the simulated environment via IPMI raw access
- Returning the intended payload, encoded as ASCII and received in hexadecimal format
By decoding the hexadecimal payload into ASCII, you verified the full path from handler registration to command execution and payload delivery.
You have now implemented and tested a custom IPMI command in OpenBMC using pre-silicon simulation. This sets the foundation for adding OEM commands or platform-specific extensions to your BMC firmware. You can expand this pattern to support argument parsing, custom data formats, or system-level control to prototype features such as sensor telemetry, power domain control, or boot policy configuration.