Deploy GitHub Actions Self-Hosted Runner on Google Axion C4A virtual machine
Introduction
About Google Axion and GitHub Actions
Create the instance
Set up a GitHub Self-Hosted Runner
Deploy NGINX with the GitHub runner
Next Steps
Deploy GitHub Actions Self-Hosted Runner on Google Axion C4A virtual machine
Overview
This section shows you how to deploy a GitHub Actions self-hosted runner on your Arm64 Google Axion C4A instance. You will install Git and GitHub CLI, authenticate with GitHub, and register the runner so CI/CD workflows run on Arm infrastructure.
Set up your development environment
Start by installing the required dependencies using the apt package manager:
sudo apt update
sudo apt install -y git gh vim
Configure your Git identity:
git config --global user.email "you@example.com"
git config --global user.name "Your Name"
Now you are ready to connect the machine to GitHub. The command below is used to authenticate the GitHub CLI with your GitHub account. It allows you to securely log in using a web browser or token, enabling the CLI to interact with repositories, actions, and other GitHub features on your behalf.
Authenticate with GitHub:
gh auth login
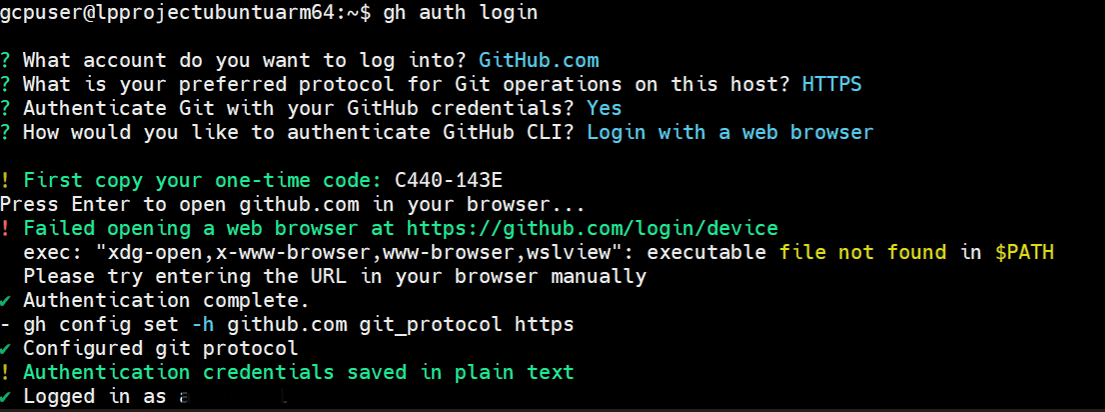
Follow the prompts and accept the defaults:
 Screenshot of GitHub authentication prompt
If you get an error opening the browser on your virtual machine, you can navigate to the following URL on the host machine and enter the device code displayed in the CLI of the virtual machine:
https://github.com/login/device
When authentication succeeds, you will see a confirmation screen in your browser:
 Screenshot of successful GitHub login confirmation
Test GitHub CLI and Git
The command below creates a new public GitHub repository named test-repo using the GitHub CLI. It sets the repository visibility to public, meaning that anyone can view it:
gh repo create test-repo --public
You should see an output similar to:
        ✓ Created repository <your-github-account>/test-repo on GitHub
  https://github.com/<your-github-account>/test-repo
Configure the self-hosted runner
In your repository, go to Settings → Actions → Runners and select Add runner, or view existing self-hosted runners.
If the Actions tab is not visible, enable Actions under Settings → Actions → General by selecting Allow all actions and reusable workflows.
 Screenshot of repository Runners settings page
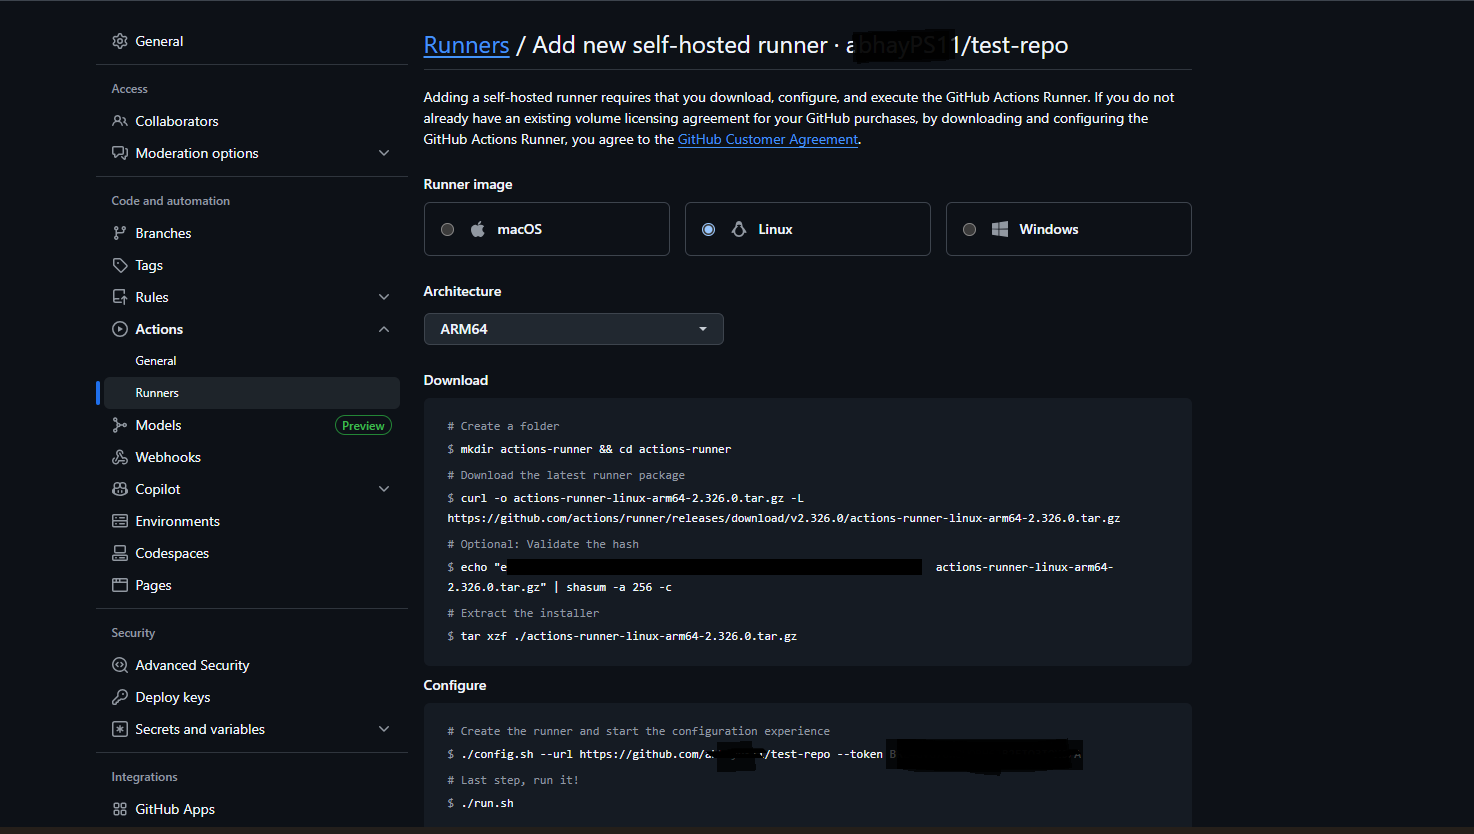
Click New self-hosted runner. In the setup panel, choose Linux as the operating system and ARM64 as the architecture. Copy the generated setup commands and run them on your C4A VM.
 Screenshot of the Add new self-hosted runner panel
The final command links the runner to your GitHub repository using a one-time registration token. During setup, you will be prompted for the runner group, runner name, and work folder. Press Enter at each prompt to accept the defaults. The output should look similar to:
        --------------------------------------------------------------------------------
|        ____ _ _   _   _       _          _        _   _                      |
|       / ___(_) |_| | | |_   _| |__      / \   ___| |_(_) ___  _ __  ___      |
|      | |  _| | __| |_| | | | | '_ \    / _ \ / __| __| |/ _ \| '_ \/ __|     |
|      | |_| | | |_|  _  | |_| | |_) |  / ___ \ (__| |_| | (_) | | | \__ \     |
|       \____|_|\__|_| |_|\__,_|_.__/  /_/   \_\___|\__|_|\___/|_| |_|___/     |
|                                                                              |
|                       Self-hosted runner registration                        |
|                                                                              |
--------------------------------------------------------------------------------

# Authentication

√ Connected to GitHub
# Runner Registration
Enter the name of the runner group to add this runner to: [press Enter for Default]
Enter the name of runner: [press Enter for lpprojectubuntuarm64]
This runner will have the following labels: 'self-hosted', 'Linux', 'ARM64'
Enter any additional labels (ex. label-1,label-2): [press Enter to skip]
√ Runner successfully added
√ Runner connection is good
Finally, start the runner by executing:
./run.sh
You should see an output similar to:
        √ Connected to GitHub

Current runner version: '2.326.0'
2025-07-15 05:51:13Z: Listening for Jobs
The runner will now be visible in the GitHub actions:
 Screenshot of runner visible in GitHub
For now, you can terminate the ./run.sh command with Ctrl+C. Move on to the next section to set up a simple web server using the runner.