After your model has been trained and validated using GitHub Actions workflows, the next step is to deploy the model into a production environment.
In this section, you will containerize your trained model and push the container image to DockerHub.
Containerize the model
You can use the Dockerfile included in the repository to create a container for the trained model and the deployment scripts.
Review the Dockerfile to understand how it works:
# Use the official PyTorch image as the base image
FROM armswdev/pytorch-arm-neoverse:r24.07-torch-2.3.0-onednn-acl

# Set the working directory
WORKDIR /app

# Copy the necessary files
COPY models/ /app/models/
COPY scripts/ /app/scripts/

# Install any additional dependencies
RUN pip install --no-cache-dir torch torchvision fastapi uvicorn python-multipart

# Expose the port the app will run on
EXPOSE 8000

# Specify the command to run the model server
CMD ["uvicorn", "scripts.serve_model:app", "--host", "0.0.0.0", "--port", "8000"]
The Dockerfile uses the PyTorch image with the ACL backend as the base image for the container.
The working directory is set to /app where the trained model and the scripts to deploy the model are copied.
The container runs an application (scripts/serve_model.py) on port 8000. This script is called by uvicorn when the container is run. Uvicorn is a fast, lightweight ASGI (Asynchronous Server Gateway Interface) server, and is good for serving Python web applications. More information about application is provided in the next section.
Serve the model using FastAPI
FastAPI is an easy way to serve your trained model as an API.
The Python application using FastAPI and PyTorch loads the pre-trained model, accepts image uploads, and makes predictions about the image.
The code is in the file scripts/serve_model.py and is shown below:
import torch
import torchvision.transforms as transforms
from fastapi import FastAPI, UploadFile, File, HTTPException
from fastapi.responses import JSONResponse
from PIL import Image
import io

# Define the model class (should match the model architecture used during training)
class TrafficSignNet(torch.nn.Module):
    def __init__(self):
        super(TrafficSignNet, self).__init__()
        self.conv1 = torch.nn.Conv2d(3, 32, kernel_size=3)
        self.conv2 = torch.nn.Conv2d(32, 64, kernel_size=3)
        self.fc1 = torch.nn.Linear(64 * 6 * 6, 128)
        self.fc2 = torch.nn.Linear(128, 43) # 43 classes in GTSRB dataset

    def forward(self, x):
        x = torch.relu(self.conv1(x))
        x = torch.max_pool2d(x, 2)
        x = torch.relu(self.conv2(x))
        x = torch.max_pool2d(x, 2)
        x = torch.flatten(x, 1)
        x = torch.relu(self.fc1(x))
        x = self.fc2(x)
        return x

# Load the trained model
model = TrafficSignNet()
model.load_state_dict(torch.load("/app/models/traffic_sign_net.pth",
map_location=torch.device('cpu')))
model.eval()

# Define image transformations (should match the preprocessing used during training)
transform = transforms.Compose([
    transforms.Resize((32, 32)),
    transforms.ToTensor(),
    transforms.Normalize((0.5,), (0.5,))
])

# Initialize FastAPI
app = FastAPI()

# Define the prediction endpoint
@app.post("/predict/")
async def predict(file: UploadFile = File(...)):
    try:
        # Read the image
        image_bytes = await file.read()
        image = Image.open(io.BytesIO(image_bytes)).convert("RGB")

        # Preprocess the image
        image = transform(image).unsqueeze(0) # Add batch dimension

        # Run the model on the image
        with torch.no_grad():
            output = model(image)
            _, predicted = torch.max(output, 1)

        # Return the prediction
        return {"predicted_class": predicted.item()}

       # Return the prediction as a JSON response
        return JSONResponse(content={"prediction": prediction.tolist()})

    except Exception as e:
        raise HTTPException(status_code=500, detail=str(e))
Build the container image with GitHub Actions
You are now ready automate the build of your containerized model using GitHub Actions.
Review the workflow file at .github/workflows/deploy-model.yml:
name: Deploy to DockerHub

on:
  workflow_dispatch:
  workflow_run:
    workflows: [Test Model]
    types:
      - completed

jobs:
  deploy-to-dockerhub:
    runs-on: ubuntu-22.04-arm-os
    name: Build and Push Docker Image to DockerHub
    steps:
      - name: Checkout code
        uses: actions/checkout@v3

      - name: Set up Docker Buildx
        uses: docker/setup-buildx-action@v3

      - name: Log in to DockerHub
        uses: docker/login-action@v3
        with:
          username: ${{ secrets.DOCKER_USERNAME }}
          password: ${{ secrets.DOCKER_PASSWORD }}

      - name: Build and Push Docker Image
        run: |
          docker buildx build --platform linux/arm64 -t ${{ secrets.DOCKER_USERNAME }}/gtsrb-image:latest --push .
This workflow builds the container for the Arm architecture and pushes the container image to DockerHub.
Configure your DockerHub credentials
Before you run this workflow, you need your Docker Hub username and a Personal Access Token (PAT). This enables GitHub Actions to store the container image in your DockerHub account.
If you don’t have a personal access token log in to
DockerHub
, click on your profile on the top right, select Account settings and then select Personal access tokens. Use the Generate new token button to create the token.
The credentials are passed to the workflow as secrets.
To save your secrets, click on the Settings tab in the GitHub repository. Expand the Secrets and variables on the left side and click Actions.
Add two secrets using the New repository secret button:
- DOCKER_USERNAME: Your DockerHub username
- DOCKER_PASSWORD: Your DockerHub Personal Access Token
Run the workflow
Navigate to the Actions tab in your repository, and select Deploy to DockerHub on the left side.
Use the Run workflow drop-down on the right-hand side to click Run workflow to start the workflow on the main branch.
The workflow starts running.
Verify the deployment
When the Deploy to DockerHub workflow completes, the container image is available in DockerHub and you can run it on any Arm machine.
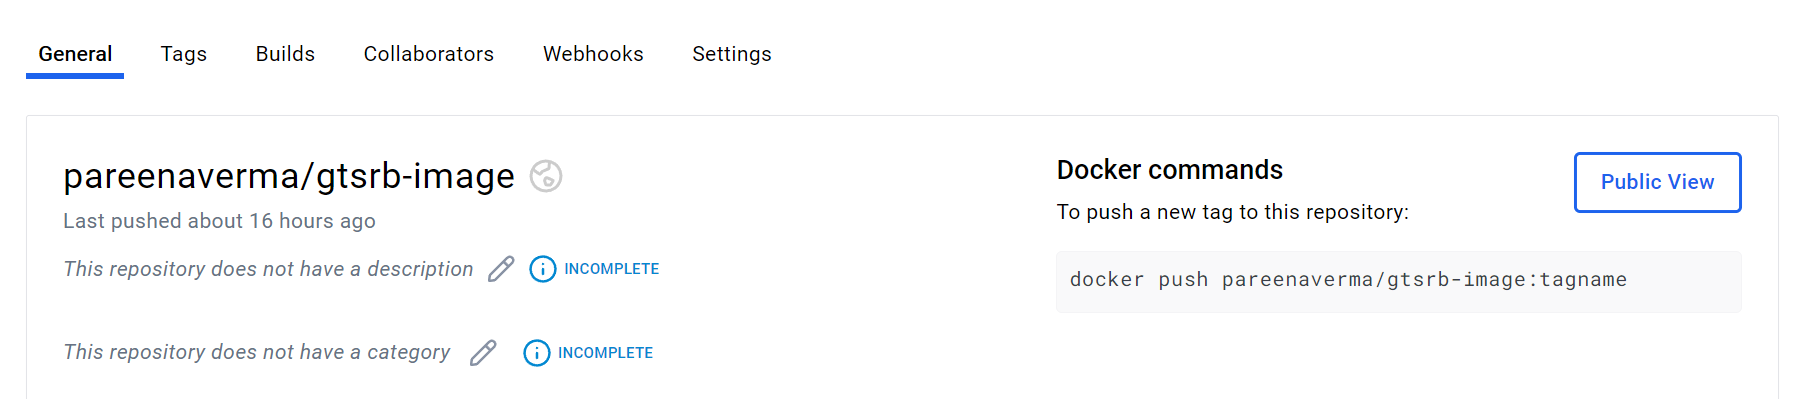
Confirm the image in DockerHub
Log in to DockerHub and see the newly created container image.
A screenshot showing the new image in DockerHub is below:
Run the application
To run the application on an Arm machine, you can pull the Docker image and run create a container.
Make sure to substitute your DockerHub username in the commands below:
docker pull <docker-username>/gtsrb-image
docker run -d -p 8000:8000 <docker-username>/gtsrb-image
Test the API with a traffic sign image
Test the application using an image from the repository. Download the test image named test-img.png from GitHub by clicking it and using the download button on the right side.
Run the curl command below to make a POST request to the predict endpoint using the image:
curl -X 'POST' 'http://localhost:8000/predict/' -H 'accept: application/json' -H 'Content-Type: multipart/form-data' -F 'file=@test-img.png;type=image/png'
The output is:
{"predicted_class":6}
You have now validated that you were able to successfully deploy your application, serve your model as an API, and make predictions on a test image.
In the last section, you will learn about the complete end-to-end MLOps workflow by combining the individual workflows.