Deploy a container on AWS Graviton processors with Amazon ECS Managed Instances
Introduction
Set up IAM roles and an Arm-compatible task definition
Create a capacity provider for Graviton-based instances
Run a container as an Amazon ECS task on AWS Graviton
Clean up AWS resources
Next Steps
Deploy a container on AWS Graviton processors with Amazon ECS Managed Instances
Run a standalone Amazon ECS task
You can deploy your application on Amazon ECS either as a standalone task or as a service.
A standalone task is an instance of your application. It runs once and isn’t automatically replaced when it stops, which suits batch jobs and short tests.
A service is a collection of tasks. By using a service, you can maintain a desired number of tasks and replace failed tasks. A service can integrate with a load balancer, which suits long-running applications.
For testing whether your application lands on Graviton-based compute, run a standalone task. Use the cluster, capacity provider, and task definition that you created earlier.
Run a task using the console
To deploy a standalone task using the console:
- Navigate to the console for Amazon ECS .
- Select Clusters.
- Select the cluster ecs-managed-instances-cluster that you created earlier.
- Under Tasks, select Run new task.
- Under Task details, for Task definition family, select the nginx task definition that you created earlier.
- Leave all other values as defaults and select Create.
Run a task using the AWS CLI
Run the nginx task definition using the Graviton capacity provider that you created earlier. Save the task Amazon Resource Name (ARN) so that you can use it in later commands:
TASK_ARN=$(aws ecs run-task \
  --cluster ecs-managed-instances-cluster \
  --task-definition nginx \
  --capacity-provider-strategy \
    capacityProvider=graviton-managed-instances-cp,weight=1 \
  --query 'tasks[0].taskArn' \
  --output text)
echo "$TASK_ARN"
The task initially enters the PROVISIONING state while Amazon ECS selects and launches matching compute. Wait until the task reaches the RUNNING state:
aws ecs wait tasks-running \
  --cluster ecs-managed-instances-cluster \
  --tasks "$TASK_ARN"
Verify application deployment
Confirm that the Amazon CPU-manufacturer and ARM64 settings that you configured earlier resulted in Amazon ECS selecting a Graviton-based instance.
Verify deployment using the AWS Management Console
To verify that the application deployed successfully:
Select the cluster ecs-managed-instances-cluster.
Select Infrastructure.
Under Container instances, note the Instance type that AWS chose based on the capacity provider. The
gin an instance family name, such asm6gorc6g, indicates an AWS Graviton (Arm-based) processor. Confirm that the name of the instance family that you see contains ag. The following screenshot shows that the instance type selected by AWS ism6g.medium: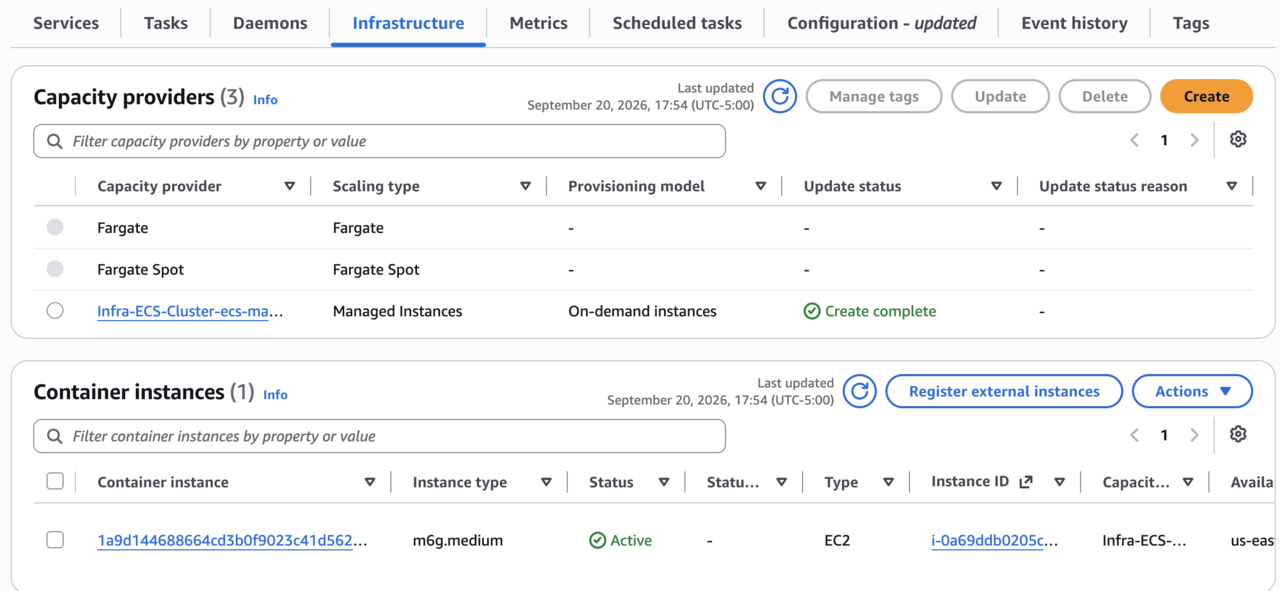 Active m6g.medium container instance selected by the capacity provider
Select the container instance that’s associated with the ECS Managed Instances capacity provider.
Under Networking, you’ll find the public DNS name and IP address for the instance. Copy the Public IP and paste it into a web browser of your choice.
You’ll see the following welcome message:
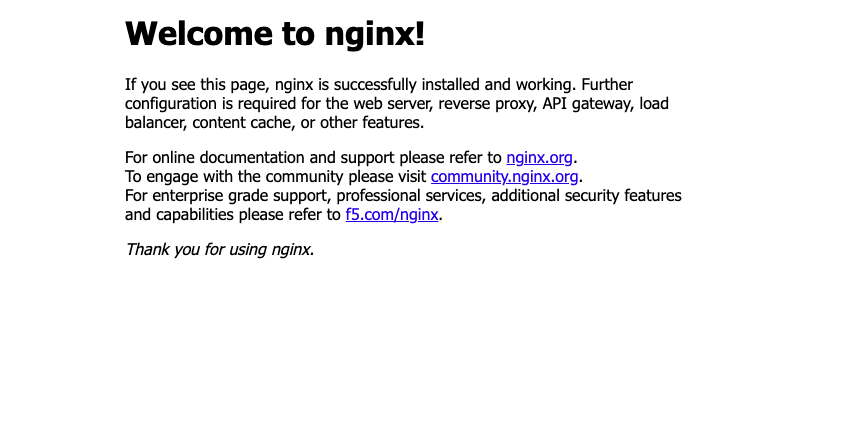 NGINX welcome page indicating successful deployment
Verify deployment using the AWS CLI
Get the ARN of the container instance where Amazon ECS placed the task:
CONTAINER_INSTANCE_ARN=$(aws ecs describe-tasks \
  --cluster ecs-managed-instances-cluster \
  --tasks "$TASK_ARN" \
  --query 'tasks[0].containerInstanceArn' \
  --output text)
echo "$CONTAINER_INSTANCE_ARN"
Use the container instance ARN to get the ID of the underlying Amazon EC2 instance:
EC2_INSTANCE_ID=$(aws ecs describe-container-instances \
  --cluster ecs-managed-instances-cluster \
  --container-instances "$CONTAINER_INSTANCE_ARN" \
  --query 'containerInstances[0].ec2InstanceId' \
  --output text)
echo "$EC2_INSTANCE_ID"
Display the instance type and public IP address:
aws ec2 describe-instances \
  --instance-ids "$EC2_INSTANCE_ID" \
  --query 'Reservations[0].Instances[0].{InstanceType:InstanceType,PublicIpAddress:PublicIpAddress}'
The output is similar to:
        {
    "InstanceType": "m6g.medium",
    "PublicIpAddress": "203.0.113.10"
}
The instance type that Amazon ECS selects can differ. Confirm that the name of the instance family contains g, as in m6g or c6g, which indicates an AWS Graviton processor.
Get the public IP address and request the NGINX welcome page:
PUBLIC_IP=$(aws ec2 describe-instances \
  --instance-ids "$EC2_INSTANCE_ID" \
  --query 'Reservations[0].Instances[0].PublicIpAddress' \
  --output text)
curl -s "http://$PUBLIC_IP" | grep '<title>'
The expected output is:
<title>Welcome to nginx!</title>
Because the task definition uses host network mode, the task doesn’t receive a separate public IP address. The request uses the public IP address of the backing Managed Instance. If the command returns None for the public IP, confirm that the selected subnet automatically assigns public IPv4 addresses.
What you’ve accomplished and what’s next
You’ve successfully deployed a containerized application on Graviton-based instances using Amazon ECS Managed Instances.
Next, you’ll remove the task and the AWS resources that you created.