Deploy a Cobalt 100 Virtual Machine on Azure
Use the Azure Portal to deploy a Cobalt 100 VM
Cobalt 100 is Microsoft’s first Arm-based server processor, built on the Armv9 Neoverse-N2 CPU architecture. It is optimized for the performance and efficiency of scale-out, cloud-based applications.
Azure offers Cobalt 100–powered virtual machines in two series:
- Dpsv6 and Dplsv6 (general-purpose)
- Epsv6 (memory-optimized)
To create a Cobalt 100 VM, follow these steps:
Sign in to the Azure Portal .
Select Create a resource → Compute → Virtual machine.
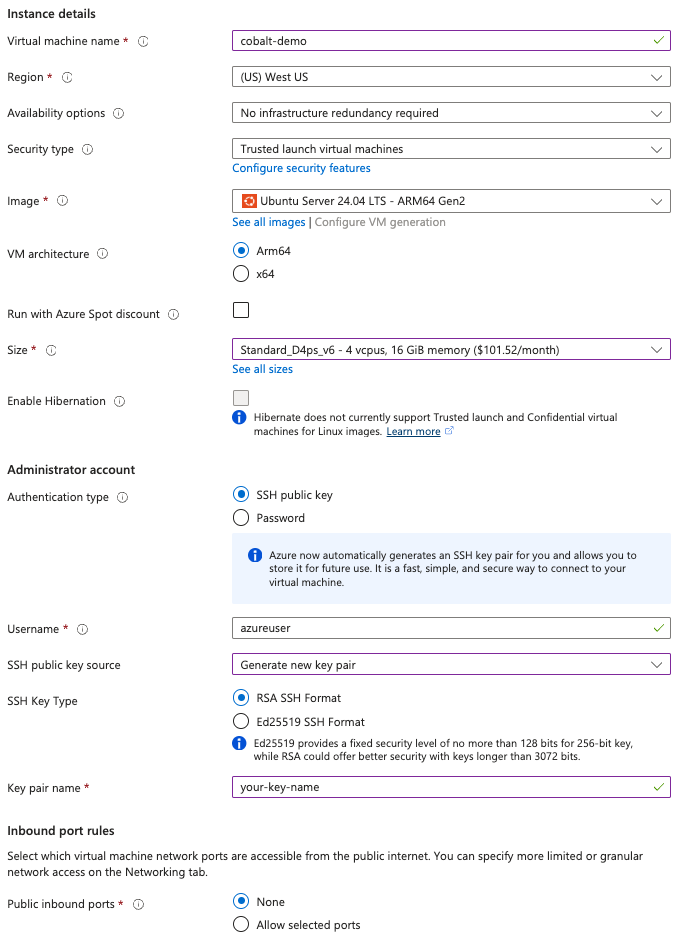
Complete the fields in the Basics tab using the values shown in the figure below:
 Configuring the Basics tab
Cobalt 100 powers the Dpsv6 and Dplsv6 series. Selecting Standard_D4ps_v6 creates a Cobalt VM with four physical cores. You can choose a different size if you need more or fewer cores.
Upload your public SSH key or generate a new one in the wizard.
For the Public inbound ports field, select None.
On the Disks tab, accept the default options.
On the Networking tab, ensure that a Public IP is selected. You will need it to connect to the VM later. Leave the NSG settings as Basic.
Select Review + create, then Create. Azure deploys the VM and the automatically-generated Network Security Group (NSG). Provisioning takes ~2 minutes.
Navigate to the Deployment in progress pane or open the Notifications panel to track progress. When the deployment completes, proceed to the next step to expose an inbound port.