Run an optimized text-to-speech model from the Arm AI Portal on an Arm Neoverse-based instance
Introduction
Set up Qwen3-TTS on Arm Neoverse
Generate speech with Qwen3-TTS
Understand the web application and server runner
Next Steps
Run an optimized text-to-speech model from the Arm AI Portal on an Arm Neoverse-based instance
Start the web application
The browser workflow is the recommended way to run Qwen3-TTS. You can use the web application to do the following without manually copying audio files between your computer and the instance:
- Record or upload a reference voice
- Generate speech on the instance
- Play or download the result
Start the application by running the following command:
python tts_web.py \
  --model-dir . \
  --threads 4
The application checks the runner, cascade driver, and text-path files. It also checks the FFmpeg installation and thread count, then listens on 127.0.0.1:8000. Leave the application running while you use the browser interface.
Connect from your local browser
Open another terminal on your local computer and create an SSH tunnel to the application. Replace the placeholders with the values that you use to connect to your instance. If your connection requires an identity file, add -i path-to-key before -L:
ssh -L 8000:127.0.0.1:8000 <ssh-user>@<ip-address>
The tunnel forwards port 8000 on your computer to the web application without exposing the service on a public network interface.
Open http://127.0.0.1:8000 in your local browser.
Record or upload a reference voice
Use a clean recording of the voice of a speaker whose permission you have. A recording of approximately 5-15 seconds with little background noise provides a useful starting point.
Choose one of the following options in the Reference voice section:
- Select Record, allow microphone access if the browser asks for permission, speak clearly, and select Stop.
- Select Upload audio and choose an existing recording from your computer.
The selected recording appears with an audio player. Listen to the recording before generating speech, or select Discard to replace it.
Generate and download speech
Enter the sentence that you want to synthesize, then select Generate speech. The ONNX cascade runs on the instance, so generation can take several minutes.
When generation finishes, use the Generated speech player to listen to the result. Select Download WAV to save generated_voice.wav directly to your computer.
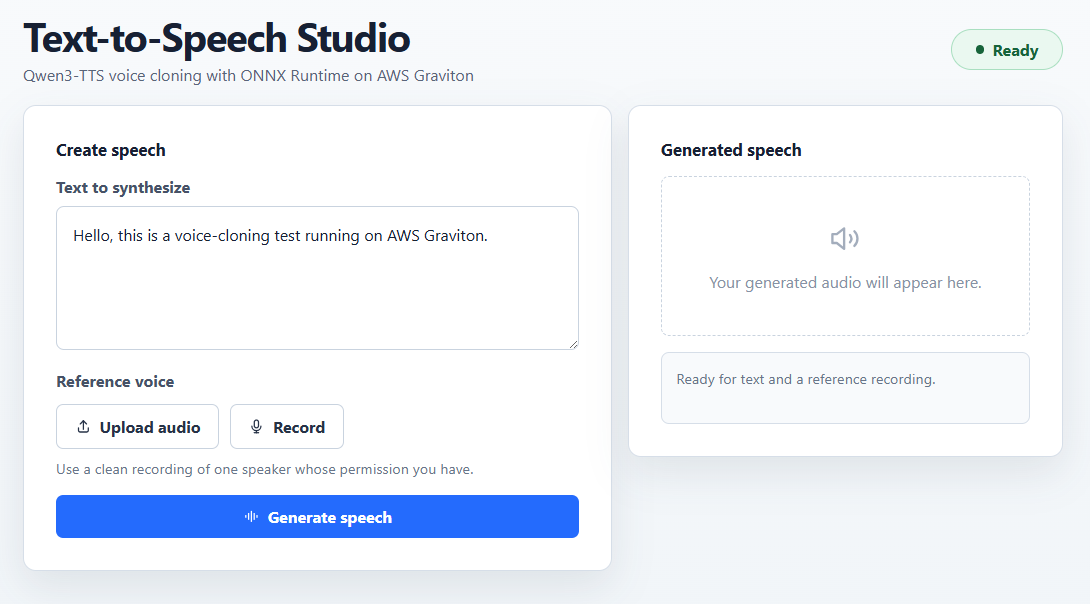 Qwen3-TTS ONNX web interface running on an AWS Graviton-based instance
The web application wraps the same onnx_tts_runner.py script used by the terminal workflow. FastAPI handles the text and audio upload. FFmpeg converts the reference recording to a 24 kHz mono WAV file, and the generated WAV file is returned to the browser. The service remains bound to the instance loopback interface and is accessible only through the SSH tunnel.
Stop the application with Ctrl+C. Keep the Python environment active if you want to try the terminal workflow.
(Optional) Run the model from the terminal
The browser is the recommended workflow because it handles recording, upload, playback, and download. If you use the terminal workflow, you’re responsible for copying reference and generated audio files to and from the Arm Neoverse-based machine.
Run the model with the provided reference recording:
python onnx_tts_runner.py \
  --text "Hello, this is a voice-cloning test running on AWS Graviton." \
  --ref-audio sample_input.wav \
  --out generated_voice.wav \
  --intra-op-threads 4
Run the model with your own reference recording by replacing reference_voice.wav with its filename:
python onnx_tts_runner.py \
  --text "This sentence should sound like my reference recording." \
  --ref-audio reference_voice.wav \
  --out my_generated_voice.wav \
  --intra-op-threads 4
What you’ve accomplished and what’s next
You’ve used a browser to record or upload a reference voice, generate speech on an Arm Neoverse machine, and play and download the resulting WAV file. You’ve also learned how to run the same model directly from the terminal if you prefer a command-line workflow.
Next, you’ll learn how the web application and the runner work.