Run optimized LLMs from the Arm AI Portal on Arm Neoverse-based instances
Introduction
Prepare the Arm Neoverse Linux environment
Download and run a model from the Arm AI Portal
Understand how the runner scripts work
(Optional) Explore other cloud LLM deployment options
Next Steps
Run optimized LLMs from the Arm AI Portal on Arm Neoverse-based instances
Set the model ID
Choose the text-to-text model you want to use from the Arm AI Portal. The Hugging Face repository ID for each model contains the organization and repository name, for example Arm/<model-repository-name>. The included runner scripts have been confirmed with the models in the following table. Copy the repository ID from the table:
If you generated an adapter for another runtime during setup, keep the MODEL_ID value already set and use the model type and prompt guidance from that package. The following table applies to the supplied ONNX Runtime GenAI adapter.
Table of confirmed supported models
| Model | Type | Hugging Face repository ID |
|---|---|---|
| Llama 3.2 1B Instruct INT4 | Instruction-tuned | Arm/llama-3-2-1b-instruct-onnx-genai-int4-kquantlast-emb-int8-graviton-g4 |
| Qwen3 0.6B INT4 | Instruction-tuned | Arm/qwen3-0-6b-onnx-genai-int4-kquantlast-emb-int4 |
| TinyLlama 1.1B Chat INT4 | Instruction-tuned | Arm/tinyllama-1-1b-chat-onnx-genai-int4-kquantlast-emb-int8-graviton-g4 |
| Qwen2.5 1.5B Instruct INT4 | Instruction-tuned | Arm/qwen2-5-1-5b-instruct-onnx-genai-int4-kquantlast-emb-int4 |
| Gemma 3 1B Instruct INT4 | Instruction-tuned | Arm/gemma-3-1b-instruct-onnx-genai-int4-emb-int8 |
| Llama 3.2 3B Instruct INT4 | Instruction-tuned | Arm/llama-3-2-3b-instruct-onnx-genai-int4-kquantlast-emb-int8 |
| Llama 3.1 8B Instruct INT4 | Instruction-tuned | Arm/llama-3-1-8b-instruct-onnx-genai-int4-kquantlast-emb-int8 |
| Llama 3.2 1B Base INT4 | Base | Arm/llama-3-2-1b-base-onnx-genai-int4-kquantlast-emb-int8-graviton-g4 |
| Gemma 3 1B Base INT4 | Base | Arm/gemma-3-1b-base-onnx-genai-int4-emb-int8 |
| Llama 3.1 8B Base INT4 | Base | Arm/llama-3-1-8b-base-onnx-genai-int4-kquantlast-emb-int8 |
Set MODEL_ID to your chosen repository ID, replacing the placeholder before running the command:
export MODEL_ID="Arm/<model-repository-name>"
The remaining commands use MODEL_ID, so you need to substitute the repository ID only once. Keep the same terminal session. If you open a new session, you’ll need to export the variable again.
For information on how each script works, see Understand the runner scripts .
Download the model
Activate the Python environment and download the selected model:
source .venv/bin/activate
python download_model.py --repo-id "$MODEL_ID"
If you used the optional adapter workflow and already downloaded the package, this command reuses the local snapshot.
The script stores the complete model package under models/ and replaces the organization and repository separator / with __, so each Hugging Face repository ID maps to one predictable directory name. model_adapter.py validates the ONNX Runtime GenAI files before loading the model.
Validate the model package against the supplied adapter:
python validate_adapter.py --model-id "$MODEL_ID"
The supported models use the same ONNX Runtime GenAI execution path, but they expect different prompt formats. Instruction-tuned models use the chat or instruction template packaged for the model. Base models usually receive plain text to continue without a chat template.
For an instruction-tuned model, the output is similar to:
        Adapter validation passed
Runtime: ONNX Runtime GenAI
Interaction mode: chat
Model directory contains the files required by the adapter
A base model reports completion as its interaction mode.
A different generated adapter would report its selected runtime and either chat or completion, according to the model package it supports.
Run text generation
Choose the tab that matches the model type shown in the Arm AI Portal or model card. Depending on the provided model, the supplied ONNX adapter automatically selects raw completion text, the chat template packaged with the model, or the built-in Qwen2.5 ChatML fallback. A generated adapter will use the prompt handling implemented for its selected package.
python run_model.py \
  --model-id "$MODEL_ID" \
  --prompt 'Write a concise technical briefing for a cloud architect explaining why Arm64 CPUs are well suited to AI inference. Cover performance per watt, deployment scale, and software portability.'
python run_model.py \
  --model-id "$MODEL_ID" \
  --max-new-tokens 64 \
  --prompt 'Title: Why Arm64 is reshaping cloud infrastructure

Arm64 is becoming a preferred architecture for modern cloud workloads because'
Instruction-tuned models apply the chat template included with the model bundle. Base models receive the article title and opening sentence as raw text to continue.
The model output varies, but the final lines contain generation statistics similar to:
        Generated tokens: 128
Time to first token: 0.74 seconds
Decode throughput: 42.18 tokens/second
These values are illustrative. They depend on the model, processor, thread count, prompt length, and system load.
For details about base-model prompts, chat templates, the Qwen2.5 fallback, and Qwen3 thinking mode, see Understand the runner scripts .
(Optional) Use the web interface
You can optionally serve the models through a browser interface.
If your Arm Neoverse-based machine is remote, open another terminal and create an SSH tunnel from your local computer. Make sure to add any path to your key, if required, using -i path-to-key:
ssh -L 8000:127.0.0.1:8000 user@remotehost
On your original terminal, with the virtual environment activated, install the web dependencies on the machine in the arm-llm-cloud directory:
python -m pip install "fastapi>=0.116,<1" "uvicorn>=0.35,<1"
Choose the tab that matches your model type. Start the server, leave it running, and open the local web interface (http://127.0.0.1:8000/) in your local browser.
Start the model as an instruction-following chatbot:
python genai_web.py --model-id "$MODEL_ID"
Enter a request and select Send. The interface looks similar to:
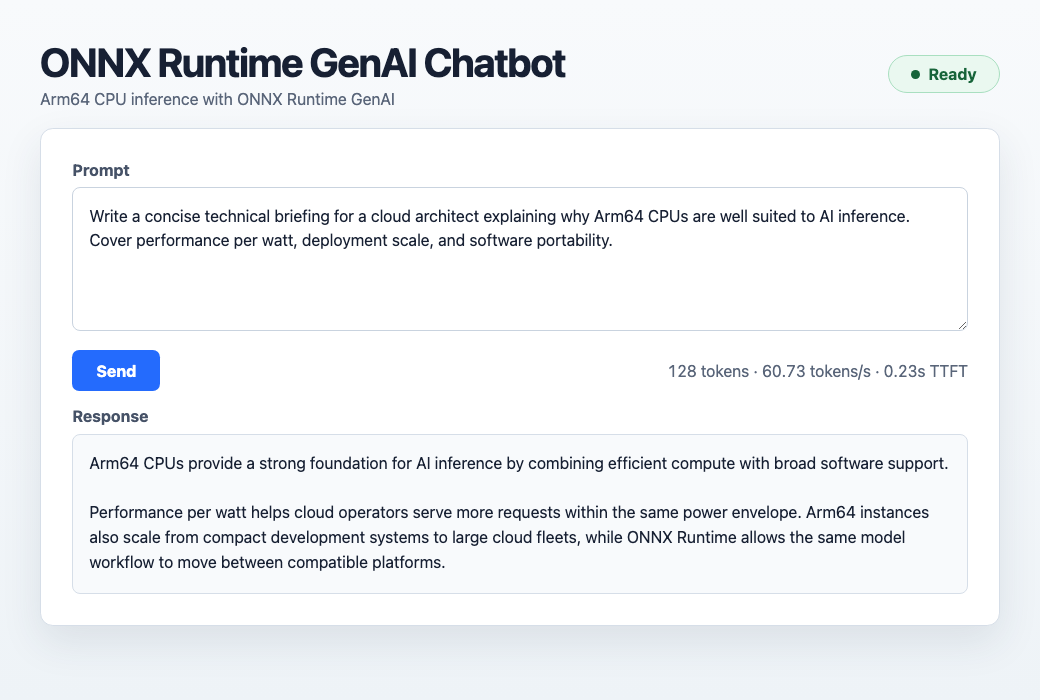 ONNX Runtime GenAI chatbot running on an Arm64 CPU
Start the model as a text-completion application:
python genai_web.py \
  --model-id "$MODEL_ID" \
  --max-new-tokens 64
Edit the unfinished text and select Continue. The interface looks similar to:
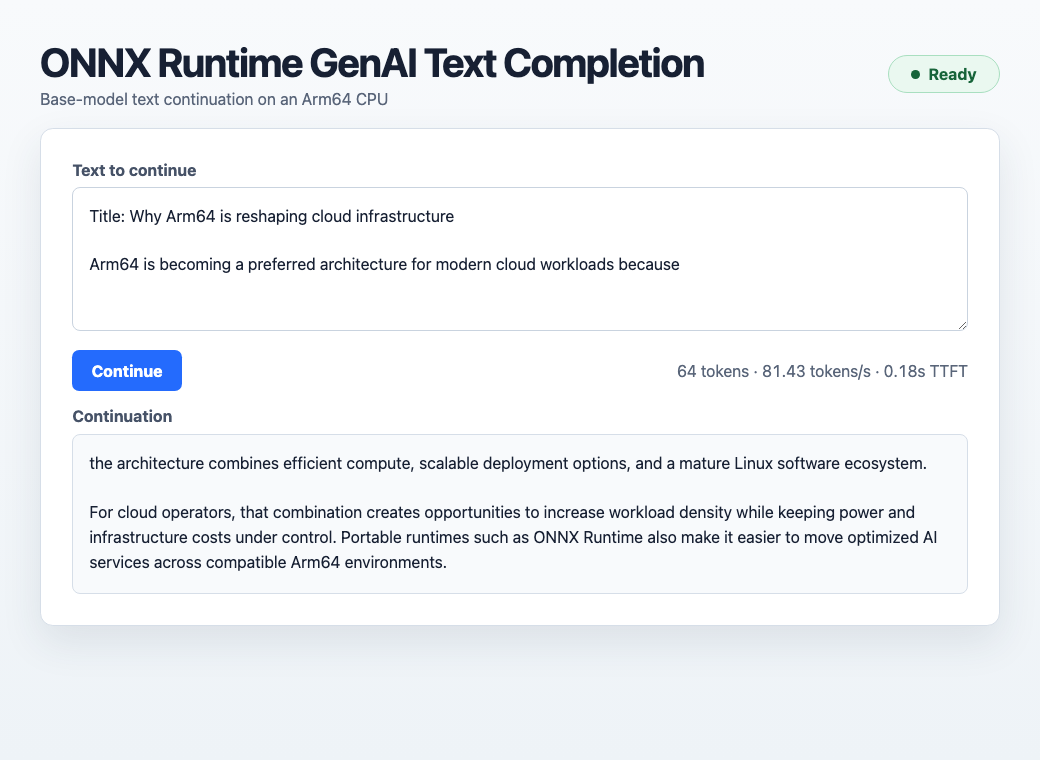 ONNX Runtime GenAI base-model text completion on an Arm64 CPU
The example server processes one generation request at a time. It’s intended for local evaluation and isn’t a production deployment.
What you’ve accomplished and what’s next
You’ve downloaded an ONNX Runtime GenAI model and generated text through the shared terminal application. If you completed the optional section, you also used the same adapter through a browser interface.
Next, you’ll inspect the boundary between the shared applications and the supplied ONNX adapter.