# Deploy the model to Android
## In this learning path
- [Introduction](https://learn.arm.com/learning-paths/mobile-graphics-and-gaming/onnx/)
- [Understand ONNX fundamentals and architecture](https://learn.arm.com/learning-paths/mobile-graphics-and-gaming/onnx/01_fundamentals/)
- [Set up your development environment](https://learn.arm.com/learning-paths/mobile-graphics-and-gaming/onnx/02_setup/)
- [Generate a synthetic Sudoku digit dataset](https://learn.arm.com/learning-paths/mobile-graphics-and-gaming/onnx/03_preparingdata/)
- [Train the digit recognizer](https://learn.arm.com/learning-paths/mobile-graphics-and-gaming/onnx/04_training/)
- [Run inference and evaluate the model](https://learn.arm.com/learning-paths/mobile-graphics-and-gaming/onnx/05_inference/)
- [Build the Sudoku processor pipeline](https://learn.arm.com/learning-paths/mobile-graphics-and-gaming/onnx/06_sudokuprocessor/)
- [Optimize the model for Arm64 deployment](https://learn.arm.com/learning-paths/mobile-graphics-and-gaming/onnx/07_optimisation/)
- [Deploy the model to Android](https://learn.arm.com/learning-paths/mobile-graphics-and-gaming/onnx/08_android/)
- [Next Steps](https://learn.arm.com/learning-paths/mobile-graphics-and-gaming/onnx/_next-steps/)
## Objective
You’ll now transition from desktop deployment to a fully on-device Android application. The goal is to demonstrate how the optimized Sudoku pipeline—image preprocessing, ONNX inference, and deterministic solving—can be packaged and executed entirely on a mobile device, without relying on cloud services.
Rather than starting with a live camera feed, you begin with a fixed input bitmap generated earlier in the Learning Path. This approach allows you to focus on correctness, performance, and integration details before introducing additional complexity such as camera permissions, real-time capture, and varying lighting conditions.
In this section, you will:
- Create a new Android project and configure dependencies for ONNX Runtime and OpenCV
- Bundle the trained ONNX model and sample Sudoku images as application assets
- Build a minimal user interface that loads images and triggers the solver
- Implement the Sudoku processing pipeline on Android, including grid detection, digit recognition, and solving
- Display the solved result overlaid on the original image, confirming end-to-end on-device execution
By the end of this section, you will have a working Android app that takes a Sudoku image, runs neural network inference and solving on-device, and displays the solution.
## Project creation
Start by creating a new Android project using Android Studio. This project will host the Sudoku solver application and serve as the foundation for integrating ONNX Runtime and OpenCV.
1. Create a new project:
- Open Android Studio and click New Project.
- In the Templates screen, select Phone and Tablet, then choose Empty Views Activity.
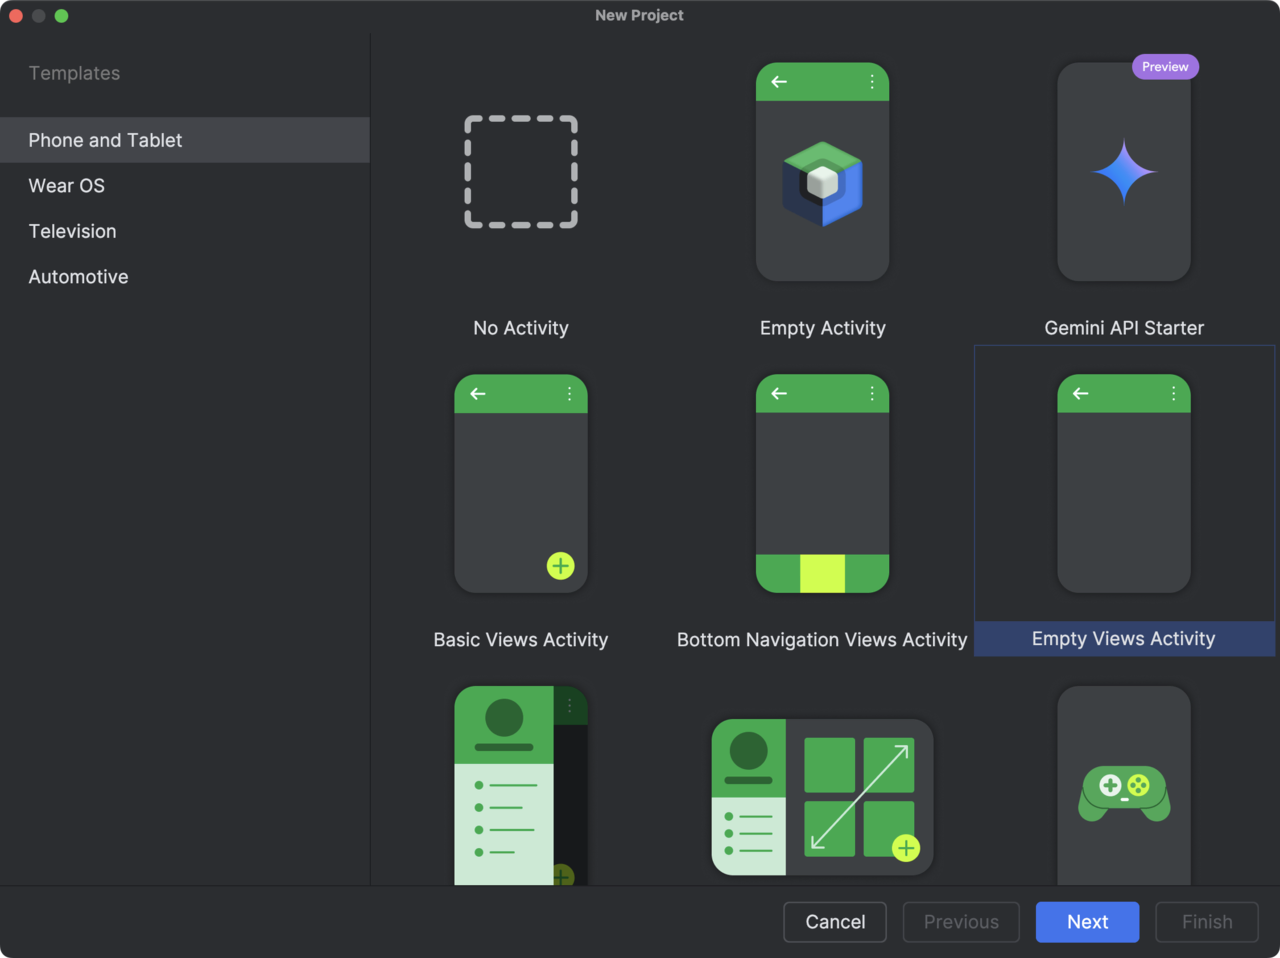
This template creates a minimal Android application without additional UI components, which is ideal for a focused, step-by-step integration.
- Click Next to proceed to the project configuration screen.
2. Configure the project. In the configuration screen, fill in the fields as follows:
- Name: SudokuSolverOnnx. This is the application name that will appear in Android Studio and on the device.
- Package name: com.arm.sudokusolveronnx. This package name clearly reflects the purpose of the app and its use of ONNX on Arm platforms.
- Save location. Choose a convenient directory on your system (for example, your repositories folder).
- Language: Kotlin. Kotlin is the recommended language for modern Android development and integrates cleanly with ONNX Runtime APIs.
- Minimum SDK: API 24 (Android 7.0 – Nougat). This provides wide device coverage while remaining compatible with ONNX Runtime and OpenCV.
- Build configuration language: Kotlin DSL (build.gradle.kts). We use the Kotlin DSL for Gradle, which is now the recommended option.
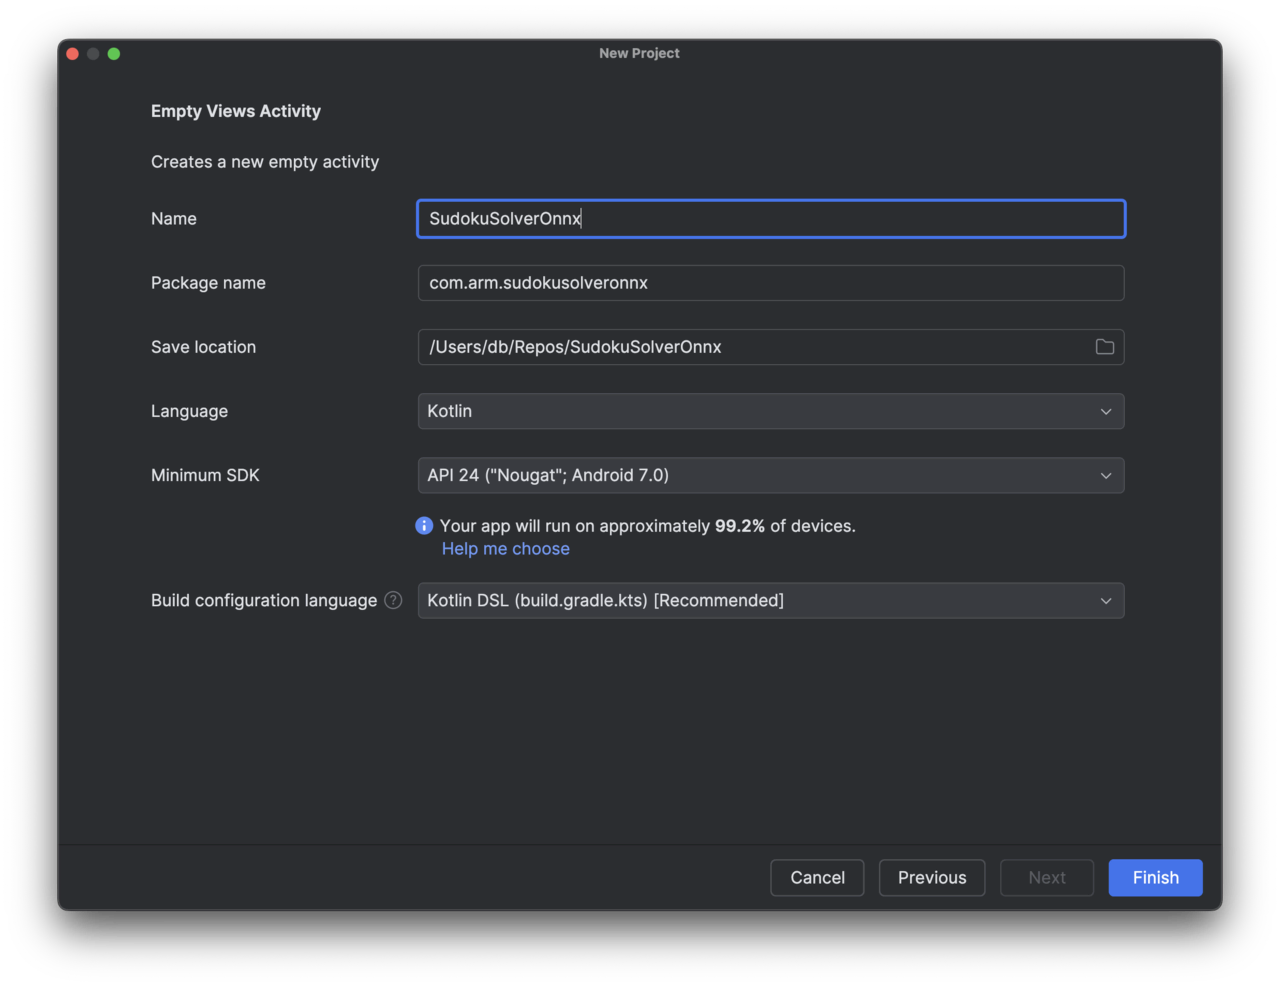
- After confirming these settings, click Finish. Android Studio will create the project and generate a basic MainActivity along with the necessary Gradle files.
## View
You will now define the user interface of the Android application. The goal of this view is to remain intentionally simple while clearly exposing the end-to-end Sudoku workflow. The interface will consist of:
- A button row at the top that allows the user to load a Sudoku image and trigger the solver.
- A status text area used to display short messages (for example, whether an image has been loaded or the puzzle has been solved).
- An input image view that displays the selected Sudoku bitmap.
- An output image view that displays the solved result.
This layout is sufficient to validate that the ONNX model, preprocessing pipeline, and solver are all working correctly on Android before adding more advanced features such as camera input or animations.
To define the view, open the file `res/layout/activity_main.xml` and replace its contents with the following layout definition:
```xml
```
This layout uses a ConstraintLayout as the root container to ensure it adapts cleanly across different screen sizes. The UI is split into two parts: a pinned header and a scrollable content area. The pinned header at the top contains a horizontal button row with two equally sized buttons:
- Load image randomly selects one of the bundled Sudoku bitmaps and displays it in the Input view.
- Solve triggers the inference and solving pipeline (it starts disabled and becomes enabled after an image is loaded).
- Directly below the buttons, a status text field provides quick feedback to the user (for example, whether an image has been loaded or the solver is running).
Below the header, the screen contains a ScrollView that holds the image content:
- The Input section displays the selected Sudoku bitmap.
- The Solved section displays the output image produced after running inference and solving.
Because the image area is scrollable, the layout remains usable even on smaller screens, while the buttons and status remain accessible at all times.
When rendered, this produces a clear, vertically structured interface with a fixed control panel at the top and large input/output images underneath, as shown in the figure below.
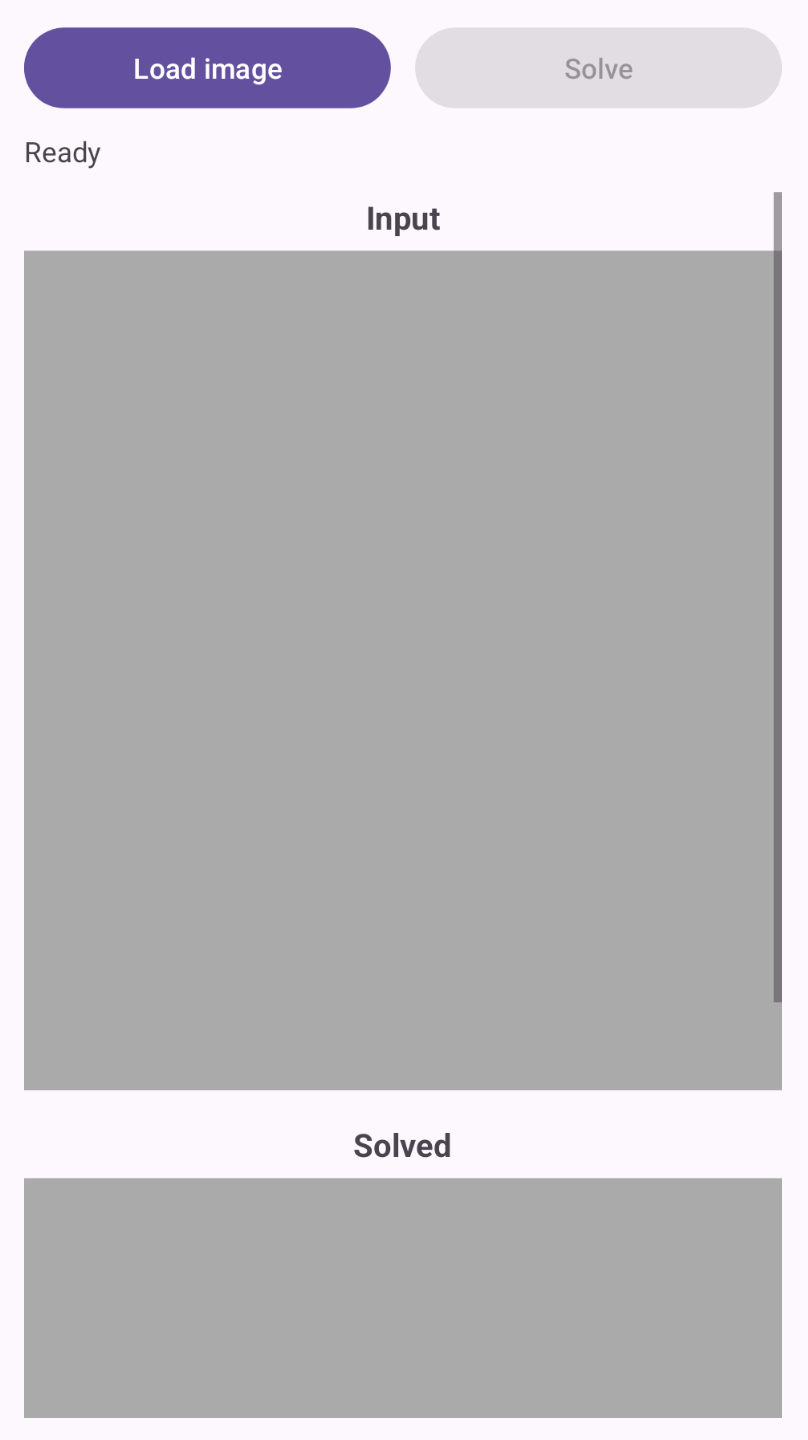
At this stage, the UI is intentionally minimal. In the next step, you will connect this view to the application logic in MainActivity, load a sample Sudoku bitmap, and wire up the Load image and Solve buttons to the ONNX-based processing pipeline.
## Preparing input images for the Android app
Before wiring the application logic, you need to provide the Android app with a small set of Sudoku images that it can load and solve. For this learning path, you will use a fixed collection of pre-generated images (from Preparing a Synthetic Sudoku Digit Dataset) instead of a camera feed. This keeps the Android integration simple and allows us to focus on ONNX inference and solver integration first.
1. Select Sudoku images. From the earlier Python steps, select a small number of generated Sudoku images. These can be either:
- Clean grids (book-style), or
- Camera-like grids (with perspective distortion and noise).
For example, you might choose:
`data/grids/val/000000_cam.png`
`data/grids/val/000000_clean.png`
Using both clean and camera-like images is useful later for testing robustness.
2. Rename images to Android-friendly names. Android resource names must follow strict rules:
- lowercase letters only,
- numbers allowed,
- underscores allowed,
- no spaces or hyphens.
Rename your files accordingly, for example:
- `sudoku_01.png`
- `sudoku_cam_01.png`
3. Copy the renamed PNG files into the following directory of your Android project:
`app/src/main/res/drawable/`
After copying, Android Studio will automatically generate resource IDs for these images.
4. Once the images are in place:
- Let Android Studio finish indexing and syncing.
- Open the Project view and navigate to `res/drawable/`.
- Verify that the images appear without errors.
You should now be able to reference these images in Kotlin code using identifiers such as:
```
R.drawable.sudoku_01
R.drawable.sudoku_cam_01
```
In this tutorial, the Load image button will randomly select one of these drawable resources and display it in the app. This provides a deterministic and repeatable input source while validating the full Sudoku pipeline on Android.
At this point, the Android project has all the static resources it needs. In the next step, you will implement `MainActivity.kt`, wire up the Load image and Solve buttons, and display the selected Sudoku image in the UI.
## Preparing the ONNX model for the Android app
In addition to the input images, the Android application needs access to the trained ONNX model so that it can run inference directly on the device. Android does not allow arbitrary file access by default, so the model must be bundled with the app as an asset.
1. From the previous optimization steps, you should have at least one ONNX model available in your Python project, for example:
- `sudoku_digitnet.onnx` (FP32 model), or
- `sudoku_digitnet.int8.onnx` (INT8 quantized model, if supported on your target device).
For the initial Android integration, it is recommended to start with the FP32 model, as it offers the broadest compatibility. You can switch to the quantized model later once everything is working end-to-end.
2. In your Android project, create the following directory if it does not already exist:
`app/src/main/assets/`
If you prefer to keep assets organized, you can also create a subfolder:
`app/src/main/assets/models/`
Both approaches work. In the examples that follow, you will assume the model is placed directly under assets/.
3. Prepare the model for android such that it does not contain external resources. Android assets are not normal filesystem paths, so models that reference external .onnx.data files will fail to load unless they are merged into a single ONNX file. To do so, create another Python file `07_PrepareModelForAndroid.py`:
```python
import onnx
from onnx import external_data_helper
IN_PATH = "artifacts/sudoku_digitnet.onnx"
OUT_PATH = "artifacts/sudoku_digitnet_android.onnx"
model = onnx.load(IN_PATH)
# If the model references external data, load it into the model object
external_data_helper.load_external_data_for_model(model, base_dir="artifacts")
# Clear external locations so it can be saved as a single file
for init in model.graph.initializer:
if init.data_location == onnx.TensorProto.EXTERNAL:
init.data_location = onnx.TensorProto.DEFAULT
# Remove external data metadata entries
del init.external_data[:]
# Save as a single-file ONNX
onnx.save_model(model, OUT_PATH, save_as_external_data=False)
print("Saved:", OUT_PATH)
```
4. Run the script. Then, copy the selected ONNX model file (`sudoku_digitnet_android`) into the assets directory, for example:
```
app/src/main/assets/sudoku_digitnet_android.onnx
```
or, if using a subfolder:
```
app/src/main/assets/models/sudoku_digitnet_android.onnx
```
5. After copying the model:
- Let Android Studio finish indexing and syncing the project.
- In the Project view, expand the assets folder.
- Verify that the ONNX file appears without any warnings or errors.
Assets are accessed via the Android AssetManager. Later in this tutorial, we will load the model using code similar to:
```kotlin
assets.open("sudoku_digitnet_android.onnx")
```
If you placed the model in a subfolder, include the relative path:
```kotlin
assets.open("models/sudoku_digitnet_android.onnx")
```
This input stream will be passed to ONNX Runtime to create an inference session on the device. At this point, the Android project contains:
- A set of Sudoku images in `res/drawable/`,
- A trained ONNX model in `assets/`.
In the next step, you will implement `MainActivity.kt`, wire up the Load image and Solve buttons, and verify that the app can successfully load both the image and the ONNX model before running inference.
## Implement MainActivity.kt (Load image + basic UI wiring)
Open `app/src/main/java/com/arm/sudokusolveronnx/MainActivity.kt` and replace it with:
```kotlin
package com.arm.sudokusolveronnx
import android.graphics.Bitmap
import android.graphics.BitmapFactory
import android.os.Bundle
import android.widget.Button
import android.widget.ImageView
import android.widget.TextView
import androidx.appcompat.app.AppCompatActivity
import kotlin.random.Random
class MainActivity : AppCompatActivity() {
private lateinit var btnLoadRandom: Button
private lateinit var btnSolve: Button
private lateinit var txtStatus: TextView
private lateinit var imgInput: ImageView
private lateinit var imgOutput: ImageView
private var currentBitmap: Bitmap? = null
// Clean and camera-like pools (you copied these into res/drawable/)
private val sudokuCleanImages = listOf(
R.drawable.sudoku_01,
R.drawable.sudoku_02,
R.drawable.sudoku_03,
R.drawable.sudoku_04,
R.drawable.sudoku_05,
R.drawable.sudoku_06,
R.drawable.sudoku_07,
R.drawable.sudoku_08,
R.drawable.sudoku_09,
R.drawable.sudoku_10,
)
private val sudokuCamImages = listOf(
R.drawable.sudoku_cam_01,
R.drawable.sudoku_cam_02,
R.drawable.sudoku_cam_03,
R.drawable.sudoku_cam_04,
R.drawable.sudoku_cam_05,
R.drawable.sudoku_cam_06,
R.drawable.sudoku_cam_07,
R.drawable.sudoku_cam_08,
R.drawable.sudoku_cam_09,
R.drawable.sudoku_cam_10,
)
override fun onCreate(savedInstanceState: Bundle?) {
super.onCreate(savedInstanceState)
setContentView(R.layout.activity_main)
btnLoadRandom = findViewById(R.id.btnLoadRandom)
btnSolve = findViewById(R.id.btnSolve)
txtStatus = findViewById(R.id.txtStatus)
imgInput = findViewById(R.id.imgInput)
imgOutput = findViewById(R.id.imgOutput)
btnSolve.isEnabled = false
txtStatus.text = "Ready"
btnLoadRandom.setOnClickListener {
loadRandomSudokuImage(useCameraLike = true)
}
btnSolve.setOnClickListener {
txtStatus.text = "Solve clicked (engine not wired yet)"
imgOutput.setImageBitmap(currentBitmap) // temporary: mirror input
}
}
private fun loadRandomSudokuImage(useCameraLike: Boolean) {
val pool = if (useCameraLike) sudokuCamImages else sudokuCleanImages
val resId = pool[Random.nextInt(pool.size)]
val bmp = BitmapFactory.decodeResource(resources, resId)
currentBitmap = bmp
imgInput.setImageBitmap(bmp)
imgOutput.setImageDrawable(null)
btnSolve.isEnabled = true
txtStatus.text = if (useCameraLike) "Loaded camera-like Sudoku" else "Loaded clean Sudoku"
}
}
```
What this gives you immediately
- Tap Load image. Random sudoku_cam_XX loads into Input
- Solve becomes enabled
- Tap Solve. For now, it just mirrors the input to output + updates status (We’ll replace that with the real ONNX+OpenCV solver next.)
Run the app now. This verifies your layout IDs are correct and your drawables are packaged properly.
Here is a clean, reader-facing addition you can include in Step 1 (MainActivity wiring) to explain the expected compile error and how to fix it. This is written in the same instructional tone as the rest of the learning path.
After implementing MainActivity.kt and running the app for the first time, you may encounter a compile-time error. This is expected and related to the Android SDK level used by the project template.
The error occurs because recent versions of Android Studio and its dependencies (in particular androidx.activity and related libraries) require a newer Compile SDK than the default project configuration provides.
Android Studio templates sometimes lag behind the latest library requirements. In this project, we are using up-to-date AndroidX components, which expect the project to be compiled against Android API level 35.
This does not affect which devices your app can run on. It only affects which APIs are available at compile time.
To fix the error, open the Gradle build file for the app module:
`app/build.gradle.kts`
Update the android {} block so that compileSdk is set to 35, as shown below:
```kotlin
plugins {
alias(libs.plugins.android.application)
alias(libs.plugins.kotlin.android)
}
android {
namespace = "com.arm.sudokusolveronnx"
compileSdk = 35
defaultConfig {
applicationId = "com.arm.sudokusolveronnx"
minSdk = 24
targetSdk = 34
versionCode = 1
versionName = "1.0"
testInstrumentationRunner = "androidx.test.runner.AndroidJUnitRunner"
}
buildTypes {
release {
isMinifyEnabled = false
proguardFiles(
getDefaultProguardFile("proguard-android-optimize.txt"),
"proguard-rules.pro"
)
}
}
compileOptions {
sourceCompatibility = JavaVersion.VERSION_11
targetCompatibility = JavaVersion.VERSION_11
}
kotlinOptions {
jvmTarget = "11"
}
}
dependencies {
implementation(libs.androidx.core.ktx)
implementation(libs.androidx.appcompat)
implementation(libs.material)
implementation(libs.androidx.activity)
implementation(libs.androidx.constraintlayout)
testImplementation(libs.junit)
androidTestImplementation(libs.androidx.junit)
androidTestImplementation(libs.androidx.espresso.core)
}
```
After making this change:
1. Click Sync Now when Android Studio prompts you.
2. Rebuild and run the app.
The project should now compile and launch successfully.
At this point, the app should start, display the UI, and allow you to load random Sudoku images. In the next step, you will replace the placeholder logic in the Solve button with the real ONNX- and OpenCV-based Sudoku processing engine.
## Processing pipeline on Android
With the user interface and static resources in place, you can now wire the full Sudoku processing pipeline on Android. Conceptually, this pipeline mirrors the Python implementation developed earlier in the learning path, but is reimplemented using Android-compatible components.
The pipeline consists of four stages:
1. Grid detection and rectification (OpenCV). The input bitmap is converted to an OpenCV matrix, the Sudoku grid is detected, and a perspective transform is applied to obtain a top-down, square view of the board.
2. Digit recognition (ONNX Runtime). The rectified grid is split into 81 cells, each cell is preprocessed to match the training distribution, and all cells are passed as a single batch to the ONNX model for digit recognition.
3. Solving (Kotlin). The recognized board is solved using a deterministic backtracking algorithm. This step is lightweight but can exhibit occasional tail latency when recognition errors introduce ambiguity.
4. Rendering and overlay. The solution is rendered back onto the original image by inverse-warping a transparent overlay from the rectified grid space to the input image.
### Dependencies
To support this pipeline, add three dependencies:
- ONNX Runtime for on-device inference,
- OpenCV for image processing and geometric transformations,
- Kotlin coroutines to ensure that heavy computation runs off the UI thread.
Open `build.gradle.kts` and add the following:
```kotlin
dependencies {
implementation("com.microsoft.onnxruntime:onnxruntime-android:1.18.0")
implementation("org.opencv:opencv:4.10.0")
implementation("org.jetbrains.kotlinx:kotlinx-coroutines-android:1.8.1")
}
```
Then sync Gradle. Using the Maven dependency keeps the setup simple for this tutorial.
Then, make sure you have:
```
app/src/main/assets/sudoku_digitnet_android.onnx
```
### Core components
The Android implementation is organized into three small, focused components:
1. SudokuSolver.kt. Implements a classic backtracking Sudoku solver. This logic is deterministic and independent of the machine learning model.
2. SudokuEngine.kt. Encapsulates the full vision and inference pipeline. It loads the ONNX model from assets, performs grid detection, preprocessing, batched inference, solving, and overlay generation.
3. BoardRenderer.kt. Provides a utility to render a clean Sudoku grid bitmap. This is useful for debugging and for visualizing results independent of the original image.
This separation keeps the codebase readable and makes it easy to extend or replace individual stages later.
Create these Kotlin files under:
```
app/src/main/java/com/arm/sudokusolveronnx/
```
- SudokuSolver.kt (backtracking)
```kotlin
package com.arm.sudokusolveronnx
object SudokuSolver {
fun solve(board: Array): Boolean {
val pos = findEmpty(board) ?: return true
val r = pos.first
val c = pos.second
for (v in 1..9) {
if (isValid(board, r, c, v)) {
board[r][c] = v
if (solve(board)) return true
board[r][c] = 0
}
}
return false
}
private fun findEmpty(board: Array): Pair? {
for (r in 0 until 9) for (c in 0 until 9) if (board[r][c] == 0) return r to c
return null
}
private fun isValid(board: Array, r: Int, c: Int, v: Int): Boolean {
for (j in 0 until 9) if (board[r][j] == v) return false
for (i in 0 until 9) if (board[i][c] == v) return false
val br = (r / 3) * 3
val bc = (c / 3) * 3
for (i in br until br + 3) for (j in bc until bc + 3) if (board[i][j] == v) return false
return true
}
}
```
- SudokuEngine.kt (OpenCV + ORT inference)
```kotlin
package com.arm.sudokusolveronnx
import ai.onnxruntime.OnnxTensor
import ai.onnxruntime.OrtEnvironment
import ai.onnxruntime.OrtSession
import android.content.Context
import android.graphics.Bitmap
import org.opencv.android.Utils
import org.opencv.core.*
import org.opencv.imgproc.Imgproc
import java.nio.FloatBuffer
class SudokuEngine(
private val context: Context,
private val modelAssetName: String = "sudoku_digitnet_android.onnx",
private val warpSize: Int = 450,
private val inputSize: Int = 28,
private val blankConfThreshold: Float = 0.65f,
) {
private val env: OrtEnvironment = OrtEnvironment.getEnvironment()
private val session: OrtSession
init {
val modelBytes = context.assets.open(modelAssetName).use { it.readBytes() }
val opts = OrtSession.SessionOptions()
session = env.createSession(modelBytes, opts)
}
private data class WarpResult(
val warped: Mat,
val H: Mat // perspective transform from original -> warped
)
data class Result(
val recognized: Array,
val solved: Array?,
val solvedBitmap: Bitmap?,
val overlayBitmap: Bitmap?
)
fun solveBitmap(input: Bitmap): Result {
// Bitmap -> Mat (BGR/RGBA depending on Utils, but works for our pipeline)
val bgr = Mat()
Utils.bitmapToMat(input, bgr)
val warp = detectAndWarp(bgr) ?: return Result(emptyBoard(), null, null, null)
val board = recognizeBoard(warp.warped)
val solved = board.map { it.clone() }.toTypedArray()
val ok = SudokuSolver.solve(solved)
return if (ok) {
val solvedGrid = BoardRenderer.render(solved) // keep if you still want it
val overlay = makeOverlayBitmap(input, warp.H, board, solved)
Result(board, solved, solvedGrid, overlay)
} else {
Result(board, null, null, null)
}
}
private fun emptyBoard(): Array = Array(9) { IntArray(9) }
private fun detectAndWarp(bgr: Mat): WarpResult? {
val gray = Mat()
Imgproc.cvtColor(bgr, gray, Imgproc.COLOR_BGR2GRAY)
Imgproc.GaussianBlur(gray, gray, Size(5.0, 5.0), 0.0)
val thr = Mat()
Imgproc.adaptiveThreshold(
gray, thr, 255.0,
Imgproc.ADAPTIVE_THRESH_GAUSSIAN_C,
Imgproc.THRESH_BINARY_INV,
31, 7.0
)
val kernel = Imgproc.getStructuringElement(Imgproc.MORPH_RECT, Size(3.0, 3.0))
Imgproc.morphologyEx(thr, thr, Imgproc.MORPH_CLOSE, kernel, Point(-1.0, -1.0), 2)
val contours = ArrayList()
Imgproc.findContours(thr, contours, Mat(), Imgproc.RETR_EXTERNAL, Imgproc.CHAIN_APPROX_SIMPLE)
if (contours.isEmpty()) return null
contours.sortByDescending { Imgproc.contourArea(it) }
var quad: MatOfPoint2f? = null
for (i in 0 until minOf(20, contours.size)) {
val c = contours[i]
val peri = Imgproc.arcLength(MatOfPoint2f(*c.toArray()), true)
val approx = MatOfPoint2f()
Imgproc.approxPolyDP(MatOfPoint2f(*c.toArray()), approx, 0.02 * peri, true)
if (approx.total().toInt() == 4) {
quad = approx
break
}
}
if (quad == null) return null
val pts = orderQuad(quad.toArray())
val dst = arrayOf(
Point(0.0, 0.0),
Point((warpSize - 1).toDouble(), 0.0),
Point((warpSize - 1).toDouble(), (warpSize - 1).toDouble()),
Point(0.0, (warpSize - 1).toDouble())
)
val M = Imgproc.getPerspectiveTransform(MatOfPoint2f(*pts), MatOfPoint2f(*dst))
val warped = Mat()
Imgproc.warpPerspective(bgr, warped, M, Size(warpSize.toDouble(), warpSize.toDouble()))
return WarpResult(warped, M)
}
private fun orderQuad(pts: Array): Array {
// order: TL, TR, BR, BL
val sum = pts.map { it.x + it.y }
val diff = pts.map { it.x - it.y }
val tl = pts[sum.indices.minBy { sum[it] }]
val br = pts[sum.indices.maxBy { sum[it] }]
val tr = pts[diff.indices.maxBy { diff[it] }]
val bl = pts[diff.indices.minBy { diff[it] }]
return arrayOf(tl, tr, br, bl)
}
private fun recognizeBoard(warpedBgr: Mat): Array {
val step = warpSize / 9
val inputs = FloatArray(81 * 1 * inputSize * inputSize)
var idx = 0
for (r in 0 until 9) for (c in 0 until 9) {
val cell = warpedBgr.submat(r * step, (r + 1) * step, c * step, (c + 1) * step)
val tensor = preprocessCell(cell) // FloatArray length = 1*28*28
System.arraycopy(tensor, 0, inputs, idx * inputSize * inputSize, inputSize * inputSize)
idx++
}
val shape = longArrayOf(81, 1, inputSize.toLong(), inputSize.toLong())
val fb = FloatBuffer.wrap(inputs)
val inputTensor = OnnxTensor.createTensor(env, fb, shape)
val out = session.run(mapOf("input" to inputTensor))
val logits = out[0].value as Array // [81][10]
out.forEach { it.close() }
inputTensor.close()
val board = Array(9) { IntArray(9) }
for (i in 0 until 81) {
val probs = softmax(logits[i])
var bestK = 0
var bestV = probs[0]
for (k in 1 until probs.size) {
if (probs[k] > bestV) {
bestV = probs[k]; bestK = k
}
}
val r = i / 9
val c = i % 9
board[r][c] = if (bestV < blankConfThreshold) 0 else bestK
}
return board
}
private fun preprocessCell(cellBgr: Mat): FloatArray {
val gray = Mat()
Imgproc.cvtColor(cellBgr, gray, Imgproc.COLOR_BGR2GRAY)
val m = (0.12 * minOf(gray.rows(), gray.cols())).toInt()
val cropped = gray.submat(m, gray.rows() - m, m, gray.cols() - m)
val resized = Mat()
Imgproc.resize(cropped, resized, Size(inputSize.toDouble(), inputSize.toDouble()), 0.0, 0.0, Imgproc.INTER_AREA)
val out = FloatArray(inputSize * inputSize)
var k = 0
for (y in 0 until inputSize) for (x in 0 until inputSize) {
val v = resized.get(y, x)[0].toFloat() / 255f
out[k++] = (v - 0.5f) / 0.5f
}
return out
}
private fun softmax(x: FloatArray): FloatArray {
var max = x[0]
for (v in x) if (v > max) max = v
val e = FloatArray(x.size)
var sum = 0f
for (i in x.indices) {
val v = kotlin.math.exp((x[i] - max).toDouble()).toFloat()
e[i] = v
sum += v
}
for (i in e.indices) e[i] /= (sum + 1e-12f)
return e
}
private fun makeOverlayBitmap(
originalBitmap: Bitmap,
H: Mat,
recognized: Array,
solved: Array
): Bitmap {
// Convert original to Mat (could be RGBA on Android)
val original = Mat()
Utils.bitmapToMat(originalBitmap, original)
// Ensure original is BGR (3 channels)
val originalBgr = Mat()
if (original.channels() == 4) {
Imgproc.cvtColor(original, originalBgr, Imgproc.COLOR_RGBA2BGR)
} else {
original.copyTo(originalBgr)
}
// Create layer in warped space (BGR)
val layer = Mat.zeros(warpSize, warpSize, CvType.CV_8UC3)
val step = warpSize / 9
for (r in 0 until 9) for (c in 0 until 9) {
if (recognized[r][c] != 0) continue
val d = solved[r][c]
val x = (c * step + step * 0.32).toInt()
val y = (r * step + step * 0.72).toInt()
Imgproc.putText(
layer, d.toString(),
Point(x.toDouble(), y.toDouble()),
Imgproc.FONT_HERSHEY_SIMPLEX,
1.2f,
Scalar(0.0, 200.0, 0.0), // green in BGR
2, Imgproc.LINE_AA
)
}
// Inverse warp to original size (BGR)
val invH = Mat()
Core.invert(H, invH)
val back = Mat.zeros(originalBgr.size(), CvType.CV_8UC3)
Imgproc.warpPerspective(layer, back, invH, originalBgr.size())
// Mask where back has pixels
val mask = Mat()
Imgproc.cvtColor(back, mask, Imgproc.COLOR_BGR2GRAY)
Imgproc.threshold(mask, mask, 1.0, 255.0, Imgproc.THRESH_BINARY)
// Blend (same size + same channels)
val blended = Mat()
Core.addWeighted(originalBgr, 0.6, back, 0.4, 0.0, blended)
// Copy only where mask is present
val outBgr = originalBgr.clone()
blended.copyTo(outBgr, mask)
// Convert back to bitmap (need RGBA for Android Bitmap)
val outRgba = Mat()
Imgproc.cvtColor(outBgr, outRgba, Imgproc.COLOR_BGR2RGBA)
val outBmp = Bitmap.createBitmap(originalBitmap.width, originalBitmap.height, Bitmap.Config.ARGB_8888)
Utils.matToBitmap(outRgba, outBmp)
return outBmp
}
}
```
- BoardRenderer.kt
```kotlin
package com.arm.sudokusolveronnx
import android.graphics.*
object BoardRenderer {
fun render(board: Array, cell: Int = 80, margin: Int = 24): Bitmap {
val size = 9 * cell + 2 * margin
val bmp = Bitmap.createBitmap(size, size, Bitmap.Config.ARGB_8888)
val canvas = Canvas(bmp)
canvas.drawColor(Color.WHITE)
val thin = Paint().apply { color = Color.BLACK; strokeWidth = 2f; isAntiAlias = true }
val thick = Paint().apply { color = Color.BLACK; strokeWidth = 6f; isAntiAlias = true }
// grid
for (i in 0..9) {
val p = if (i % 3 == 0) thick else thin
val x = (margin + i * cell).toFloat()
val y = (margin + i * cell).toFloat()
canvas.drawLine(x, margin.toFloat(), x, (margin + 9 * cell).toFloat(), p)
canvas.drawLine(margin.toFloat(), y, (margin + 9 * cell).toFloat(), y, p)
}
val textPaint = Paint().apply {
color = Color.BLACK
textSize = (cell * 0.62f)
isAntiAlias = true
textAlign = Paint.Align.CENTER
typeface = Typeface.create(Typeface.SANS_SERIF, Typeface.BOLD)
}
val fm = textPaint.fontMetrics
val textYOffset = (fm.ascent + fm.descent) / 2f
for (r in 0 until 9) for (c in 0 until 9) {
val v = board[r][c]
if (v == 0) continue
val cx = margin + c * cell + cell / 2f
val cy = margin + r * cell + cell / 2f - textYOffset
canvas.drawText(v.toString(), cx, cy, textPaint)
}
return bmp
}
}
```
### Overlay rendering
Instead of simply rendering a solved grid, the application overlays the missing digits directly onto the original Sudoku image. This is achieved by drawing the solution in the rectified grid space and then mapping it back to the input image using the inverse perspective transform.
Only cells that were originally empty are filled, and the solution digits are rendered in green to distinguish them from the original puzzle. This approach closely matches how real-world Sudoku solver apps present results and provides an intuitive visual confirmation that the pipeline is working correctly.
## MainActivity integration
MainActivity acts as a thin integration layer between the UI and the processing engine. Its responsibilities are intentionally minimal:
- loading a random Sudoku image from resources,
- invoking the solver on a background thread,
- updating the UI with the solved result or an error message.
All heavy computation is delegated to SudokuEngine, which ensures that the UI remains responsive during processing.
```kotlin
package com.arm.sudokusolveronnx
import android.graphics.Bitmap
import android.graphics.BitmapFactory
import android.os.Bundle
import android.widget.Button
import android.widget.ImageView
import android.widget.TextView
import androidx.appcompat.app.AppCompatActivity
import androidx.lifecycle.lifecycleScope
import kotlinx.coroutines.Dispatchers
import kotlinx.coroutines.launch
import kotlinx.coroutines.withContext
import kotlin.random.Random
import org.opencv.android.OpenCVLoader
class MainActivity : AppCompatActivity() {
private lateinit var btnLoadRandom: Button
private lateinit var btnSolve: Button
private lateinit var txtStatus: TextView
private lateinit var imgInput: ImageView
private lateinit var imgOutput: ImageView
private lateinit var engine: SudokuEngine
private var currentBitmap: Bitmap? = null
// Clean and camera-like pools (you copied these into res/drawable/)
private val sudokuCleanImages = listOf(
R.drawable.sudoku_01,
R.drawable.sudoku_02,
R.drawable.sudoku_03,
R.drawable.sudoku_04,
R.drawable.sudoku_05,
R.drawable.sudoku_06,
R.drawable.sudoku_07,
R.drawable.sudoku_08,
R.drawable.sudoku_09,
R.drawable.sudoku_10,
)
private val sudokuCamImages = listOf(
R.drawable.sudoku_cam_01,
R.drawable.sudoku_cam_02,
R.drawable.sudoku_cam_03,
R.drawable.sudoku_cam_04,
R.drawable.sudoku_cam_05,
R.drawable.sudoku_cam_06,
R.drawable.sudoku_cam_07,
R.drawable.sudoku_cam_08,
R.drawable.sudoku_cam_09,
R.drawable.sudoku_cam_10,
)
override fun onCreate(savedInstanceState: Bundle?) {
super.onCreate(savedInstanceState)
setContentView(R.layout.activity_main)
btnLoadRandom = findViewById(R.id.btnLoadRandom)
btnSolve = findViewById(R.id.btnSolve)
txtStatus = findViewById(R.id.txtStatus)
imgInput = findViewById(R.id.imgInput)
imgOutput = findViewById(R.id.imgOutput)
btnSolve.isEnabled = false
val ok = OpenCVLoader.initLocal()
txtStatus.text = if (ok) "OpenCV ready" else "OpenCV init failed"
engine = SudokuEngine(this)
btnLoadRandom.setOnClickListener {
loadRandomSudokuImage(useCameraLike = true)
}
btnSolve.setOnClickListener {
val bmp = currentBitmap ?: return@setOnClickListener
txtStatus.text = "Solving..."
btnSolve.isEnabled = false
lifecycleScope.launch {
val result = withContext(Dispatchers.Default) {
engine.solveBitmap(bmp)
}
if (result.overlayBitmap != null) {
imgOutput.setImageBitmap(result.overlayBitmap)
txtStatus.text = "Solved"
} else {
txtStatus.text = "Solve failed (recognition errors)"
}
btnSolve.isEnabled = true
}
}
}
private fun loadRandomSudokuImage(useCameraLike: Boolean) {
val pool = if (useCameraLike) sudokuCamImages else sudokuCleanImages
val resId = pool[Random.nextInt(pool.size)]
val bmp = BitmapFactory.decodeResource(resources, resId)
currentBitmap = bmp
imgInput.setImageBitmap(bmp)
imgOutput.setImageDrawable(null)
btnSolve.isEnabled = true
txtStatus.text = if (useCameraLike) "Loaded camera-like Sudoku" else "Loaded clean Sudoku"
}
}
```
Depending on your OpenCV packaging, you may use `initLocal()` or `initDebug()`.
## Testing the application
With the full pipeline integrated, the application can now be tested end-to-end on an Android device or emulator.
To test the app:
1. Tap Load image to randomly select one of the bundled Sudoku bitmaps (clean or camera-like).
2. The selected image is displayed in the Input section.
3. Tap Solve to run the complete on-device pipeline:
- OpenCV detects and rectifies the Sudoku grid,
- the ONNX model performs batched digit recognition,
- the Sudoku solver reconstructs and solves the board,
- the solution is overlaid back onto the original image.
The figures below show two representative test cases. In each example, the upper image corresponds to the original Sudoku puzzle, while the lower image shows the same puzzle with the missing digits filled in and overlaid in green. This visual comparison confirms that grid detection, digit recognition, solving, and rendering are all functioning correctly on-device.
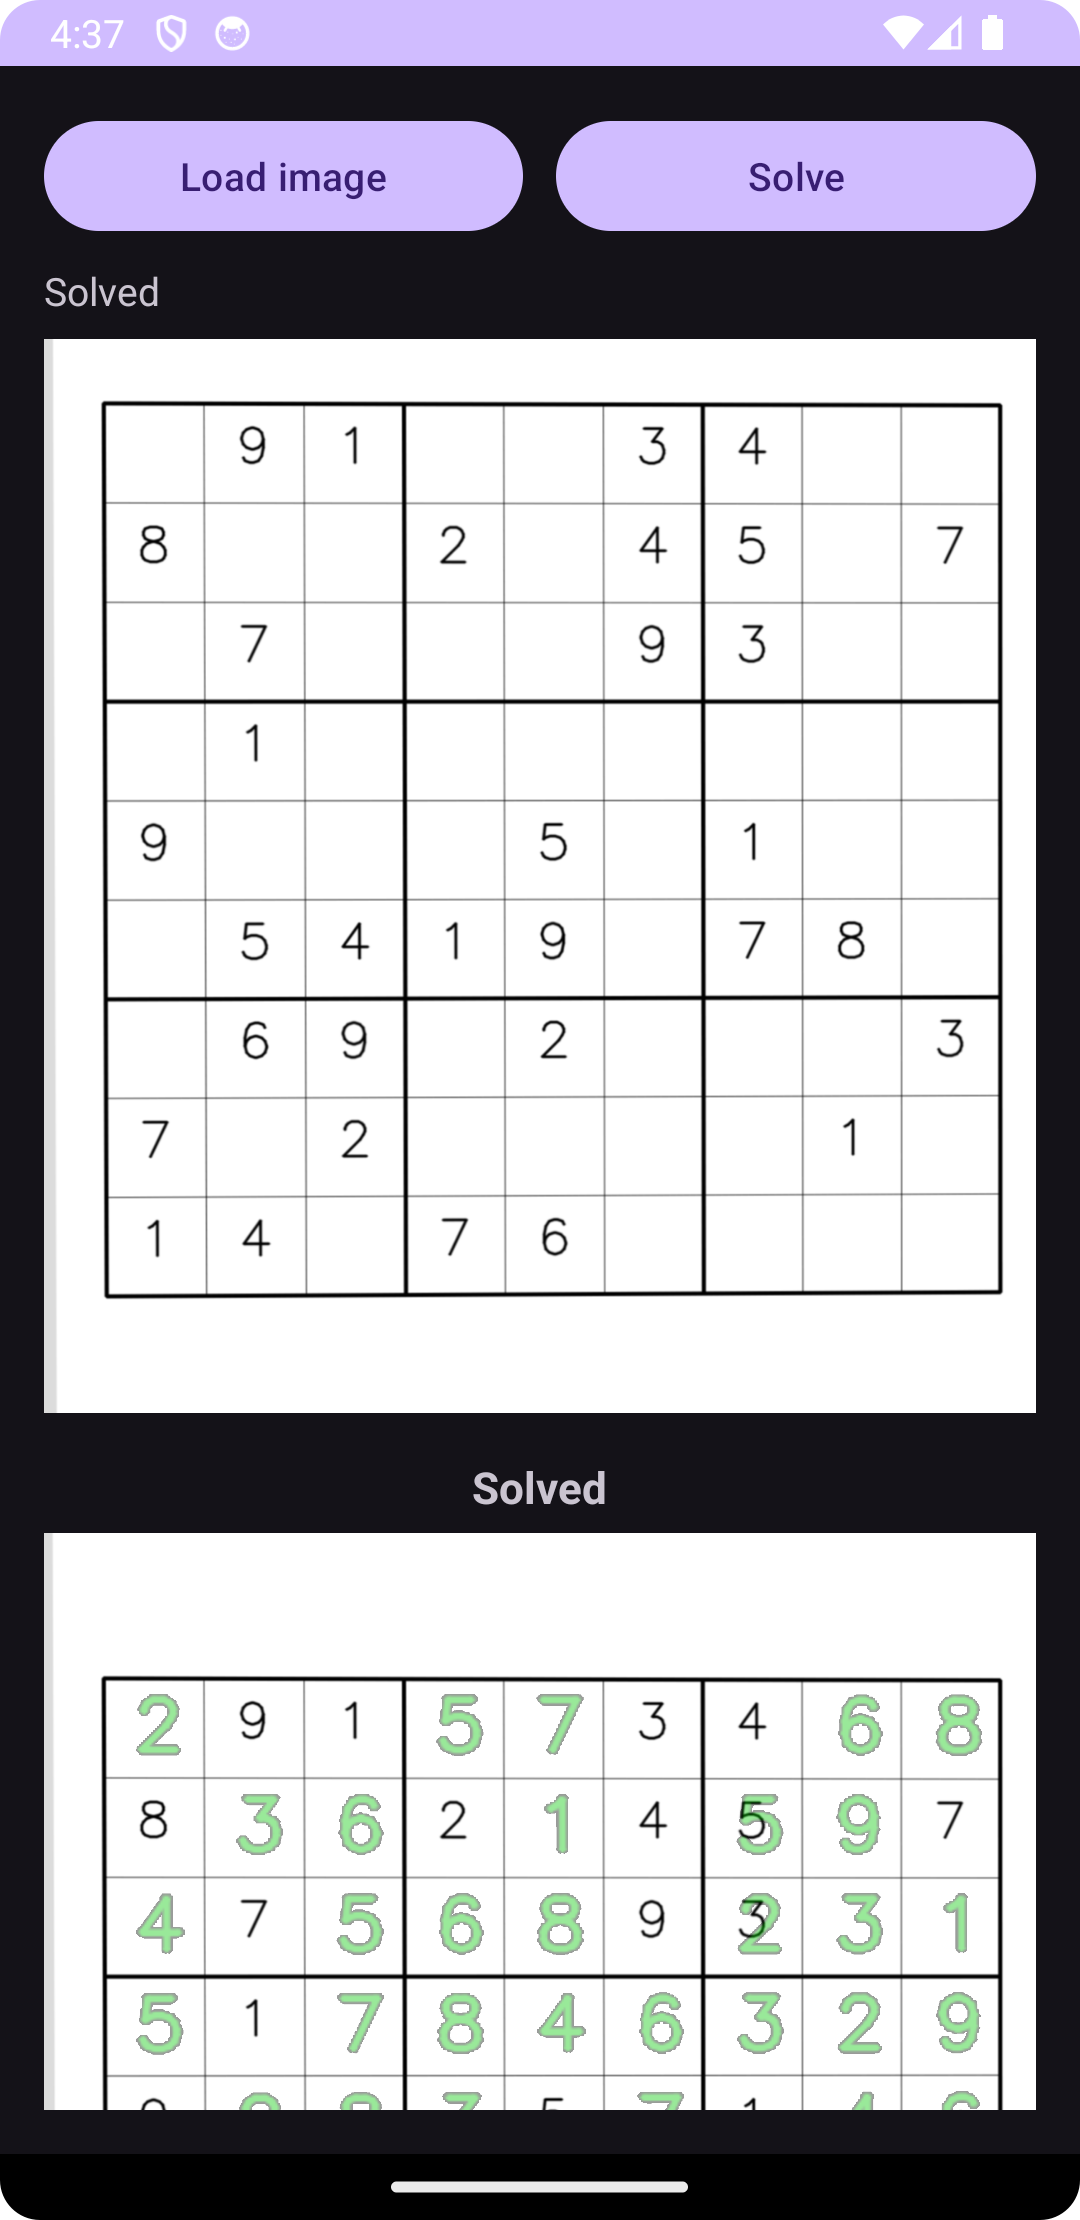
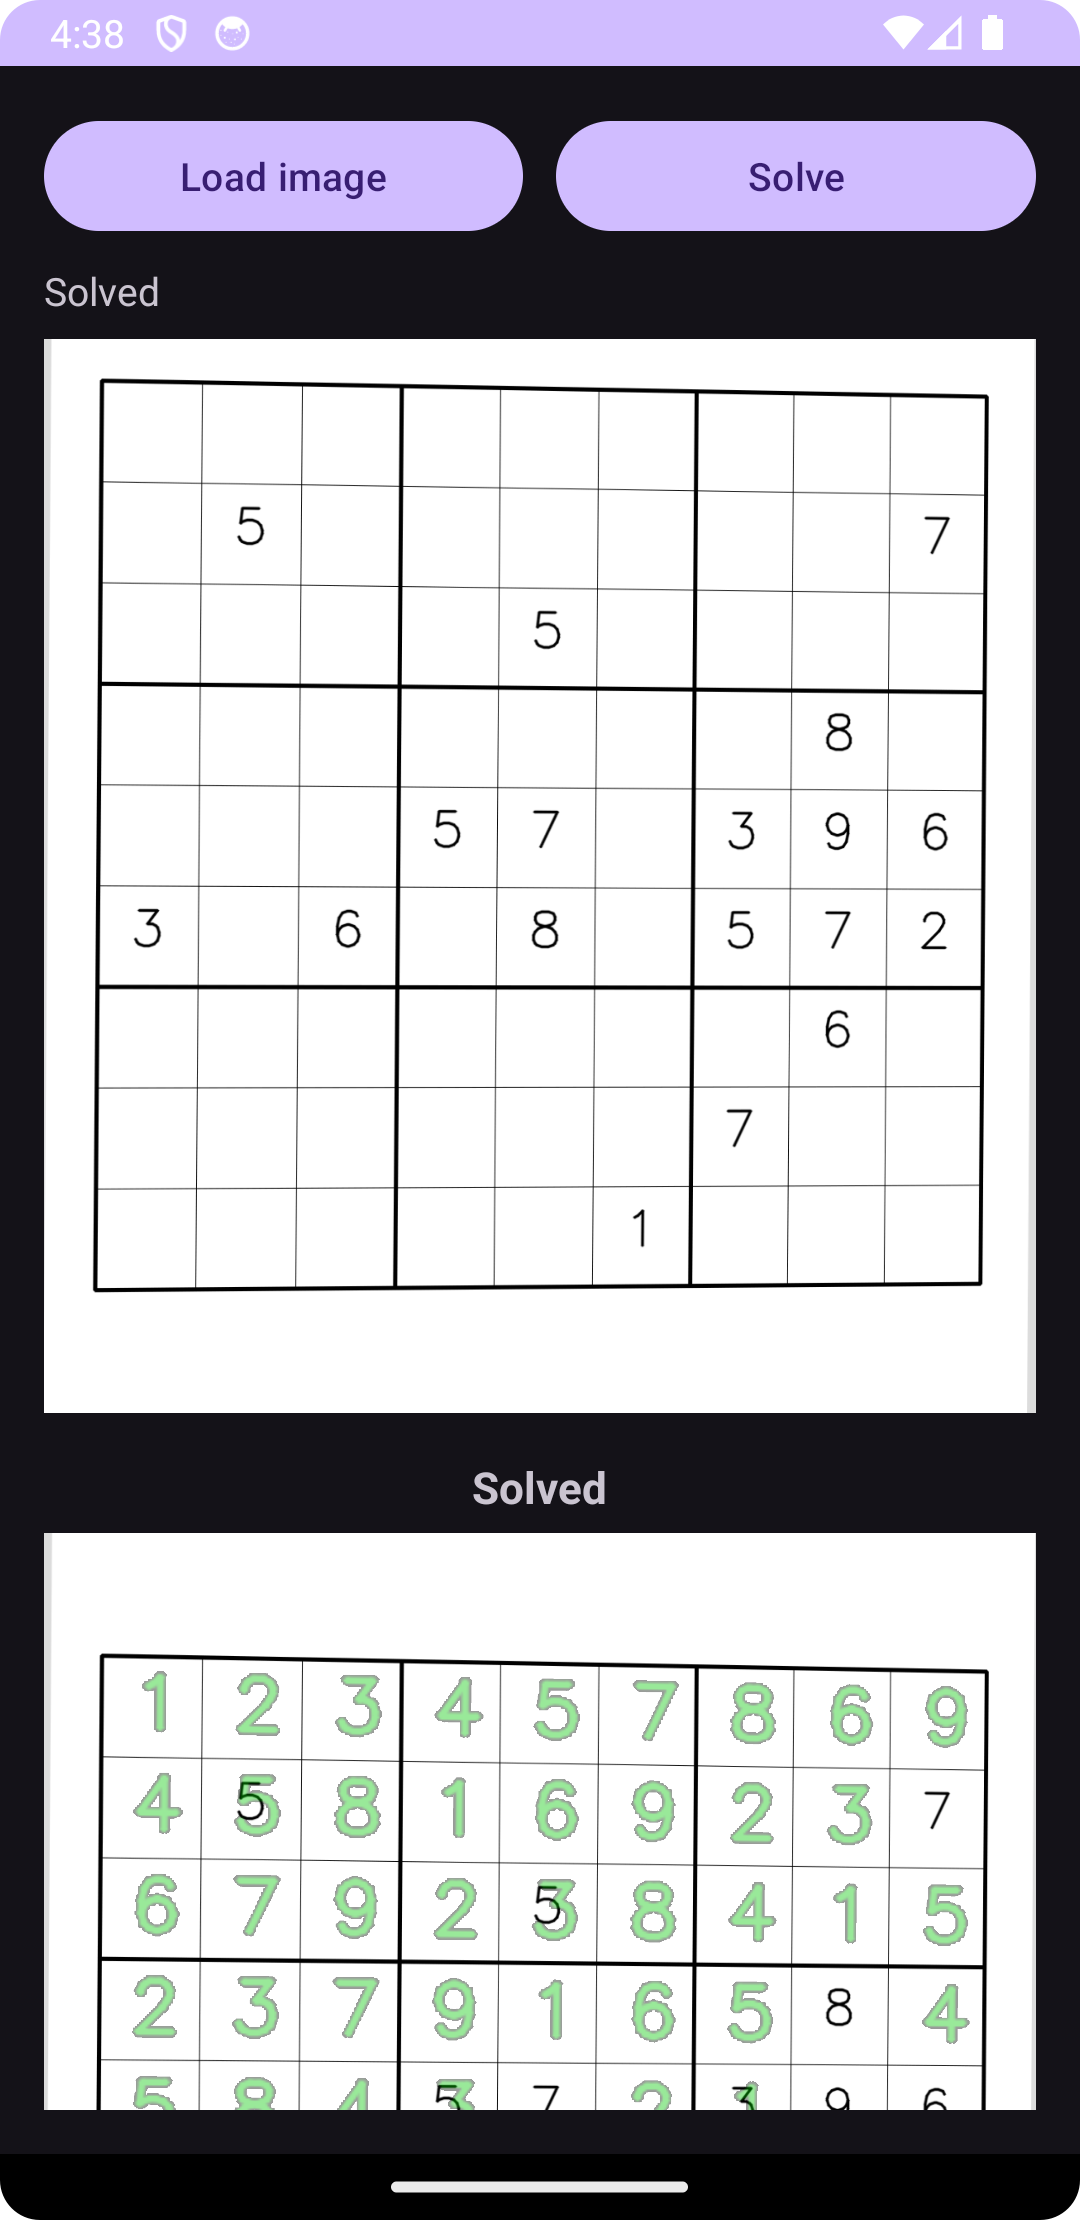
These tests demonstrate that the application is robust to perspective distortion and partial digit placement, and that the model performs reliably when deployed via ONNX Runtime on Android.
## What you’ve accomplished and what’s next
You built an end-to-end workflow for deploying ONNX models on Arm64 and mobile platforms—from model development in Python to on-device Android deployment. Throughout this Learning Path, you trained a lightweight digit recognizer and constructed an OpenCV-based pipeline for grid detection and rectification, exported models to ONNX with dynamic batch support, validated correctness with ONNX Runtime, applied practical optimizations including quantization and session tuning, and integrated everything into an on-device Android app with no cloud dependency. The final application processes Sudoku images from capture to completed solution, all running locally on the device.
### Real-world considerations
Challenging lighting, strong perspective distortion, faint or occluded digits, and imperfect crops can cause recognition errors that propagate into the solver, increasing solve time or occasionally preventing a valid solution. These behaviors highlight the trade-offs between model size, robustness, and performance at the edge.
### Potential improvements
Next steps to enhance the application:
- Add more varied training data and tighter preprocessing for improved robustness
- Implement live capture with CameraX
- Polish the UX with progress feedback and overlays
- Experiment with quantized models and hardware acceleration where available
- Generalize to other document- and grid-based vision tasks
This Learning Path provides a solid foundation for building, optimizing, and deploying ONNX-based machine learning applications on Arm64 and mobile platforms.
## Companion code
All source code used throughout this learning path is available in the following repositories:
1. [Sudoku solver](https://github.com/dawidborycki/SudokuSolverOnnx.git)
2. [Python scripts](https://github.com/dawidborycki/ONNX-LP.git)
## What you’ve learned and what’s next
Throughout this Learning Path, you built a complete machine learning deployment pipeline from training to mobile deployment. You created and trained a digit recognition model in PyTorch, exported it to the portable ONNX format with dynamic batch support, and validated inference correctness across frameworks. You then integrated the model into an end-to-end Sudoku processing system using OpenCV for image processing and grid detection, applied performance optimizations including INT8 quantization, and measured real-world latency characteristics on Arm64 hardware. Finally, you deployed the entire pipeline as a fully functional Android application that performs on-device inference with ONNX Runtime, demonstrating how to bring machine learning models from development to production on Arm-based mobile platforms without cloud dependencies.
You can now apply these techniques to other vision-based applications on Arm platforms, experiment with different model architectures and optimization strategies, or extend this foundation to solve similar document processing and grid-based recognition tasks.