Enable Neural Frame Rate Upscaling in Unreal Engine
Introduction
Understand neural graphics and NFRU
Set up the development environment
Set up the Unreal project with NFRU enabled
Validate NFRU in Unreal Engine
Understand console variables for NFRU
Set up a debug view in Unreal Engine
Use RenderDoc for Arm GPUs with NFRU for debugging and analysis
Next Steps
Enable Neural Frame Rate Upscaling in Unreal Engine
Introduction
Understand neural graphics and NFRU
Set up the development environment
Set up the Unreal project with NFRU enabled
Validate NFRU in Unreal Engine
Understand console variables for NFRU
Set up a debug view in Unreal Engine
Use RenderDoc for Arm GPUs with NFRU for debugging and analysis
Next Steps
Install the required tools and dependencies
To use Neural Frame Rate Upscaling (NFRU) in your Unreal Engine project, install and configure several tools. These components provide the development environment and runtime support for building and testing NFRU with ML extensions for Vulkan.
You will install the following:
- Vulkan SDK 1.4.321.0 or later. The SDK includes Vulkan Configurator, which you use to activate the ML emulation layers on Windows.
- ML Emulation Layer for Vulkan 0.10.0 or later. The standalone Windows release is available in the
arm/ai-ml-emulation-layer-for-vulkanrepository. Version 0.10.0 or later is required for the NFRU optical-flow extension. - Arm Neural Graphics Plugin 1.1.0. The plugin sits in the
arm/neural-graphics-for-unrealrepository.
Install the Vulkan SDK
Go to the Vulkan SDK page and install Vulkan SDK version 1.4.321.0 or later for Windows.
The Vulkan SDK supplies the development tools and headers, but NFRU also requires a Vulkan implementation that exposes the ML Extensions for Vulkan used by the plugin. In particular, the NFRU optical-flow path requires VK_ARM_data_graph_optical_flow, in addition to the tensor and data graph functionality used for neural inference.
On a Windows development system without native support for these extensions, use the standalone ML Emulation Layer for Vulkan. The active Vulkan environment must expose VK_ARM_data_graph_optical_flow; otherwise, NFRU cannot run its optical-flow stage.
Download the ML Emulation Layer for Vulkan
Go to the
ML Emulation Layer for Vulkan releases
and download version 0.10.0 or later of the Windows_AMD64.zip archive. Version 0.10.0 added support for VK_ARM_data_graph_optical_flow.
Extract the archive. Its bin directory contains the Graph and Tensor layer DLLs and their Vulkan manifest files. Keep this directory separate from Arm Neural Graphics Plugin 1.1.0; the plugin and emulation layers are downloaded and installed independently.
Download Arm Neural Graphics Plugin 1.1.0
Go to the
Arm Neural Graphics Plugin releases
and download the 1.1.0 release .zip file. Extract the archive on your Windows system.
Keep the extracted neural-graphics-for-unreal folder intact. You will copy this complete folder into your Unreal project’s Plugins directory in the next section.
Configure the Vulkan ML emulation layers
Vulkan Configurator is installed with the Vulkan SDK. Use it to activate the emulation layers before you run the Windows non-editor build.
Launch Vulkan Configurator from the Windows Start menu.
Add a user-defined Vulkan layer path that points to the
bindirectory in the extracted standalone emulation-layer release:<extracted-emulation-layer>\bin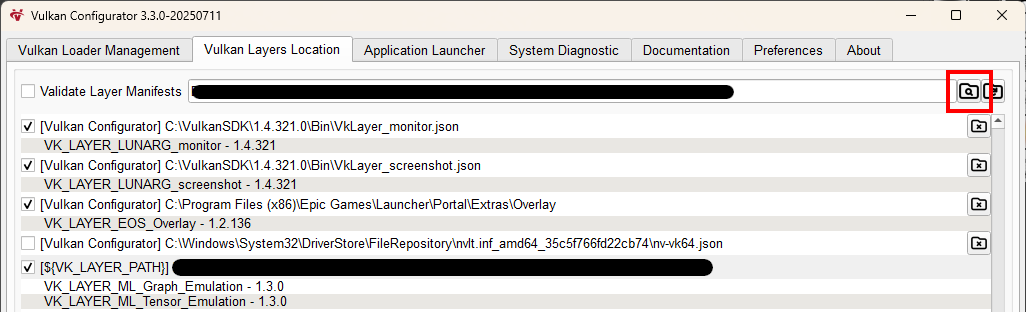 Add the standalone emulation layer's bin directory
Verify that these layers appear in the list:
VK_LAYER_ML_Graph_EmulationVK_LAYER_ML_Tensor_Emulation
 Confirm that both Vulkan ML emulation layers are available
Switch to the Vulkan Loader Management tab. Make sure the Graph layer is above the Tensor layer, enable both layers, and apply the configuration.
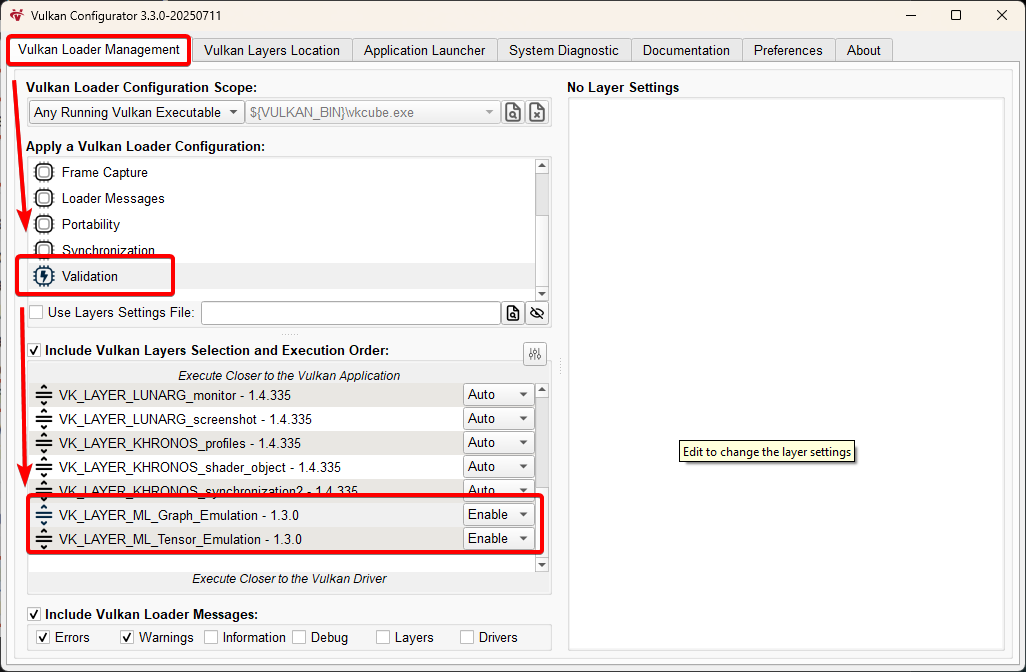 Verify the emulation layer ordering
Keep Vulkan Configurator running with this configuration active whenever you launch the NFRU Windows executable.
With the Vulkan requirements in place, you can install Arm Neural Graphics Plugin 1.1.0 in your Unreal Engine project.