Build a Hands-Free Selfie Android Application with MediaPipe
Introduction
Set up the Development Environment
Manage Camera Permissions
Integrate MediaPipe solutions
Manage UI state with ViewModel
Use SharedFlow to View Events
Use StateFlow to View Controller States
Mediate flows to trigger photo capture
Avoid duplicate photo capture requests
Next Steps
Build a Hands-Free Selfie Android Application with MediaPipe
Download Android Studio
Start by downloading and installing the latest version of Android Studio on your host machine.
The instructions for this learning path were tested on a host machine running macOS, but you can use any of the supported hardware systems listed on the Install Android Studio webpage on the Android Developer website.
After installation, open Android Studio and do the following:
- Accept license agreements.
- Download all the required assets.
- Select the default or recommended settings.
Before you start coding, here are some useful tips:
To navigate to a file, simply press the Shift key twice, input the file name, select the correct result using the up and down arrow keys, and then press Enter.
Every time after you copy-and-paste a code block from this Learning Path, ensure that you import the correct classes and resolve any errors. For more information, see the Auto import web page.
Create a new Android project
Navigate to File > New > New Project.
Select Empty Views Activity in the Phone and Tablet gallery as Figure 1 shows, then select Next.
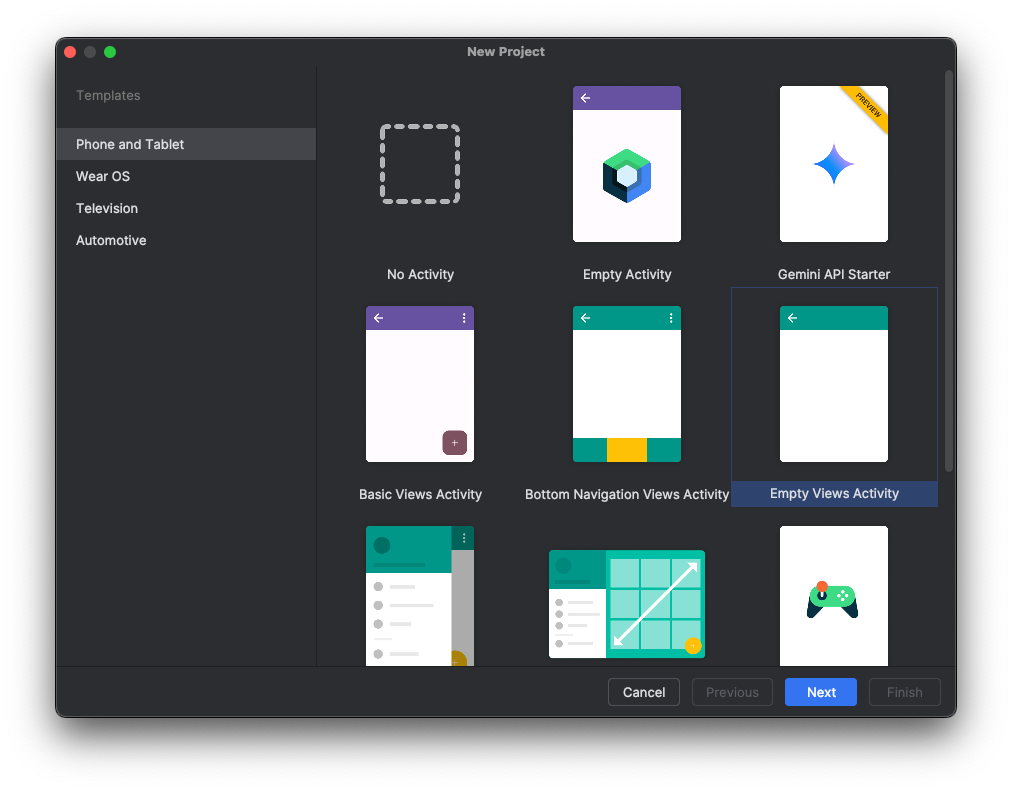 Figure 1: Select Empty Views Activity.
Choose a project name, and select the default configurations as Figure 2 shows.
Make sure that the Language field is set to Kotlin, and the Build configuration language field is set to Kotlin DSL.
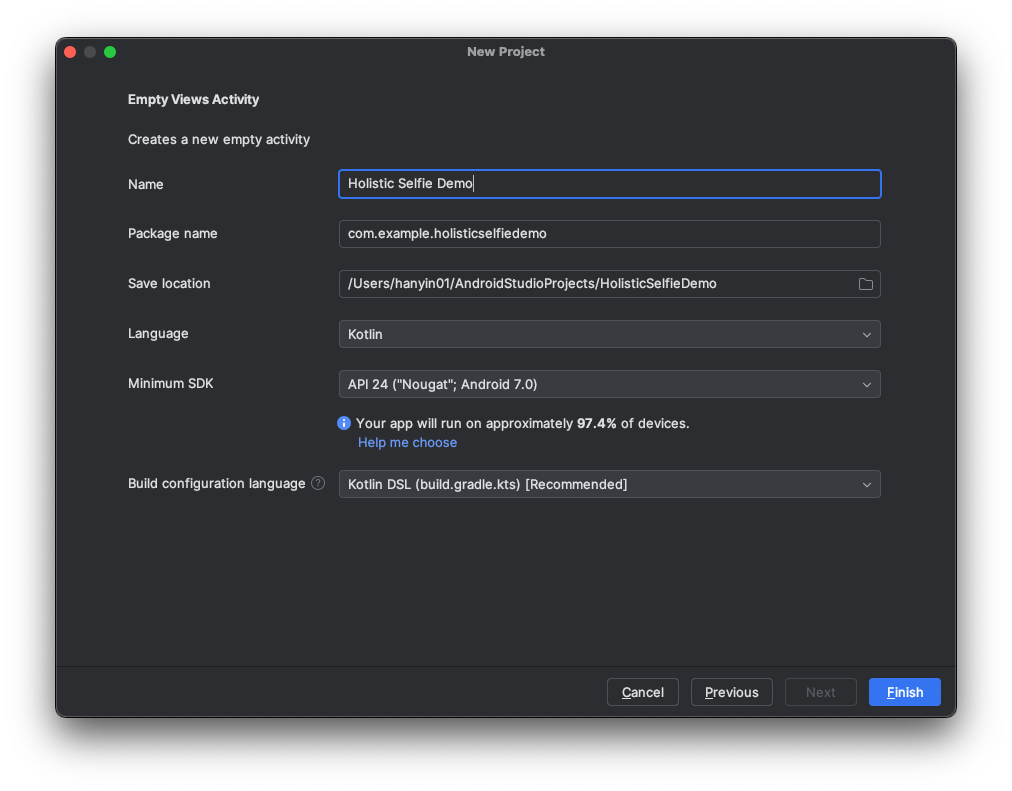 Figure 2: Project Configuration.
Add CameraX dependencies
CameraX is a Jetpack library, built to help make camera app development easier. It provides a consistent, easy-to-use API that works across the vast majority of Android devices with great backward-compatibility.
Wait for Android Studio to sync project with Gradle files. This might take several minutes.
Once the project is synced, navigate to
libs.versions.tomlin your project’s root directory. See Figure 3. This file serves as the version catalog for all dependencies that the project uses.
 Figure 3: Version Catalog.
For more information on version catalogs, see Migrate your build to version catalogs .
- Append the following line to the end of
[versions]section. This defines the version of CameraX libraries that you will be using.
camerax = "1.4.0"
- Append the following lines to the end of
[libraries]section. This declares the group, name and version of CameraX dependencies.
camera-core = { group = "androidx.camera", name = "camera-core", version.ref = "camerax" }
camera-camera2 = { group = "androidx.camera", name = "camera-camera2", version.ref = "camerax" }
camera-lifecycle = { group = "androidx.camera", name = "camera-lifecycle", version.ref = "camerax" }
camera-view = { group = "androidx.camera", name = "camera-view", version.ref = "camerax" }
- Navigate to
build.gradle.ktsin your project’sappdirectory, then insert the following lines intodependenciesblock. This introduces the dependencies listed above into theappsubproject:
    implementation(libs.camera.core)
    implementation(libs.camera.camera2)
    implementation(libs.camera.lifecycle)
    implementation(libs.camera.view)
Enable view binding
- Within the above
build.gradle.ktsfile, append the following lines to the end ofandroidblock to enable the view binding feature:
    buildFeatures {
        viewBinding = true
    }
- You should see that a notification appears. See Figure 4. Click Sync Now to sync your project.
 Figure 4: Gradle Sync.
You can also click the Sync Project with Gradle Files button in the toolbar, or enter the corresponding shortcut to start a sync.
Navigate to the
MainActivity.ktsource file and make the changes that Figure 5 shows in the View Binding screenshot.This inflates the layout file into a view binding object, and stores it in a member variable within the view controller for easier access later.
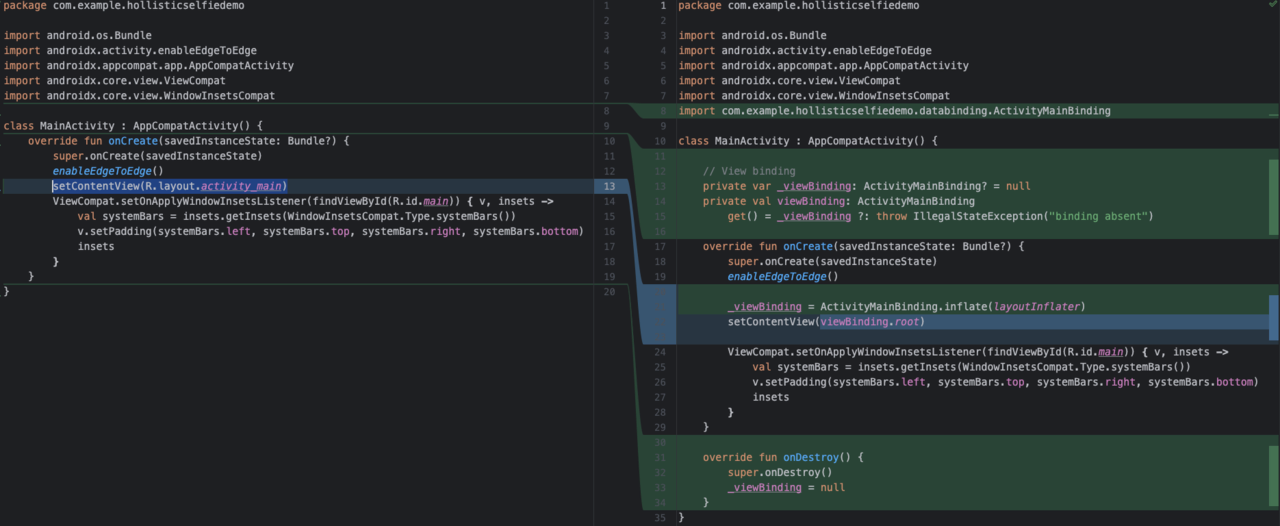 Figure 5: View Binding.
Configure CameraX preview
- Within the layout file
activity_main.xml, replace the placeholder “Hello World!” inTextViewwith a camera preview view:
    <androidx.camera.view.PreviewView
        android:id="@+id/view_finder"
        android:layout_width="match_parent"
        android:layout_height="match_parent"
        app:scaleType="fillStart" />
- Add the following member variables to
MainActivity.ktto store camera-related objects:
    // Camera
    private var camera: Camera? = null
    private var cameraProvider: ProcessCameraProvider? = null
    private var preview: Preview? = null
- Add two new private methods named
setupCamera()andbindCameraUseCases()withinMainActivity.kt:
    private fun setupCamera() {
        viewBinding.viewFinder.post {
            cameraProvider?.unbindAll()

            ProcessCameraProvider.getInstance(baseContext).let {
                it.addListener(
                    {
                        cameraProvider = it.get()

                        bindCameraUseCases()
                    },
                    Dispatchers.Main.asExecutor()
                )
            }
        }
    }

    private fun bindCameraUseCases() {
        // TODO: TO BE IMPLEMENTED
    }
- Implement the
bindCameraUseCases()method:
private fun bindCameraUseCases() {
        val cameraProvider = cameraProvider
            ?: throw IllegalStateException("Camera initialization failed.")

        val cameraSelector =
            CameraSelector.Builder().requireLensFacing(CameraSelector.LENS_FACING_FRONT).build()

        // Only using the 4:3 ratio because this is the closest to MediaPipe models
        val resolutionSelector =
            ResolutionSelector.Builder()
                .setAspectRatioStrategy(AspectRatioStrategy.RATIO_4_3_FALLBACK_AUTO_STRATEGY)
                .build()
        val targetRotation = viewBinding.viewFinder.display.rotation

        // Preview usecase.
        preview = Preview.Builder()
            .setResolutionSelector(resolutionSelector)
            .setTargetRotation(targetRotation)
            .build()

        // Must unbind the use-cases before rebinding them
        cameraProvider.unbindAll()

        try {
            // A variable number of use-cases can be passed here -
            // camera provides access to CameraControl & CameraInfo
            camera = cameraProvider.bindToLifecycle(
                this, cameraSelector, preview,
            )

            // Attach the viewfinder's surface provider to preview use case
            preview?.surfaceProvider = viewBinding.viewFinder.surfaceProvider
        } catch (exc: Exception) {
            Log.e(TAG, "Use case binding failed", exc)
        }
    }
- Add a
companion object
to
MainActivity.kt, and declare aTAGconstant value forLogcalls to work correctly. This companion object is useful in enabling you to define all the constants and shared values accessible across the entire class.
    companion object {
        private const val TAG = "MainActivity"
    }
In the next section, you will build and run the app to ensure that the camera works as expected.