Build high-performance image processing with Halide on Android
Introduction
Install and configure Halide for Arm development
Build a simple camera image processing workflow
Apply operator fusion in Halide for real-time image processing
Generate optimized Halide pipelines for Android using ahead-of-time cross-compilation
Integrate Halide into an Android project with Kotlin
Next Steps
What you’ll build
In this section, you will build a real-time camera processing pipeline using Halide:
First, you will capture video frames from a webcam using OpenCV, implement a Gaussian (binomial) blur to smooth the captured images, followed by thresholding to create a clear binary output highlighting prominent image features.
Next, you will measure performance and explore Halide’s scheduling options: parallelization and tiling. Each technique improves throughput in a different way.
Implement Gaussian blur and thresholding
To get started, create a new camera-capture.cpp file and copy and paste in the contents below:
#include "Halide.h"
#include <opencv2/opencv.hpp>
#include <iostream>
#include <string>
#include <cstdint>
#include <exception>

using namespace Halide;
using namespace cv;
using namespace std;

int main() {
    // Open the default camera.
    VideoCapture cap(0);
    if (!cap.isOpened()) {
        cerr << "Error: Unable to open camera.\n";
        return -1;
    }

    // Grab one frame to determine dimensions and channels
    Mat frame;
    cap >> frame;
    if (frame.empty()) {
        cerr << "Error: empty first frame.\n";
        return -1;
    }

    // Ensure BGR 3-channel layout
    if (frame.channels() == 4)
        cvtColor(frame, frame, COLOR_BGRA2BGR);
    else if (frame.channels() == 1)
        cvtColor(frame, frame, COLOR_GRAY2BGR);
    if (!frame.isContinuous())
        frame = frame.clone();

    const int width  = frame.cols;
    const int height = frame.rows;
    const int ch     = frame.channels();

    // Input
    ImageParam input(UInt(8), 3, "input");
    input.dim(0).set_stride(ch);  // interleaved: x stride = channels
    input.dim(2).set_stride(1);
    input.dim(2).set_bounds(0, 3);

    // Clamp borders
    Func inputClamped = BoundaryConditions::repeat_edge(input);

    // Grayscale conversion (Rec.601 weights)
    Var x("x"), y("y");
    Func gray("gray");
    gray(x, y) = cast<uint8_t>(0.114f * inputClamped(x, y, 0) +
                               0.587f * inputClamped(x, y, 1) +
                               0.299f * inputClamped(x, y, 2));

    // 3×3 binomial blur
    Func blur("blur");
    const uint16_t k[3][3] = {{1,2,1},{2,4,2},{1,2,1}};
    Expr sum = cast<uint16_t>(0);
    for (int j = 0; j < 3; ++j)
        for (int i = 0; i < 3; ++i)
            sum += cast<uint16_t>(gray(x + i - 1, y + j - 1)) * k[j][i];
    blur(x, y) = cast<uint8_t>(sum / 16);

    // Threshold fused with blur
    Func output("output");
    Expr T = cast<uint8_t>(128);
    output(x, y) = select(blur(x, y) > T, cast<uint8_t>(255), cast<uint8_t>(0));

    // Allocate output buffer once
    Buffer<uint8_t> outBuf(width, height);

    // JIT compile once outside the loop
    Pipeline pipe(output);
    pipe.compile_jit();

    namedWindow("Processing Workflow", WINDOW_NORMAL);

    while (true) {
        cap >> frame;
        if (frame.empty()) break;
        if (frame.channels() == 4)
            cvtColor(frame, frame, COLOR_BGRA2BGR);
        else if (frame.channels() == 1)
            cvtColor(frame, frame, COLOR_GRAY2BGR);
        if (!frame.isContinuous())
            frame = frame.clone();

        // Use Halide::Buffer::make_interleaved directly
        Buffer<uint8_t> inputBuf =
            Buffer<uint8_t>::make_interleaved(frame.data, frame.cols, frame.rows, frame.channels());

        input.set(inputBuf);

        try {
            pipe.realize(outBuf);
        } catch (const Halide::RuntimeError& e) {
            cerr << "Halide runtime error: " << e.what() << "\n";
            break;
        } catch (const std::exception& e) {
            cerr << "std::exception: " << e.what() << "\n";
            break;
        }

        // Display
        Mat view(height, width, CV_8UC1, outBuf.data());
        imshow("Processing Workflow", view);
        if (waitKey(1) >= 0) break;
    }

    destroyAllWindows();
    return 0;
}
The camera delivers interleaved BGR frames. You convert them to grayscale using Rec.601 weights, apply a 3×3 binomial blur (with 16-bit accumulation and division by 16), and then threshold to create a binary image.
Compile the pipeline once before the capture loop starts, then call realize() each frame for real-time processing.
A 3×3 filter needs neighbors (x±1, y±1). At the image edges, some taps fall outside the valid region. Rather than scattering manual clamps across expressions, wrap the input once:
// Wrap the input so out-of-bounds reads replicate the nearest edge pixel.
Func inputClamped = BoundaryConditions::repeat_edge(input);
Any out-of-bounds access replicates the nearest edge pixel. This makes the boundary policy obvious, keeps expressions clean, and ensures all downstream stages behave consistently at the edges.
Halide converts the image to grayscale using Rec.601 weights. Read B, G, R from the interleaved input and compute luminance:
// Grayscale (Rec.601)
Var x("x"), y("y");
Func gray("gray");
gray(x, y) = cast<uint8_t>(0.114f * inputClamped(x, y, 0) +    // B
                           0.587f * inputClamped(x, y, 1) +    // G
                           0.299f * inputClamped(x, y, 2));    // R
Next, the pipeline applies a Gaussian-approximate (binomial) blur using a fixed 3×3 kernel. Implement it with small loops and 16-bit accumulation for safety:
Func blur("blur");
const uint16_t k[3][3] = {{1,2,1},{2,4,2},{1,2,1}};  // sum = 16
Expr sum = cast<uint16_t>(0);
for (int j = 0; j < 3; ++j)
    for (int i = 0; i < 3; ++i)
        sum += cast<uint16_t>(gray(x + i - 1, y + j - 1)) * k[j][i];
blur(x, y) = cast<uint8_t>(sum / 16);
This binomial kernel smooths images effectively while staying lightweight. Its weights closely match a Gaussian distribution, so it reduces noise but preserves edges better than a simple box filter. This makes it a fast and practical way to approximate Gaussian blur in real-time image processing.
After the blur, the pipeline applies thresholding to produce a binary image. Explicitly cast constants to uint8_t to remove ambiguity and avoid redundant widen/narrow operations in generated code:
Func output("output");
    Expr T = cast<uint8_t>(128);
    output(x, y) = select(blur(x, y) > T, cast<uint8_t>(255), cast<uint8_t>(0));
This step emphasizes strong edges and regions of high contrast, providing a building block for segmentation and feature extraction pipelines.
Halide generates the final output, and OpenCV displays it. Build the pipeline once (outside the capture loop), and then realize each frame:
// Build the pipeline once (outside the capture loop)
Buffer<uint8_t> outBuf(width, height);
Pipeline pipe(output);
pipe.compile_jit();

// Per frame
pipe.realize(outBuf);
Mat view(height, width, CV_8UC1, outBuf.data());
imshow("Processing Workflow", view);
The main loop continues capturing frames, running the Halide pipeline, and displaying the processed output in real time until a key is pressed. This illustrates how Halide integrates cleanly with OpenCV to build efficient, interactive image-processing applications.
Compile and run the program
Compile the program as follows (replace /path/to/halide accordingly):
g++ -std=c++17 camera-capture.cpp -o camera-capture \
    -I/path/to/halide/include -L/path/to/halide/lib -lHalide \
    $(pkg-config --cflags --libs opencv4) -lpthread -ldl \
    -Wl,-rpath,/path/to/halide/lib
Run the executable:
./camera-capture
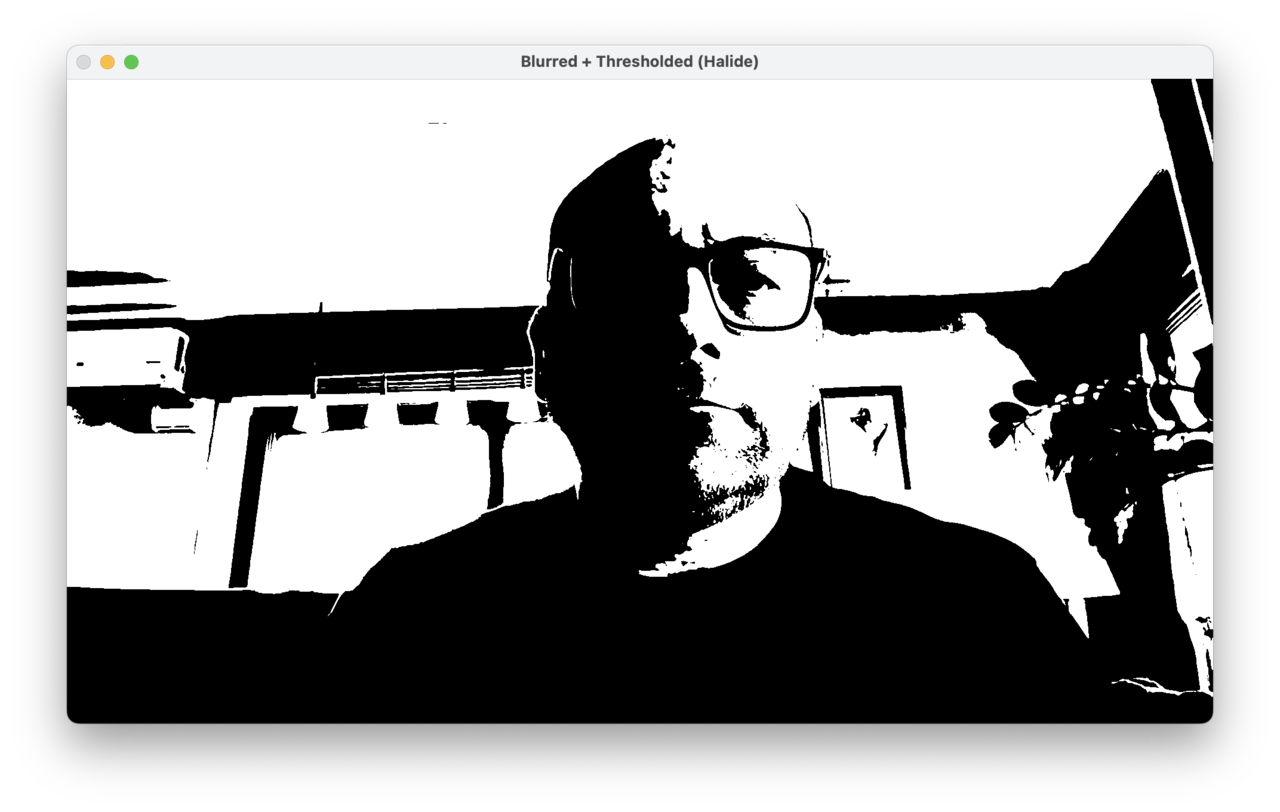
The output should look similar to the figure below:
Parallelization and tiling
In this section, you will explore two scheduling optimizations that Halide provides: parallelization and tiling. Each technique improves performance in a different way. Parallelization uses multiple CPU cores, while tiling optimizes cache efficiency through better data locality.
You will learn how to use each technique separately for clarity and to emphasize their distinct benefits.
Establish baseline performance
Before applying any scheduling optimizations, establish a measurable baseline. Create a second file, camera-capture-perf-measurement.cpp, that runs the same grayscale → blur → threshold pipeline but prints per-frame timing, FPS, and MPix/s around the Halide realize() call. This lets you quantify each optimization you add next (parallelization, tiling, caching).
Create camera-capture-perf-measurement.cpp with the following code:
#include "Halide.h"
#include <opencv2/opencv.hpp>
#include <iostream>
#include <string>
#include <cstdint>
#include <exception>
#include <chrono>
#include <iomanip>

using namespace Halide;
using namespace cv;
using namespace std;

int main() {
    // Open the default camera.
    VideoCapture cap(0);
    if (!cap.isOpened()) {
        cerr << "Error: Unable to open camera.\n";
        return -1;
    }

    // Grab one frame to determine dimensions and channels
    Mat frame;
    cap >> frame;
    if (frame.empty()) {
        cerr << "Error: empty first frame.\n";
        return -1;
    }

    // Ensure BGR 3-channel layout
    if (frame.channels() == 4)      cvtColor(frame, frame, COLOR_BGRA2BGR);
    else if (frame.channels() == 1) cvtColor(frame, frame, COLOR_GRAY2BGR);
    if (!frame.isContinuous())      frame = frame.clone();

    const int width  = frame.cols;
    const int height = frame.rows;
    const int ch     = frame.channels();

    // Build the pipeline once (outside the capture loop)
    ImageParam input(UInt(8), 3, "input");
    input.dim(0).set_stride(ch);  // interleaved: x stride = channels
    input.dim(2).set_stride(1);
    input.dim(2).set_bounds(0, 3);

    // Clamp borders
    Func inputClamped = BoundaryConditions::repeat_edge(input);

    // Grayscale conversion (Rec.601 weights)
    Var x("x"), y("y");
    Func gray("gray");
    gray(x, y) = cast<uint8_t>(0.114f * inputClamped(x, y, 0) +
                               0.587f * inputClamped(x, y, 1) +
                               0.299f * inputClamped(x, y, 2));

    // 3×3 binomial blur
    Func blur("blur");
    const uint16_t k[3][3] = {{1,2,1},{2,4,2},{1,2,1}};
    Expr sum = cast<uint16_t>(0);
    for (int j = 0; j < 3; ++j)
        for (int i = 0; i < 3; ++i)
            sum += cast<uint16_t>(gray(x + i - 1, y + j - 1)) * k[j][i];
    blur(x, y) = cast<uint8_t>(sum / 16);

    // Threshold (binary)
    Func output("output");
    Expr T = cast<uint8_t>(128);
    output(x, y) = select(blur(x, y) > T, cast<uint8_t>(255), cast<uint8_t>(0));

    // Scheduling
    {
        // Baseline schedule: materialize gray; fuse blur+threshold into output
        gray.compute_root();
    }

    // Allocate output buffer once & JIT once
    Buffer<uint8_t> outBuf(width, height);
    Pipeline pipe(output);
    pipe.compile_jit();

    namedWindow("Processing Workflow", WINDOW_NORMAL);

    bool warmed_up = false;
    for (;;) {
        cap >> frame;
        if (frame.empty()) break;
        if (frame.channels() == 4)      cvtColor(frame, frame, COLOR_BGRA2BGR);
        else if (frame.channels() == 1) cvtColor(frame, frame, COLOR_GRAY2BGR);
        if (!frame.isContinuous())      frame = frame.clone();

        // Use Halide::Buffer::make_interleaved directly
        Buffer<uint8_t> inputBuf =
            Buffer<uint8_t>::make_interleaved(frame.data, frame.cols, frame.rows, frame.channels());
        input.set(inputBuf);

        // Performance timing strictly around realize()
        auto t0 = chrono::high_resolution_clock::now();
        pipe.realize(outBuf);
        auto t1 = chrono::high_resolution_clock::now();

        double ms = chrono::duration<double, milli>(t1 - t0).count();
        double fps = ms > 0.0 ? 1000.0 / ms : 0.0;
        double mpixps = ms > 0.0 ? (double(width) * double(height)) / (ms * 1000.0) : 0.0;

        cout << fixed << setprecision(2)
             << (warmed_up ? "" : "[warm-up] ")
             << "realize: " << ms << " ms  |  "
             << fps << " FPS  |  "
             << mpixps << " MPix/s\r" << flush;
        warmed_up = true;

        // Display
        Mat view(height, width, CV_8UC1, outBuf.data());
        imshow("Processing Workflow", view);
        if (waitKey(1) >= 0) break;
    }

    cout << "\n";
    destroyAllWindows();
    return 0;
}
- The console prints ms, FPS, and MPix/s per frame, measured strictly around realize() (camera capture and UI are excluded).
- The first frame is labeled [warm-up] because it includes Halide’s JIT compilation. You can ignore it when comparing schedules.
- MPix/s = (width*height)/seconds is a good resolution-agnostic metric to compare schedule variants.
Build and run the application. Here is the sample output:
% ./camera-capture-perf-measurement
realize: 3.98 ms  |  251.51 FPS  |  521.52 MPix/s
This gives an FPS of 251.51, and average throughput of 521.52 MPix/s. Now you can start measuring potential improvements from scheduling.
Apply parallelization
Parallelization allows Halide to process different parts of the image at the same time using multiple CPU cores. In image processing pipelines, each row or block of rows can be handled independently once the input data is ready. By spreading the work across several cores, you reduce the total processing time—this is especially important for real-time video applications.
With the baseline measured, apply a minimal schedule that parallelizes the loop iteration for y axis.
Add these lines after defining output(x, y) (and before any realize()). In this sample code, replace the existing scheduling block.
// Scheduling
{
    // parallelize across scanlines
    gray.compute_root().parallel(y);
    output.compute_root().parallel(y);
}
This does two important things:
compute_root()on gray divides the entire processing into two loops, one to compute the entire gray output, and the other to compute the final output.parallel(y)parallelizes over the pure loop variable y (rows). The rows are computed on different CPU cores in parallel. Now rebuild and run the application. You should see output similar to:
realize: 1.16 ms | 864.15 FPS | 1791.90 MPix/s
This shows a significant speedup from parallelization. The exact numbers depend on your Arm CPU and how many cores are available.
        % ./camera-capture-perf-measurement
realize: 1.16 ms  |  864.15 FPS  |  1791.90 MPix/s
The performance gain by parallelization depends on how many CPU cores are available for this application to occupy.
Apply tiling for cache efficiency
Tiling is a scheduling technique that divides computations into smaller, cache-friendly blocks or tiles. This approach significantly enhances data locality, reduces memory bandwidth usage, and leverages CPU caches more efficiently. While tiling can also use parallel execution, its primary advantage comes from optimizing intermediate data storage.
Tiling divides the image into smaller, cache-friendly blocks called tiles. This gives you two main benefits:
- Partitioning: tiles are easy to process in parallel, so you can spread the work across multiple CPU cores.
- Locality: by caching intermediate results within each tile, you avoid repeating calculations and make better use of the CPU cache.
Try both methods to see how they improve performance.
Cache intermediates per tile
This approach caches gray once per tile so the 3×3 blur can reuse it instead of recomputing RGB to gray up to 9× per output pixel. This provides the best cache efficiency.
// Scheduling
{
    Halide::Var xo("xo"), yo("yo"), xi("xi"), yi("yi");

    // Tile & parallelize the consumer
    output
        .tile(x, y, xo, yo, xi, yi, 128, 64)
        .parallel(yo);

    // Cache RGB→gray per tile
    gray
        .compute_at(output, xo)
        .store_at(output, xo);
}
In this scheduling:
tile(…) splits the image into cache-friendly blocks and makes it easy to parallelize across tilesparallel(yo)distributes tiles across CPU cores where a CPU core is in charge of a row (yo) of tilesgray.compute_at(...).store_at(...)materializes a tile-local planar buffer for the grayscale intermediate so blur can reuse it within the tile
Recompile your application as before, then run.
Here’s sample output:
realize: 0.98 ms | 1023.15 FPS | 2121.60 MPix/s
Caching the grayscale image for each tile gives the best performance. By storing the intermediate grayscale result in a tile-local buffer, Halide can reuse it efficiently during the blur step. This reduces redundant computations and makes better use of the CPU cache, resulting in faster processing.
Choose a scheduling strategy
There isn’t a universal scheduling strategy that guarantees the best performance for every pipeline or device. The optimal approach depends on your specific image-processing workflow and the Arm architecture you’re targeting. Halide’s scheduling API gives you the flexibility to experiment with parallelization, tiling, and caching. Try different combinations to see which delivers the highest throughput and efficiency for your application.
For the example of this application: Start by parallelizing the outermost loop to use multiple CPU cores. This is usually the simplest way to boost performance.
Add tiling and caching if your pipeline includes a spatial filter (such as blur or convolution), or if an intermediate result is reused by several stages. Tiling works best after converting your source data to planar format, or after precomputing a planar grayscale image.
Try parallelization first, then experiment with tiling and caching for further speedups. From there, tune tile sizes and thread count for your target. HL_NUM_THREADS is the environmental variable which allows you to limit the number of threads in-flight.
What you’ve accomplished and what’s next
You built a real-time image processing pipeline using Halide and OpenCV. The workflow included converting camera frames to grayscale, applying a 3×3 binomial blur, and thresholding to create a binary image. You also measured performance to see how different scheduling strategies affect throughput.
- Parallelization lets Halide use multiple CPU cores, speeding up processing by dividing work across rows or tiles.
- Tiling improves cache efficiency, especially when intermediate results are reused often, such as with larger filters or multi-stage pipelines.
By combining these techniques, you achieved faster and more efficient image processing on Arm systems.