Run optimized TinySD image generation from the Arm AI Portal on Arm-powered Android devices
Introduction
Prepare the Android command-line tools for TinySD Studio
Connect an Arm-based Android phone and run TinySD Studio
Run and compare TinySD image generation results
Understand the TinySD Studio Android application
(Optional) Use an image-generation model not currently supported by TinySD Studio
Next Steps
Run optimized TinySD image generation from the Arm AI Portal on Arm-powered Android devices
Introduction
Prepare the Android command-line tools for TinySD Studio
Connect an Arm-based Android phone and run TinySD Studio
Run and compare TinySD image generation results
Understand the TinySD Studio Android application
(Optional) Use an image-generation model not currently supported by TinySD Studio
Next Steps
TinySD Studio adapters
TinySD Studio uses an adapter to connect its shared prompt, seed, model import, and image display interface to a model runtime and the model package’s tokenization, denoising, and decoding requirements. When the application starts, it selects the registered model and chooses the matching adapter automatically.
The supplied TinySdImageGenerationAdapter owns the complete TinySD ExecuTorch workflow. It imports the package, initializes the tokenizer and model runner, generates the image, reports progress, and releases the runtime resources.
An adapter is application code compiled into the APK. Importing a model package doesn’t import executable application code or create another adapter. You’ll examine the adapter implementation on the next page. For the runtime API, see Run ExecuTorch on Android .
Image generation with TinySD Studio
You’ll run TinySD INT8 with ExecuTorch and XNNPACK. The application accepts a text prompt and a whole-number seed, then creates a 512 × 512 image entirely on the Android device.
The model package isn’t included in the APK. The supplied downloader retrieves the optimized ExecuTorch program, tokenizer, and scheduler data, then creates the uncompressed ZIP package expected by the adapter.
Run TinySD with ExecuTorch
Set the Arm model repository ID and run download_model.py from the cloned application directory:
export MODEL_ID="Arm/tiny-sd-int8-xnnpack-executorch-vivo-x300"

export MODEL_PACKAGE="$(.hf-venv/bin/python download_model.py \
  --repo-id "$MODEL_ID" \
  --print-path)"

printf 'Model package: %s\n' "$MODEL_PACKAGE"
$MODEL_ID = "Arm/tiny-sd-int8-xnnpack-executorch-vivo-x300"

$MODEL_PACKAGE = .\.hf-venv\Scripts\python.exe download_model.py `
  --repo-id "$MODEL_ID" `
  --print-path

Write-Output "Model package: $MODEL_PACKAGE"
The downloader creates tinysd_vivo_executorch.zip, which is approximately 1 GB. It contains three files under the entry names required by the Android importer:
huggingface/optimized.pte: the optimized multimethod ExecuTorch programhuggingface/schedule_data.json: constants for the 25-step DPM-Solver++ denoising looptokenizer/tokenizer.json: the CLIP vocabulary and byte-pair encoding rules
Copy the package to the Android Downloads directory:
adb push "$MODEL_PACKAGE" /sdcard/Download/tinysd_vivo_executorch.zip
In TinySD Studio:
- Select Add or change model.
- Open Downloads in the Android document picker.
- Select
tinysd_vivo_executorch.zip. - Keep the application open until it reports Model ready.
The importer checks the required ZIP entries and copies them to application-specific storage. You can delete the ZIP from Downloads after import. The imported files remain until you uninstall the application or clear its storage.
Enter the following prompt:
A watercolor lighthouse on a cliff at sunset
Leave the seed set to 42, then select Generate image.
If Generate image remains unavailable and the application reports less than 7 GB of memory, use a phone that exposes more memory to the application. If you’re using an Arm64 AVD, stop the AVD, configure 8192 MB of RAM, and cold boot it before trying again.
TinySD Studio first runs the text encoder. It reports each of the 25 denoising steps, then runs the VAE decoder. Don’t close the application while generation is running. The first image can take several minutes, and timing varies with the Android device or emulator host.
When generation finishes, the application displays the image, seed, elapsed time, resolution, and runtime:
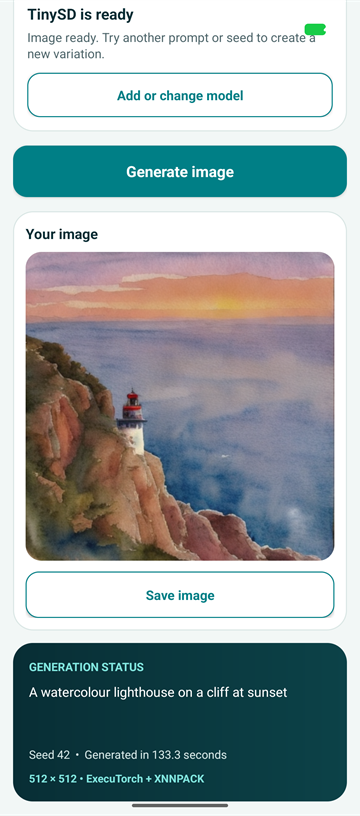 TinySD Studio after generating an image on the Android device
Select Save image. Android opens the document picker with a suggested .png filename. Choose a location such as Downloads, change the filename if needed, and select Save.
Compare another seed
Keep the prompt unchanged, replace the seed with another whole number, and select Generate image again.
Changing only the seed keeps the prompt embeddings the same but starts generation from different latent noise. The result should depict the same requested subject with a different composition or visual details. Reusing the same model, prompt, and seed reproduces the same variation.
This comparison isolates the effect of the seed. You can then change the prompt to see how different text embeddings guide generation.
Use another supported model
TinySD Studio currently has one registered and validated model package. Complete the guided workflow before changing the application or downloader.
| Model | Runtime | Repository | Import package |
|---|---|---|---|
| TinySD INT8 | ExecuTorch with XNNPACK | Arm/tiny-sd-int8-xnnpack-executorch-vivo-x300
| tinysd_vivo_executorch.zip |
The repository also contains an FP32 ExecuTorch program. It isn’t registered or validated with this application, and the downloader deliberately packages the optimized program only.
What you’ve accomplished and what’s next
You’ve downloaded and packaged the optimized TinySD model and imported it into TinySD Studio. You’ve also generated and saved an image locally, and compared the effect of another seed.
Next, you’ll learn how the application resolves the adapter and runs the TinySD image-generation pipeline.