Run optimized object-detection models from the Arm AI Portal on Android
Introduction
Prepare the Android command-line tools for building Scene Detector
Connect an Arm-based Android device and run Scene Detector
Import and run an Arm AI Portal object-detection model
Understand the Scene Detector Android application
(Optional) Use an object-detection model not currently supported by Scene Detector
Next Steps
Run optimized object-detection models from the Arm AI Portal on Android
Introduction
Prepare the Android command-line tools for building Scene Detector
Connect an Arm-based Android device and run Scene Detector
Import and run an Arm AI Portal object-detection model
Understand the Scene Detector Android application
(Optional) Use an object-detection model not currently supported by Scene Detector
Next Steps
Scene Detector adapters
An adapter is application code that connects the shared Android interface to a model task and runtime. Scene Detector supplies separate ExecuTorch and LiteRT adapters. Each adapter selects the preprocessing, precision settings, and output decoder associated with the imported filename.
The model runs locally on the Android CPU. The application doesn’t upload the selected image or camera frames to a server.
Object detection in Scene Detector
Image classification assigns one or more labels to an entire image. Object detection also identifies where objects appear by returning a class, confidence score, and bounding box for each retained detection. A single street image can therefore contain separate detections for people, bicycles, motorcycles, and cars.
The confidence threshold controls which detections are displayed. Increasing the threshold removes lower-confidence boxes. Decreasing the threshold can retain more objects and more false positives.
Start with YOLOv8s because it provides the shortest path to a result. You can use another supported model after completing the default workflow. Run the commands from the project directory in the same terminal session that you used during setup.
Arm AI Portal models are hosted on Hugging Face. The download_model.py script uses huggingface_hub and connects to https://huggingface.co by default.
Run YOLOv8s with ExecuTorch
Set MODEL_ID to the repository ID for the default YOLOv8s model:
export MODEL_ID="Arm/yolov8s-int8-xnnpack-executorch"
$MODEL_ID = "Arm/yolov8s-int8-xnnpack-executorch"
Download the model:
export MODEL_FILE="$(.hf-venv/bin/python download_model.py \
  --repo-id "$MODEL_ID" \
  --print-path)"

printf 'Model file: %s\n' "$MODEL_FILE"
$MODEL_FILE = .\.hf-venv\Scripts\python.exe download_model.py `
  --repo-id "$MODEL_ID" `
  --print-path

Write-Output "Model file: $MODEL_FILE"
The downloader selects yolov8s_raspberry_executorch_optimized.pte, the filename recognized by Scene Detector. Keep the filename unchanged because the application uses it to select the YOLOv8 preprocessing and decoder.
Copy the model to the phone’s Downloads directory:
adb push "$MODEL_FILE" /sdcard/Download/
Copy the sample image to Android
Download the
street-scene image
from Wikimedia Commons and save it as street-scene.jpg. The image contains pedestrians, bicycles, a motorcycle, and cars, which gives the detector several object classes to find.
The image is by Jonas Kimmich and is licensed under CC BY-SA 4.0 .
Download the sample image:
curl --fail --location --output street-scene.jpg "https://upload.wikimedia.org/wikipedia/commons/thumb/7/71/DSC_6799-_a_man_riding_a_motorcycle_down_a_street_next_to_a_parked_car.jpg/1280px-DSC_6799-_a_man_riding_a_motorcycle_down_a_street_next_to_a_parked_car.jpg"
curl.exe --fail --location --output street-scene.jpg "https://upload.wikimedia.org/wikipedia/commons/thumb/7/71/DSC_6799-_a_man_riding_a_motorcycle_down_a_street_next_to_a_parked_car.jpg/1280px-DSC_6799-_a_man_riding_a_motorcycle_down_a_street_next_to_a_parked_car.jpg"
Copy the image to the phone:
adb push street-scene.jpg /sdcard/Download/
To use a different JPEG or PNG image, replace street-scene.jpg in the adb push command with its path. You can also skip the copy command and select an image already stored on the phone or emulator.
Run object detection
In Scene Detector:
- Select Add or change model and choose the
.ptefile from Downloads. - Select Choose saved image and choose
street-scene.jpgfrom Downloads. - Keep the default
75%confidence threshold for the first run. - Select Detect objects.
The application runs detection once and displays the annotated image, detected objects, confidence scores, and processing time.
The output is similar to:
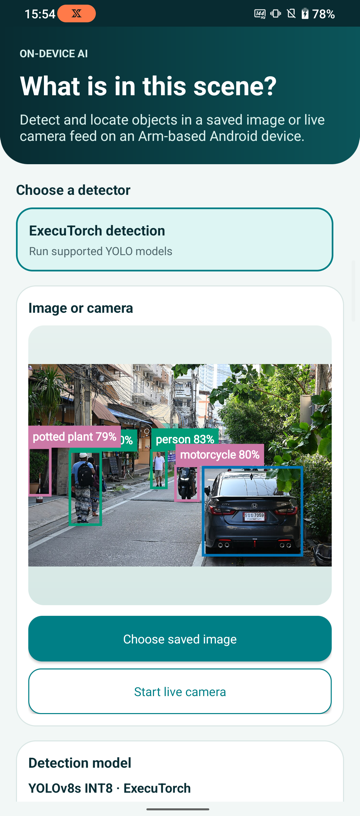 Scene Detector analyzing the sample street image with YOLOv8s
Increase the confidence threshold to remove more lower-scoring boxes. Reduce it if the model doesn’t display expected objects.
Reducing the threshold can increase false positives and the amount of work passed to non-maximum suppression.
Use the live camera
On the phone, select Start live camera and allow camera access. The application uses the most recent camera frame and drops queued frames while inference is running. Dropping queued frames prevents a slow detector from building an increasingly delayed frame queue.
The live-camera view draws each retained label, confidence score, and bounding box over the preview.
Camera behavior on an emulator depends on its configured front and back camera sources. Use the saved-image workflow when the emulator doesn’t expose a useful camera feed.
Run YOLO26n FP16 with LiteRT
The supplied LiteRT adapter supports the additional .tflite YOLO models from the Arm AI Portal. Start with YOLO26n FP16 to use the XNNPACK FP16 execution path selected by the model profile.
Set MODEL_ID to the YOLO26n FP16 repository ID:
export MODEL_ID="Arm/yolo26n-fp16-litert"
$MODEL_ID = "Arm/yolo26n-fp16-litert"
Download and copy the model to the phone:
export MODEL_FILE="$(.hf-venv/bin/python download_model.py \
  --repo-id "$MODEL_ID" \
  --print-path)"

adb push "$MODEL_FILE" /sdcard/Download/
$MODEL_FILE = .\.hf-venv\Scripts\python.exe download_model.py `
  --repo-id "$MODEL_ID" `
  --print-path

adb push "$MODEL_FILE" /sdcard/Download/
The downloader selects yolo26n_conv2d_f16_weights.tflite. Keep the filename unchanged so Scene Detector can select the YOLO26 FP16 profile.
In Scene Detector:
- Select LiteRT detection.
- Select Add or change model and choose
yolo26n_conv2d_f16_weights.tflite. - Select Choose saved image and choose
street-scene.jpg. - Keep the default
25%confidence threshold. - Select Detect objects.
The Java adapter configures LiteRT CPU execution with XNNPACK’s force-FP16 flag. It letterboxes the image to 640 × 640, runs the model, decodes [x1, y1, x2, y2, confidence, class] rows, and applies class-aware non-maximum suppression.
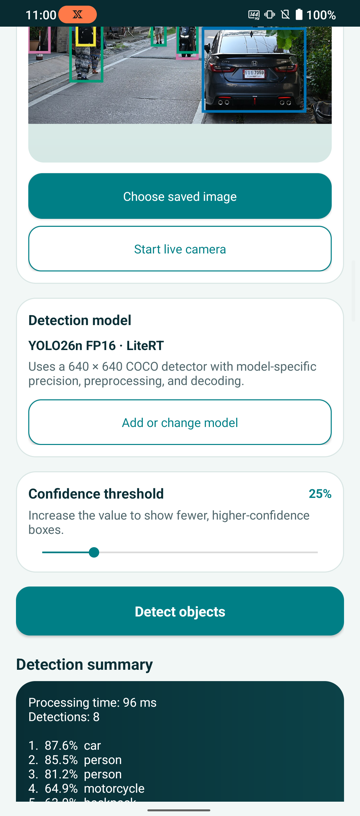 YOLO26n FP16 LiteRT detection on the sample street image
Use another supported model
Scene Detector also supports the following Arm AI Portal model packages:
| Model | Runtime | Repository ID | Import this file | Detector strategy |
|---|---|---|---|---|
| YOLOv5s INT8 | ExecuTorch | Arm/yolov5s-int8-xnnpack-executorch | yolov5s_raspberry_executorch_optimized.pte | YOLOv5 objectness and class scores |
| YOLOv8s INT8 (default) | ExecuTorch | Arm/yolov8s-int8-xnnpack-executorch | yolov8s_raspberry_executorch_optimized.pte | YOLOv8 candidate decoding |
| YOLOv9s INT8 | ExecuTorch | Arm/yolov9s-int8-xnnpack-executorch | yolov9s_raspberry_executorch_optimized.pte | Letterboxing and multi-label decoding |
| YOLO26n FP16 | LiteRT | Arm/yolo26n-fp16-litert | yolo26n_conv2d_f16_weights.tflite | Forced FP16 execution and six-value detection rows |
| YOLO26n INT8 weight-only | LiteRT | Arm/yolo26n-int8w-litert | yolo26n_conv_fc_f16_int8w.tflite | INT8 weights, FP16 execution, and six-value detection rows |
| YOLO11n INT8 | LiteRT | Arm/yolo11n-int8-litert-vivo-x300 | yolo11n_android_litert_optimized.tflite | INT8 input and [1, 84, 8400] multi-label decoding |
To use one of these models, set MODEL_ID to a repository ID from the table and repeat the download and import workflow.
What you’ve accomplished and what’s next
You’ve run optimized ExecuTorch and LiteRT detectors locally on Android and used the same detection interface with a saved image and live camera feed.
Next, you’ll understand how Scene Detector works.