Run optimized Whisper speech transcription models from the Arm AI Portal on Arm-powered Android devices
Introduction
Prepare the Android command-line tools for building Whisper Journal
Connect an Arm-based Android device and run Whisper Journal
Import and run Arm AI Portal speech recognition models on Android
Understand the Whisper Journal Android application
(Optional) Use a model not currently supported by Whisper Journal
Next Steps
Run optimized Whisper speech transcription models from the Arm AI Portal on Arm-powered Android devices
Introduction
Prepare the Android command-line tools for building Whisper Journal
Connect an Arm-based Android device and run Whisper Journal
Import and run Arm AI Portal speech recognition models on Android
Understand the Whisper Journal Android application
(Optional) Use a model not currently supported by Whisper Journal
Next Steps
Connect an Android phone
Enable Developer options and USB debugging on the phone. Connect the phone to your development computer with USB, unlock it, and accept the debugging authorization prompt.
Verify that the phone is listed in adb:
adb devices -l
The output lists the authorized phone and its device serial. If the phone reports unauthorized, unlock it and accept the debugging prompt. If the phone doesn’t appear, see
Run apps on a hardware device
.
Confirm that the phone uses the Arm64 ABI and runs Android 9 (API 28) or later:
adb shell getprop ro.product.cpu.abi
adb shell getprop ro.build.version.sdk
The first command should print arm64-v8a. The second command should print a version 28 or later.
On Linux, a phone that doesn’t appear in adb might need Android udev rules and membership in the plugdev group. On Windows, you might need the phone manufacturer’s USB driver. You don’t normally need an additional USB driver on macOS.
Clone the application repository
Clone the repository with Git, then enter the project directory:
git clone https://github.com/arm-education/ai-portal-speech-to-text-app.git
cd ai-portal-speech-to-text-app
Run the remaining terminal commands from this project directory.
Prepare the Arm AI Portal model downloader
The sample repository includes a downloader for its supported Arm AI Portal model packages. Create a Python virtual environment and install the Hugging Face Hub package used by the downloader:
python3 -m venv .hf-venv
.hf-venv/bin/python -m pip install --upgrade pip huggingface_hub
python -m venv .hf-venv
.\.hf-venv\Scripts\python.exe -m pip install --upgrade pip huggingface_hub
The later commands invoke the environment’s Python executable directly, so the PowerShell script-execution policy doesn’t need to be changed.
If Python reports that venv is unavailable on Debian or Ubuntu, install the python3-venv package and rerun the command.
Build and run the Whisper Journal application
Use the Gradle wrapper to build and lint the debug Android package (APK):
chmod +x gradlew
./gradlew :app:assembleDebug :app:lintDebug
.\gradlew.bat :app:assembleDebug :app:lintDebug
You don’t need to install Gradle separately because the repository includes the wrapper.
Install the APK and start Whisper Journal with the commands used on every operating system:
adb install -r app/build/outputs/apk/debug/app-debug.apk
adb shell am start -n org.arm.learningpath.whisper/.MainActivity
On a first install, Whisper Journal opens with recording disabled because no model has been imported. Installing with adb install -r preserves any model imported previously.
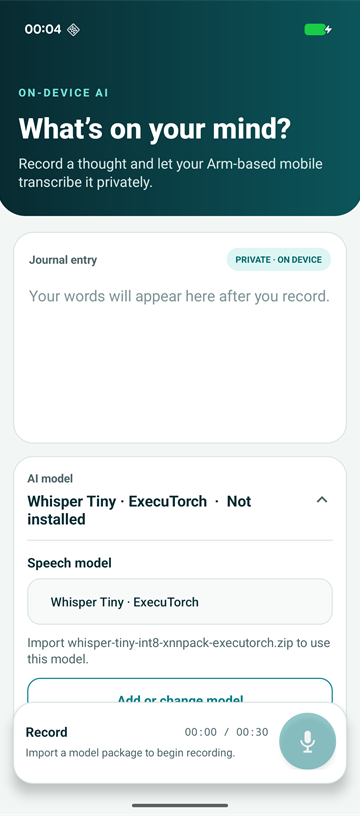 Whisper Journal before a model is imported
What you’ve accomplished and what’s next
You’ve connected an Arm-based Android phone, prepared the model downloader, and confirmed that Whisper Journal builds and starts.
Next, you’ll download an optimized speech transcription model from the Arm AI Portal and transcribe speech locally.