Build and run Arm Total Solutions for IoT
Introduction
Build and run Open-IoT-SDK examples
Enable AWS connectivity
Review
Next Steps
Build and run Arm Total Solutions for IoT
A key requirement for IoT devices is connectivity. The keyword and speech examples implement AWS cloud connectivity.
You can create an AWS thing (a representation of a device) to send data from a simulated Corstone-300 device to AWS IoT cloud services.
Default build
Build and run the keyword example:
./ats.sh build-n-run keyword
The build will take a few minutes to complete.
The results are output (alongside other data) in the terminal:
        *** ML interface initialised
INFO - For timestamp: 0.000000 (inference #: 0); label: on, score: 0.996127; threshold: 0.700000
ML_HEARD_ON
INFO - For timestamp: 0.500000 (inference #: 1); label: on, score: 0.962542; threshold: 0.700000
INFO - For timestamp: 1.000000 (inference #: 2); label: <none>; threshold: 0.000000
ML UNKNOWN
INFO - For timestamp: 1.500000 (inference #: 3); label: off, score: 0.999030; threshold: 0.700000
ML_HEARD_OFF
...
Use Ctrl+C to stop the simulation.
This confirms your environment is setup correctly to build and run the keyword (and speech) example applications.
Set up an AWS thing
You can send the output data to an AWS thing using
MQTT
.
Open the AWS console in your browser.
In the same AWS region where you launched your Arm Virtual Hardware instance, navigate to IoT Core.
Create IoT policy
An AWS IoT policy defines how your thing can be accessed.
Select
Manage>Security>Policies.Click
Create policyand give it a meaningful name.In the
Policy documentsection, create 4 statements (useAdd new statementbutton to add more) where:
Policy effect=Allow
Policy action = one each of:
iot:Connectiot:Publishiot:Receiveiot:Subscribe
Policy resource will be unique to you, of the form:
arn:aws:iot:<region>:<account-id>:*
For example, if you are in region us-east-1, and your account number is 1111-2222-3333, use:
arn:aws:iot:us-east-1:111122223333:*
- Click
Createto define the policy.
Create an AWS thing
Select
Manage>All devices>Things, and click onCreate things.Select
Create a single thingand give it a meaningful name. ClickNextleaving all other options as default.Select
Auto-generate a new certificateand clickNext.Select the
Policycreated above and clickCreate thing.When prompted, download the
device certificate(.crt) and public and privatekeys(.pem.key) for yourthing. ClickDone.
Observe MQTT data
In your AWS console, click on your thing.
Select the
Activitytab and openMQTT test client.Subscribe to
thingname/ml/inferencewherethingnameis the name from the previous section. You can subscribe to#as a catch-all wildcard if you prefer.Click
Editand enableMQTT payload display>Display payloads as strings (more accurate). ClickConfirm.
Modify code with above credentials
The example applications need to be modified to add the credentials.
Return to your Virtual Hardware terminal.
Modify the 2 .h files to add your information.
bsp/default_credentials/aws_clientcredential.h
Use a text editor to modify these macros with the unique values for your AWS thing.
#define clientcredentialMQTT_BROKER_ENDPOINT "endpointid.amazonaws.com"
where endpointid.amazonaws.com is unique to you, and is given in IoT Core > Settings > Endpoint on your AWS console.
#define clientcredentialIOT_THING_NAME "thingname"
where thingname is the thing created
above
.
Save the file when done.
bsp/default_credentials/aws_clientcredential_keys.h
Use a text editor to modify these macros with the unique values for your AWS thing.
            #define keyCLIENT_CERTIFICATE_PEM \
...
with the contents of the .crt certificate file downloaded
above
. You will need to start and end each line of the certificate with quotations and escape commands:
        "-----BEGIN CERTIFICATE-----\n"\
"1234123412341234123412341234123412341234123412341234123412341234\n"\
"5678567856785678567856785678567856785678567856785678567856785678\n"\
...
"-----END CERTIFICATE-----"
Similarly add the public and private keys (.pem.key), modified as above.
            #define keyCLIENT_PRIVATE_KEY_PEM \
...
#define keyCLIENT_PUBLIC_KEY_PEM \
...
Save the file when done.
Run with MQTT connectivity
Rebuild and run the keyword application.
./ats.sh build-n-run keyword
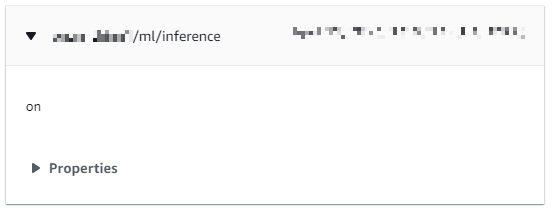
The messages are shown in the terminal as well as in MQTT test client .
        ML_HEARD_ON
109 27329 [ML_MQTT] [INFO] Publish to the MQTT topic <thingname>/ml/inference.
...
Repeat with the speech example
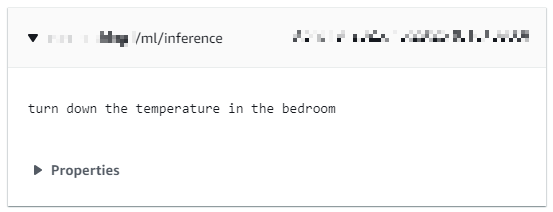
Build and run the speech example.
./ats.sh build-n-run speech
Observe the output on the terminal and your MQTT console.
        INFO - Complete recognition: turn down the temperature in the bedroom
134 14506 [ML_MQTT] [INFO] Publish to the MQTT topic <thingname>/ml/inference.
See the README.md for full details.