Get started with the CMSIS-DSP library
Introduction
What is CMSIS-DSP?
Build example with Keil Studio (VS Code)
Build example with Keil μVision
Review
Next Steps
Get started with the CMSIS-DSP library
If using Keil μVision, go to Build example with Keil μVision .
Clone the repository to get the example code
The source code of the example is available within the CMSIS-DSP Github repository.
Open a command prompt, and navigate to an appropriate folder.
Clone the repository.
git clone https://github.com/ARM-software/CMSIS-DSP
Import example into Keil Studio
Keil Studio projects are based on the CMSIS Solution standard.
The example provided is in μVision .uvprojx format. The Keil Studio VS Code Extensions include functionality to import such projects.
Launch VS Code IDE, and start a New Window (Ctrl + Shift + N).
Select the CMSIS extension, and click on Convert a μVision Project.
Browse to the above cloned repository, and locate the CMSIS-DSP/Examples/ARM/arm_dotproduct_example folder.
Select the arm_dotproduct_example.uvprojx file, and open the newly created csolution.
Configure solution environment
VS Code allows complete configurability of all aspects of the project.
Locate vcpkg-configuration.json within the project. This file defines the components used.
Right-click on this file, and select Configure Arm Tools Environment to open the configuration panel.
From the various pull-downs, ensure that the most up to date versions of the following are selected:
- Arm CMSIS-Toolbox
- Arm Compiler for Embedded
- Arm Debugger
- Arm Virtual Hardware for Cortex-M based on Fast Models
- Kitware’s cmake tool
- Ninja Build
Others can be set as None as they are not needed for this example.
If you open vcpkg-configuration.json in the text editor you will see these set as selected. Close the file to save.
All necessary components will be downloaded and installed as necessary (if not already installed).
Configure CMSIS options
Select CMSIS from the Extensions icon list. You will see the project structure.
Move cursor over the top-level, and click on Manage Software Components. This is the view to add CMSIS Software Packs to your project.
Select CMSIS > Core, CMSIS > DSP, and Device > Startup (these are likely selected by default).
Close this view to save.
Configure build options
Move cursor over the top level project, and click Open File to open the cproject.yml file, which defines the build options for the different targets.
Locate the Link settings for the ARMCM4FP and ARMCM55FPMVE targets (and any other targets you wish to build), and add the following to the linker options list if not already present:
- --entry=Reset_Handler
Configure build context
The imported example includes build targets for various Arm processors.
Click on the Manage Solution Settings gear icon to open the csolution.yml file that defines the project.
Set ARMCM3 as the Active Target.
Click the Build hammer icon to build for Cortex-M3.
Run example on Cortex-M3 FVP
Select Run and Debug from the Extensions icon list.
Click the gear icon to open launch.json. This is the file that defines the debug instance.
Right-click on launch.json and select Open Run and Debug Configuration.
From the Selected Configuration pull-down, select New Configuration > Launch FVP. Edit the Configuration Name if desired.
From the Target > Configuration Database Entry pull-down, select MPS2_Cortex_M3 > Cortex-M3.
Other fields can be left as default. Close the file to save. Observe that launch.json has been updated.
Select this configuration from the Run and Debug pulldown, and Start Debugging (F5).
The FVP will launch with the example code, and stop at main().
Set breakpoint(s) at the while(1); terminations at the end of main().
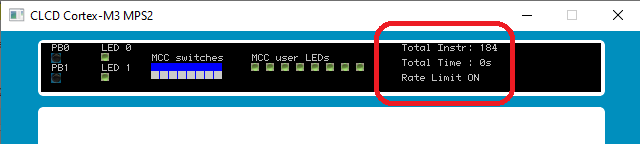
Note the number of instructions executed to this point, as shown in the FVP display (184 in the example below):
Click Continue (or press F5) to run the example to this breakpoint, and stop.
Note the number of instructions executed, and subtract the initialization cycle count.
Terminate the debug session (Stop button, Ctrl+F5).
Run example on Cortex-M55 FVP
We will now build for the ARMCM55_FP_MVE target (build for Cortex-M55). This build makes use of the
Helium
vectorizing extensions that Cortex-M55 supports.
Repeat the steps above to
build
for ARMCM55FPMVE.
Repeat the steps above to
run
on Corstone-300 FVP.
If the Corstone-300 FVP is not available in the pulldown, you will need to manually configure in launch.json. Note the cdbEntry line in the below.
                "configurations": [
        {
            "name": "M55",
            "type": "arm-debugger.fvp",
            "request": "launch",
            "program": "${command:arm-debugger.getApplicationFile}",
            "cdbEntry": "Arm SubSystem FVP::Corstone SSE-300 Ethos-U55 (MPS3)::Bare Metal Debug::Bare Metal Debug::Cortex-M55"
        },
    ]
You should be a dramatic performance improvement over Cortex-M3.
The FVPs are instruction accurate but not cycle accurate.
The instruction count is used here to illustrate relative performance to a high granularity.