Create OpenCV applications on Windows on Arm
Introduction
OpenCV and Compilers for Windows on Arm
Setup
Build OpenCV Applications with Clang
Build OpenCV Applications with MSVC
Next Steps
Create OpenCV applications on Windows on Arm
How do I build OpenCV with MSVC?
Follow these steps to build OpenCV and a test application using the library with the MSVC compiler.
Clone the OpenCV repository
Open up a Windows PowerShell and checkout the source tree:
git clone https://github.com/opencv/opencv
cd opencv
git checkout tags/4.10.0
You might be able to use a later version, but these steps have been tested with version 4.10.0.
Pre-build configuration
You can use CMake from the command line.
First, run the following command to run the pre-build configuration:
mkdir build_msvc
cd build_msvc

cmake `
-S .. `
-B . `
-G "Visual Studio 17 2022" `
-DCMAKE_BUILD_TYPE=Release `
-DBUILD_opencv_world=ON `
-DWITH_ITT=OFF `
-DWITH_OPENCL=OFF `
-DWITH_OPENCLAMDBLAS=OFF `
-DWITH_OPENCLAMDFFT=OFF `
-DWITH_OPENCL_D3D11_NV=OFF `
-DWITH_DIRECTML=OFF `
-DWITH_DIRECTX=OFF `
-DWITH_ADE=OFF `
-DWITH_CAROTENE=OFF
The given options in the code above specify the following:
- The source code is located one level above the current directory.
- The build will be performed in the current directory.
- The Visual Studio 2022 MSVC compiler will be used as the compiler.
- The compiled library is generated as a single file that includes all of OpenCV’s functionality.
- Unnecessary options have been disabled, assuming processing on Arm CPUs.
If the configuration is successful, a message similar to the following should be displayed at the end of the execution:
        -- General configuration for OpenCV 4.10.0 =====================================
--   Version control:               4.10.0
--
--   Platform:
--     Timestamp:                   2024-11-08T08:50:24Z
--     Host:                        Windows 10.0.22631 ARM64
--     CMake:                       3.28.1
--     CMake generator:             Visual Studio 17 2022
--     CMake build tool:            C:/Program Files/Microsoft Visual Studio/2022/Professional/MSBuild/Current/Bin/arm64/MSBuild.exe
--     MSVC:                        1941
--     Configuration:               Debug Release
--
--   CPU/HW features:
--     Baseline:                    NEON
--       requested:                 NEON FP16
--     Dispatched code generation:  NEON_DOTPROD NEON_FP16
--       requested:                 NEON_FP16 NEON_BF16 NEON_DOTPROD
--       NEON_DOTPROD (1 files):    + NEON_DOTPROD
--       NEON_FP16 (2 files):       + NEON_FP16
--
--   C/C++:
--     Built as dynamic libs?:      YES
--     C++ standard:                11
--     C++ Compiler:                C:/Program Files/Microsoft Visual Studio/2022/Professional/VC/Tools/MSVC/14.41.34120/bin/Hostarm64/arm64/cl.exe  (ver 19.41.34123.0)
[...]
--     C Compiler:                  C:/Program Files/Microsoft Visual Studio/2022/Professional/VC/Tools/MSVC/14.41.34120/bin/Hostarm64/arm64/cl.exe
[...]
--   Install to:                    C:/Users/username/work/opencv/build_msvc/install
-- -----------------------------------------------------------------
--
-- Configuring done (97.5s)
-- Generating done (2.8s)
-- Build files have been written to: C:/Users/username/work/opencv/build_msvc
Build and install
Run the following commands to build and install OpenCV:
cmake --build . --config Release
cmake --build . --target INSTALL --config Release
The build takes approximately 25 mins on a Lenovo X13s.
When you have completed the build and installation steps, confirm the shared library has been created by inspecting the results in the install/bin directory:
        ls ./install/x64/vc17/bin
__output__    Directory: C:\Users\username\work\opencv\build_msvc\install\x64\vc17\bin
__output__Mode                 LastWriteTime         Length Name
__output__----                 -------------         ------ ----
__output__-a----        08/11/2024     09:03          43008 opencv_annotation.exe
__output__-a----        08/11/2024     09:03         143872 opencv_interactive-calibration.exe
__output__-a----        08/11/2024     09:03          41984 opencv_model_diagnostics.exe
__output__-a----        08/11/2024     09:12          36864 opencv_version.exe
__output__-a----        08/11/2024     09:12          35328 opencv_version_win32.exe
__output__-a----        08/11/2024     08:50       26391552 opencv_videoio_ffmpeg4100_64.dll
__output__-a----        08/11/2024     09:12          56320 opencv_visualisation.exe
__output__-a----        08/11/2024     09:03       27179008 opencv_world4100.dll
Also inspect the install/lib directory:
        ls ./install/x64/vc17/lib
__output__    Directory: C:\Users\username\work\opencv\build_msvc\install\x64\vc17\lib
__output__Mode                 LastWriteTime         Length Name
__output__----                 -------------         ------ ----
__output__-a----        08/11/2024     08:50            434 OpenCVConfig-version.cmake
__output__-a----        08/11/2024     08:50          15260 OpenCVConfig.cmake
__output__-a----        08/11/2024     08:50            972 OpenCVModules-release.cmake
__output__-a----        08/11/2024     08:50           3879 OpenCVModules.cmake
__output__-a----        08/11/2024     09:02        2849862 opencv_world4100.lib
The library used in your application is opencv_world<version>.lib/dll.
Once the library files are correctly generated, run the following command to ensure that there are no errors.
        ./install/x64/vc17/bin/opencv_version.exe
__output__4.10.0
The generated directory name contains “x64,” but there is no need to worry as the libraries and executable files will definitely run as AArch64.
Build OpenCV Applications
Once the OpenCV library has been successfully created, the next step is to link it to a simple application and try using it.
Create a new project in Visual Studio
First, create a new project in Visual Studio.
Launch Visual Studio, click Create a new project on the initial screen, then select Empty Project, and click Next.
On the next screen, set the Project name and Location. You can choose any name and location, but for this example, name the project TestOpenCV, as shown below.
Click Create to generate the new project.
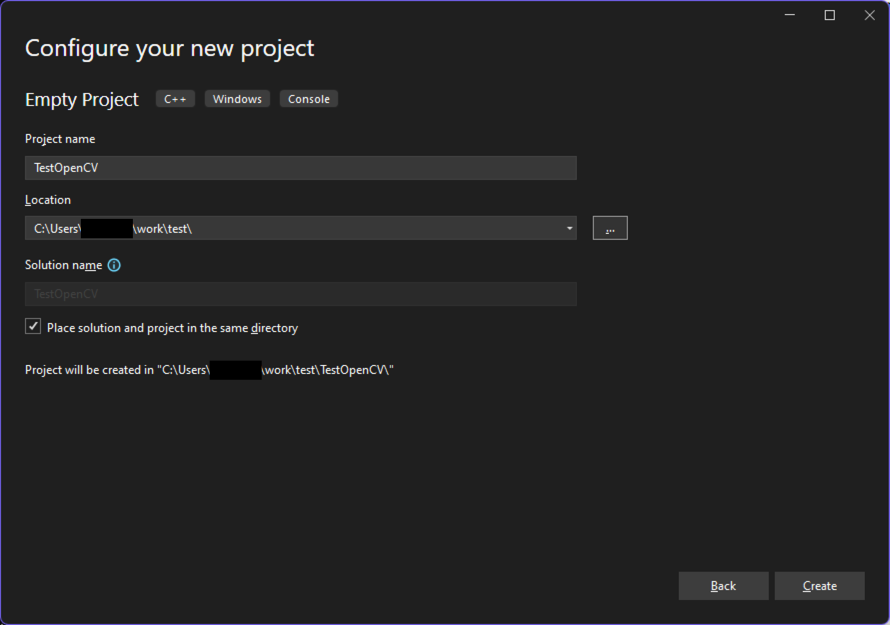 Create a new project
Add source code
In Solution Explorer, right-click the Source Files folder, select Add, and then New Item…. Create a file named test_opencv.cpp.
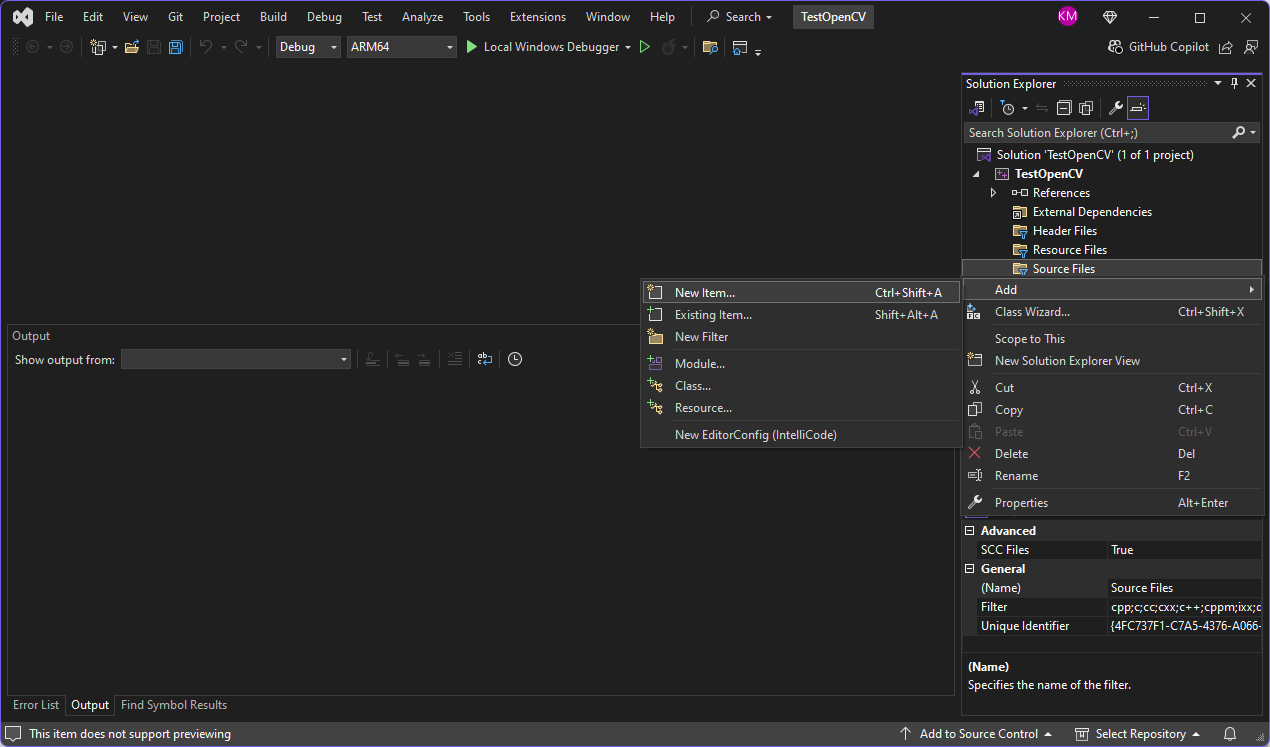 Add a source file
Once the file is created, it opens in the editor.
Copy and paste the following program into it and save the file.
#include <opencv2/opencv.hpp>
#include <iostream>
int main() {
    cv::Mat image = cv::Mat::zeros(100, 100, CV_8UC3);
    if (image.empty()) {
        std::cout << "Failed to create an image!" << std::endl;
        return -1;
    }
    cv::circle(image, cv::Point(50, 50), 30, cv::Scalar(255, 0, 0), -1);
    cv::imwrite("test_image.png", image);
    cv::waitKey(0);
    return 0;
}
This program is a simple example that uses OpenCV to do the following:
- Create a 100x100 black image.
- Draw a blue circle on it.
- Save it as a file.
Configure build settings
Next, select the Configuration drop-down menu in the center of the screen, and change it from Debug to Release. At this stage, your screen should look like the example shown below.
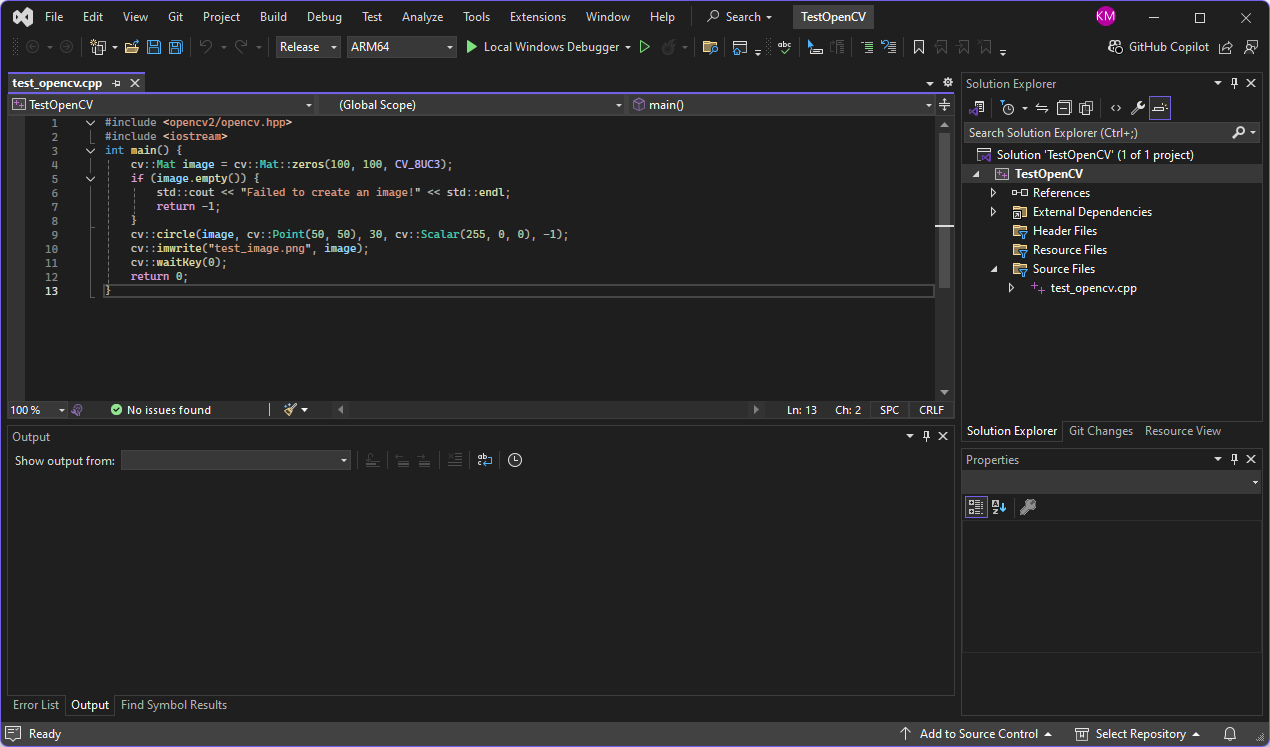 MSVC screenshot
Now, set up the compile and link settings.
Select Project from the top menu and click on TestOpenCV properties.
Edit Include directories, Library directories, and Additional dependencies as shown in the images below, and then click OK.
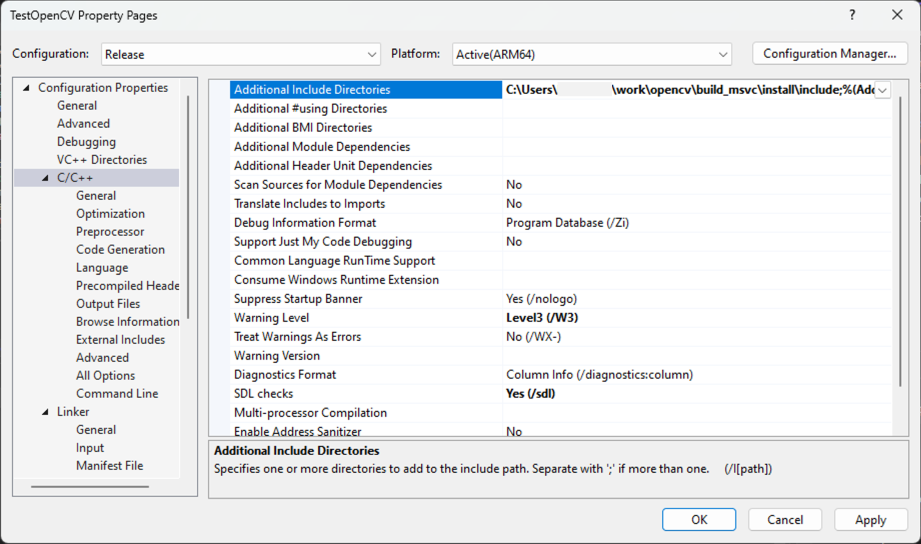 Include directories: Specify the directory containing the OpenCV header files.
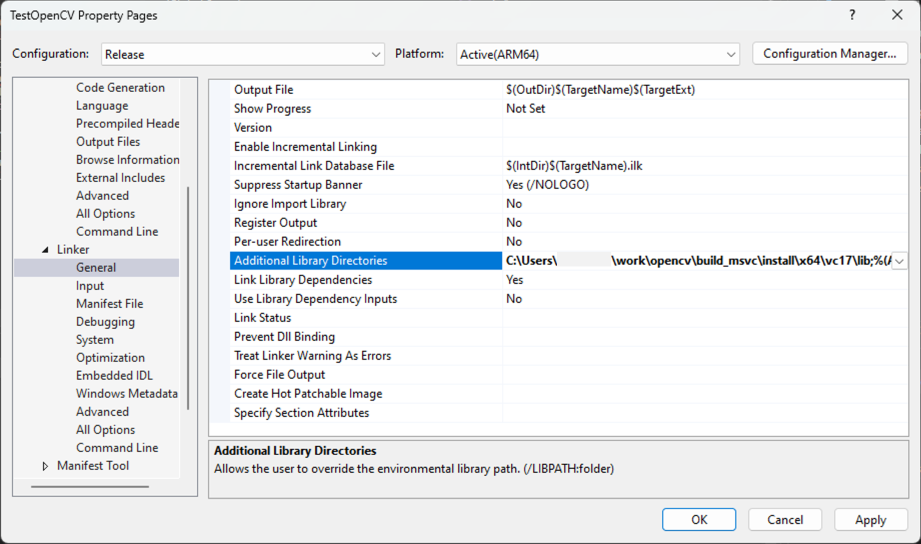 Library directories: Specify the directory where the libraries for linking are located.
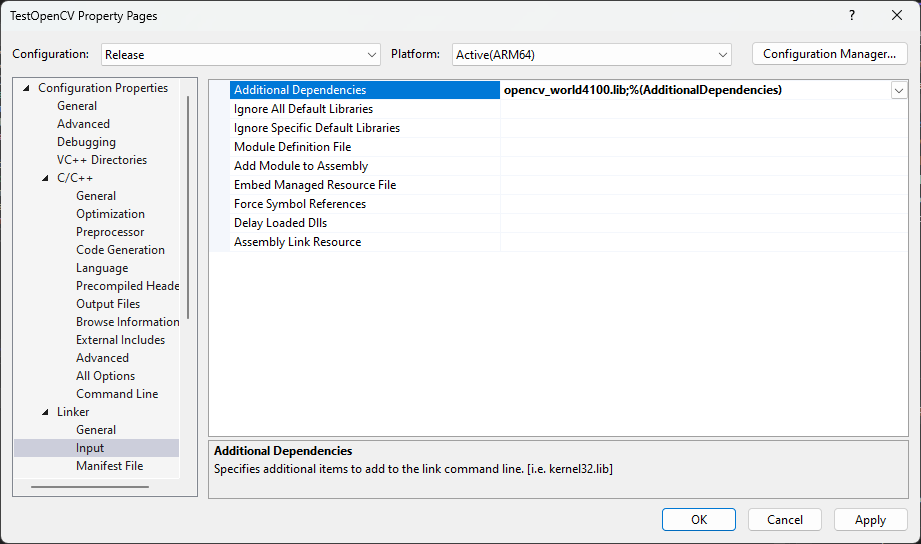 Additional dependencies: Specify the names of the libraries to link
Finally, ensure that the directory containing the dynamic libraries (DLLs) is added to the PATH environment variable. Set this in the Windows system settings. After setting the environment variable, restart Visual Studio to apply the changes.
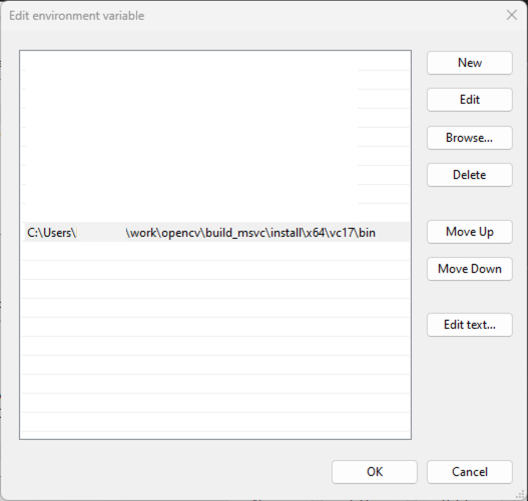 Set the DLL dir to the PATH environment variable
Build the application
You are now ready to build the application.
From the top menu, select Debug and click Start Without Debugging or press Ctrl+F5.
If a console window appears showing that the program exited with code 0 and test_image.png is generated in the top-level directory of your Visual Studio project, you have succeeded.
Open the image file, it should look like the example shown below.
 test_image.png
Congratulations! You are now ready to create your own OpenCV applications using MSVC.