Create a ChatGPT voice bot on a Raspberry Pi
Introduction
Initial setup
Configure and test audio
Create the Python application
Run and test the bot
Next Steps
Create a ChatGPT voice bot on a Raspberry Pi
Test Raspberry Pi speakers and microphone
Plug in your speakers and microphone to test if they are working. If both are working you can skip ahead to the next section. If not, you will need to manually configure the audio.
Right click on the speaker icon and select your speakers:

In a terminal, run the following command, and speak into the microphone for about five seconds.
arecord -d 5 test.wav
This will record a five second audio clip using the default microphone and then save a file named test.wav in the current directory.
Next, run the following command to attempt to play back test.wav using your default speakers:
aplay test.wav
If the record and playback worked correctly and you heard what you had recorded, you can click to the next section of this learning path. If the test did not work, you can manually configure the audio settings.
Manual audio setup
Try the steps below to manually configure audio.
Find the audio devices for speakers and microphone
Use the following commands to find the card and device for your microphone and your speakers:
arecord -l
aplay -l
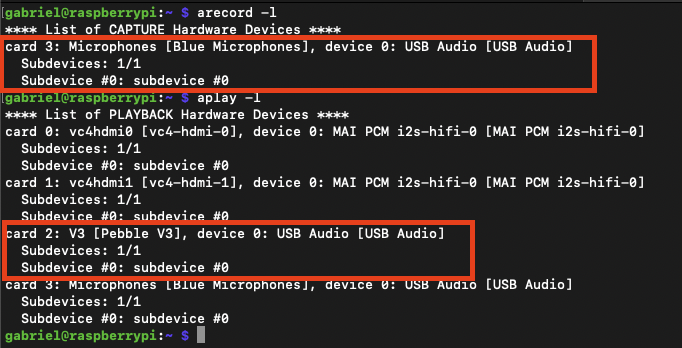
The output should look like the following:

In the example above, you can see a USB microphone on card 3, device 0 (3,0)
USB speakers are card 2, device 0 (2,0)
To find out if the devices are running correctly, you can run arecord and aplay again but this time with the card and device information.
Change your card and device numbers in plughw to match your configuration, and try recording a five second clip by speaking into your microphone again.
To record:
arecord -D plughw:3,0 -d 5 test.wav
To play back:
aplay -D plughw:2,0 test.wav
If you can hear what you recorded, you can create a configuration file.
Troubleshooting
If the above doesn’t work, you’ll have to investigate further.
Here are some steps you can take:
Verify that the speakers and microphone are properly connected and check for loose connections
Use
alsamixeroramixerto check that your devices aren’t muted and that the volume levels are high enoughCheck online and see if your microphone and / or speakers are Linux compatible
Try other speakers and microphones
Create a configuration file to set the defaults
Use a text editor to create the file /etc/asound.conf and add the appropriate information from aplay -l and arecord -l
Copy and paste the information below into the file, changing the pcm.!default playback and ctl.!default to match the aplay -l output. Change the pcm.!default capture section to the arecord -l output:
pcm.!default {
    type asym
    playback.pcm {
        type plug
        slave.pcm "hw:2,0"
    }
    capture.pcm {
        type plug
        slave.pcm "hw:3,0"
    }
}

ctl.!default {
    type hw
    card 2
}
Save the file, exit your text editor, and reboot the Raspberry Pi.
sudo reboot
After rebooting, try the commands again to verify everything is now working:
arecord -d 5 test.wav
aplay test.wav
Your speakers and microphone are now ready to use.