Boot a signed Zephyr image with U-Boot on Arm Cortex-A
Introduction
Understand where U-Boot verifies Zephyr in the Cortex-A boot chain
Set up the host tools for your target
Build a Zephyr image that U-Boot can start
Create signing keys and sign the Zephyr image into a FIT
Build U-Boot with the public key and a boot command that fails closed
Boot the signed Zephyr FIT with U-Boot on QEMU or the TI AM62L EVM
(Optional) Test that U-Boot refuses a wrong key and a tampered image
Review the Zephyr FIT verification boundary and production needs
Next Steps
Boot a signed Zephyr image with U-Boot on Arm Cortex-A
Introduction
Understand where U-Boot verifies Zephyr in the Cortex-A boot chain
Set up the host tools for your target
Build a Zephyr image that U-Boot can start
Create signing keys and sign the Zephyr image into a FIT
Build U-Boot with the public key and a boot command that fails closed
Boot the signed Zephyr FIT with U-Boot on QEMU or the TI AM62L EVM
(Optional) Test that U-Boot refuses a wrong key and a tampered image
Review the Zephyr FIT verification boundary and production needs
Next Steps
Open Workbench for Zephyr
Use Workbench for Zephyr to import an AArch64 toolchain, create a Zephyr workspace, and build your application. The steps are the same for both targets. Select the board that matches your target.
Open Visual Studio Code on your working directory:
code $HOME/zephyr-secure-boot
Select the Workbench for Zephyr icon in the Activity Bar. Its panel contains the Applications, West workspaces, Toolchains, and Host tools views.
The screenshots show Windows paths, a globally installed SDK, and the AM62L evaluation module (EVM). On Ubuntu, use your own paths and SDK location. If you chose QEMU, select qemu_cortex_a53 wherever a board is requested.
Import the AArch64 toolchain
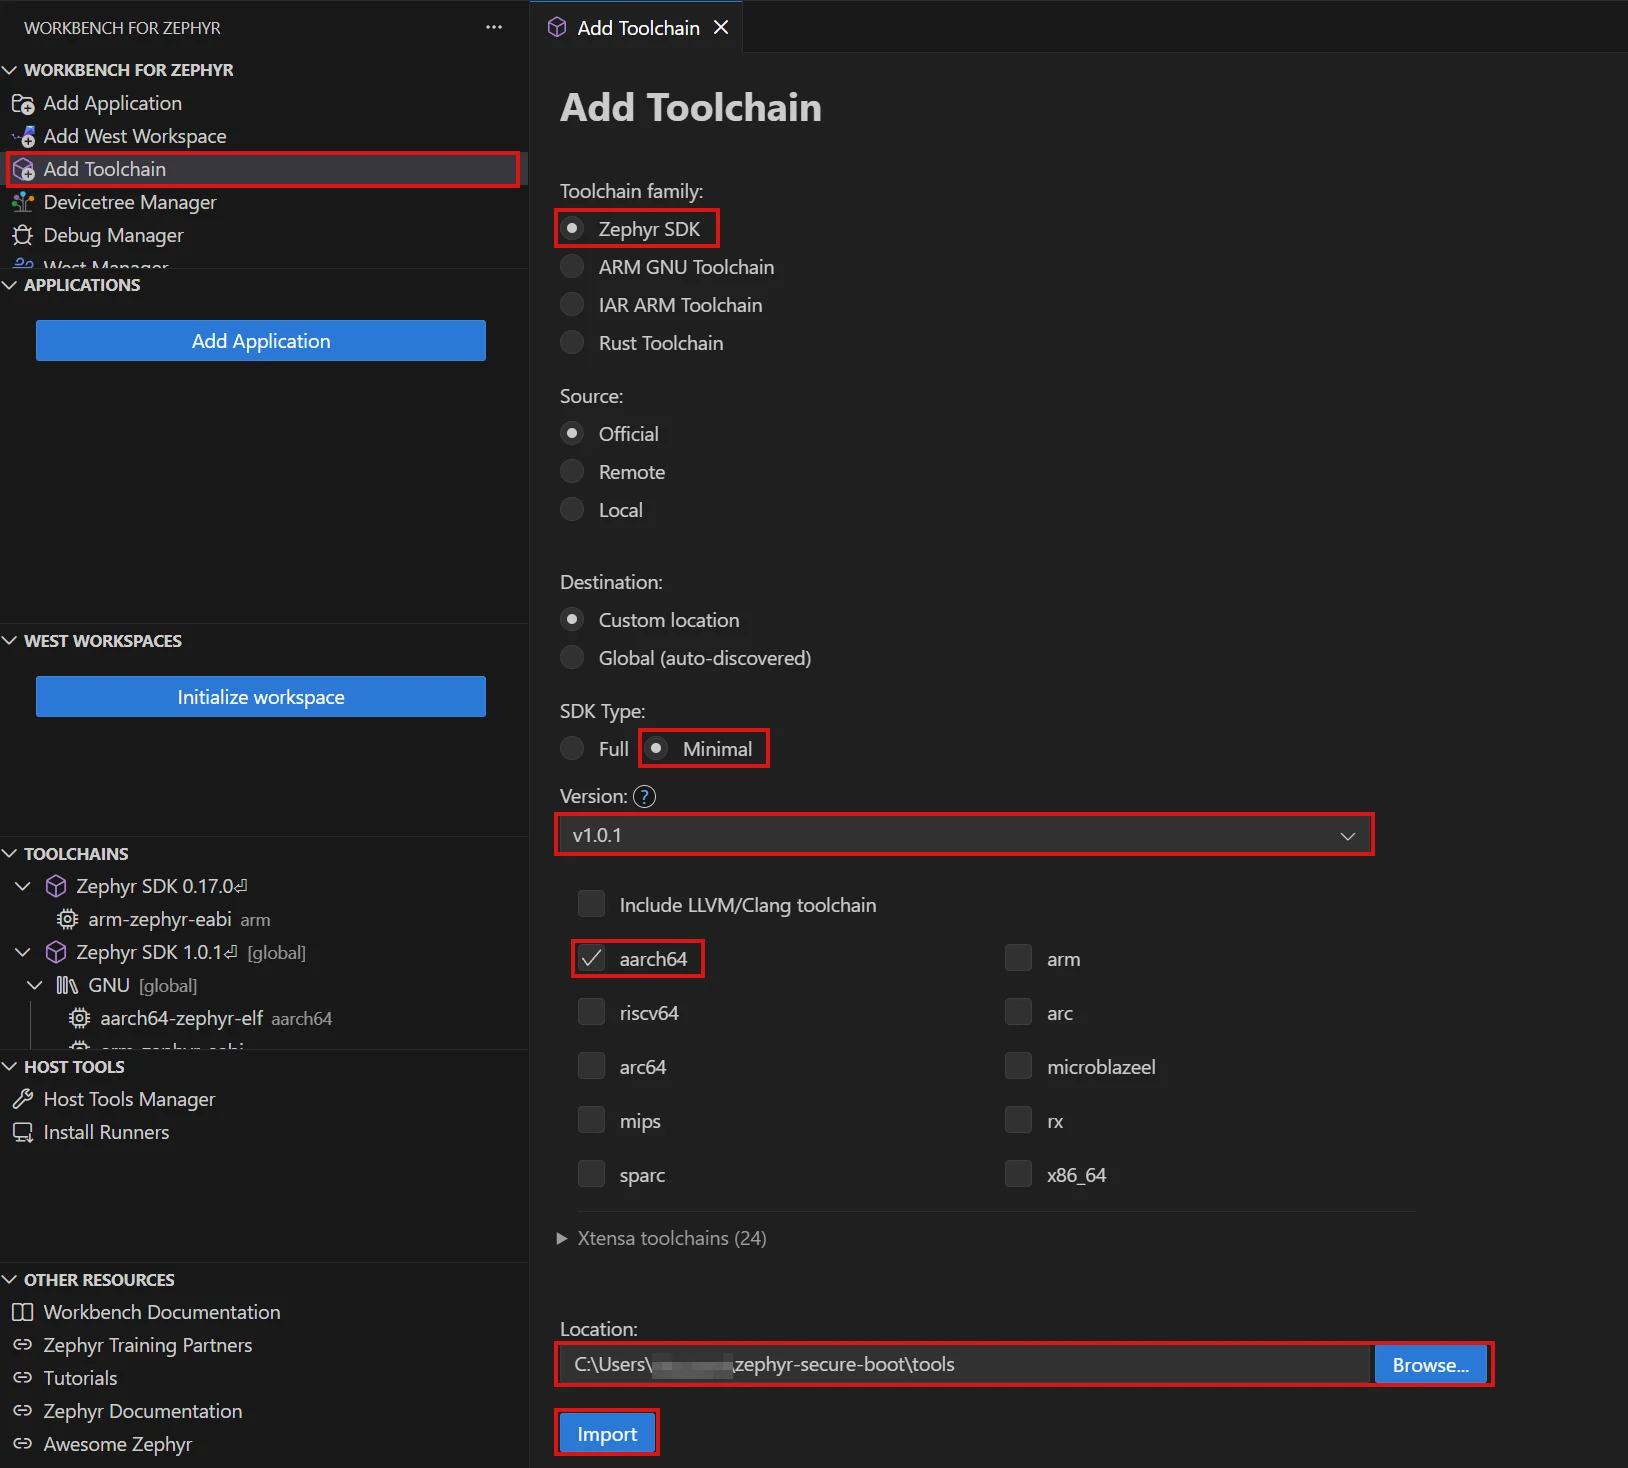
Use the aarch64-zephyr-elf compiler from the Zephyr SDK for your Cortex-A53 target. Select the Minimal SDK type and aarch64 architecture to download that toolchain.
In the Workbench for Zephyr panel, select Add Toolchain and fill in the form:
- For Toolchain family, select Zephyr SDK.
- For Source, select Official.
- For Destination, select Custom location.
- For SDK Type, select Minimal.
- For Version, select v1.0.1.
- Select aarch64 and clear the other architecture checkboxes.
- For Location, specify a parent directory where Workbench creates the SDK folder, such as
$HOME/zephyr-secure-boot. Workbench adds a versioned subdirectory such aszephyr-sdk-1.0.1inside it.
 Import the AArch64 toolchain
- Select Import.
The download takes a few minutes. When it finishes, the Toolchains view shows Zephyr SDK 1.0.1 with a GNU entry and aarch64-zephyr-elf under it.
Add a West workspace
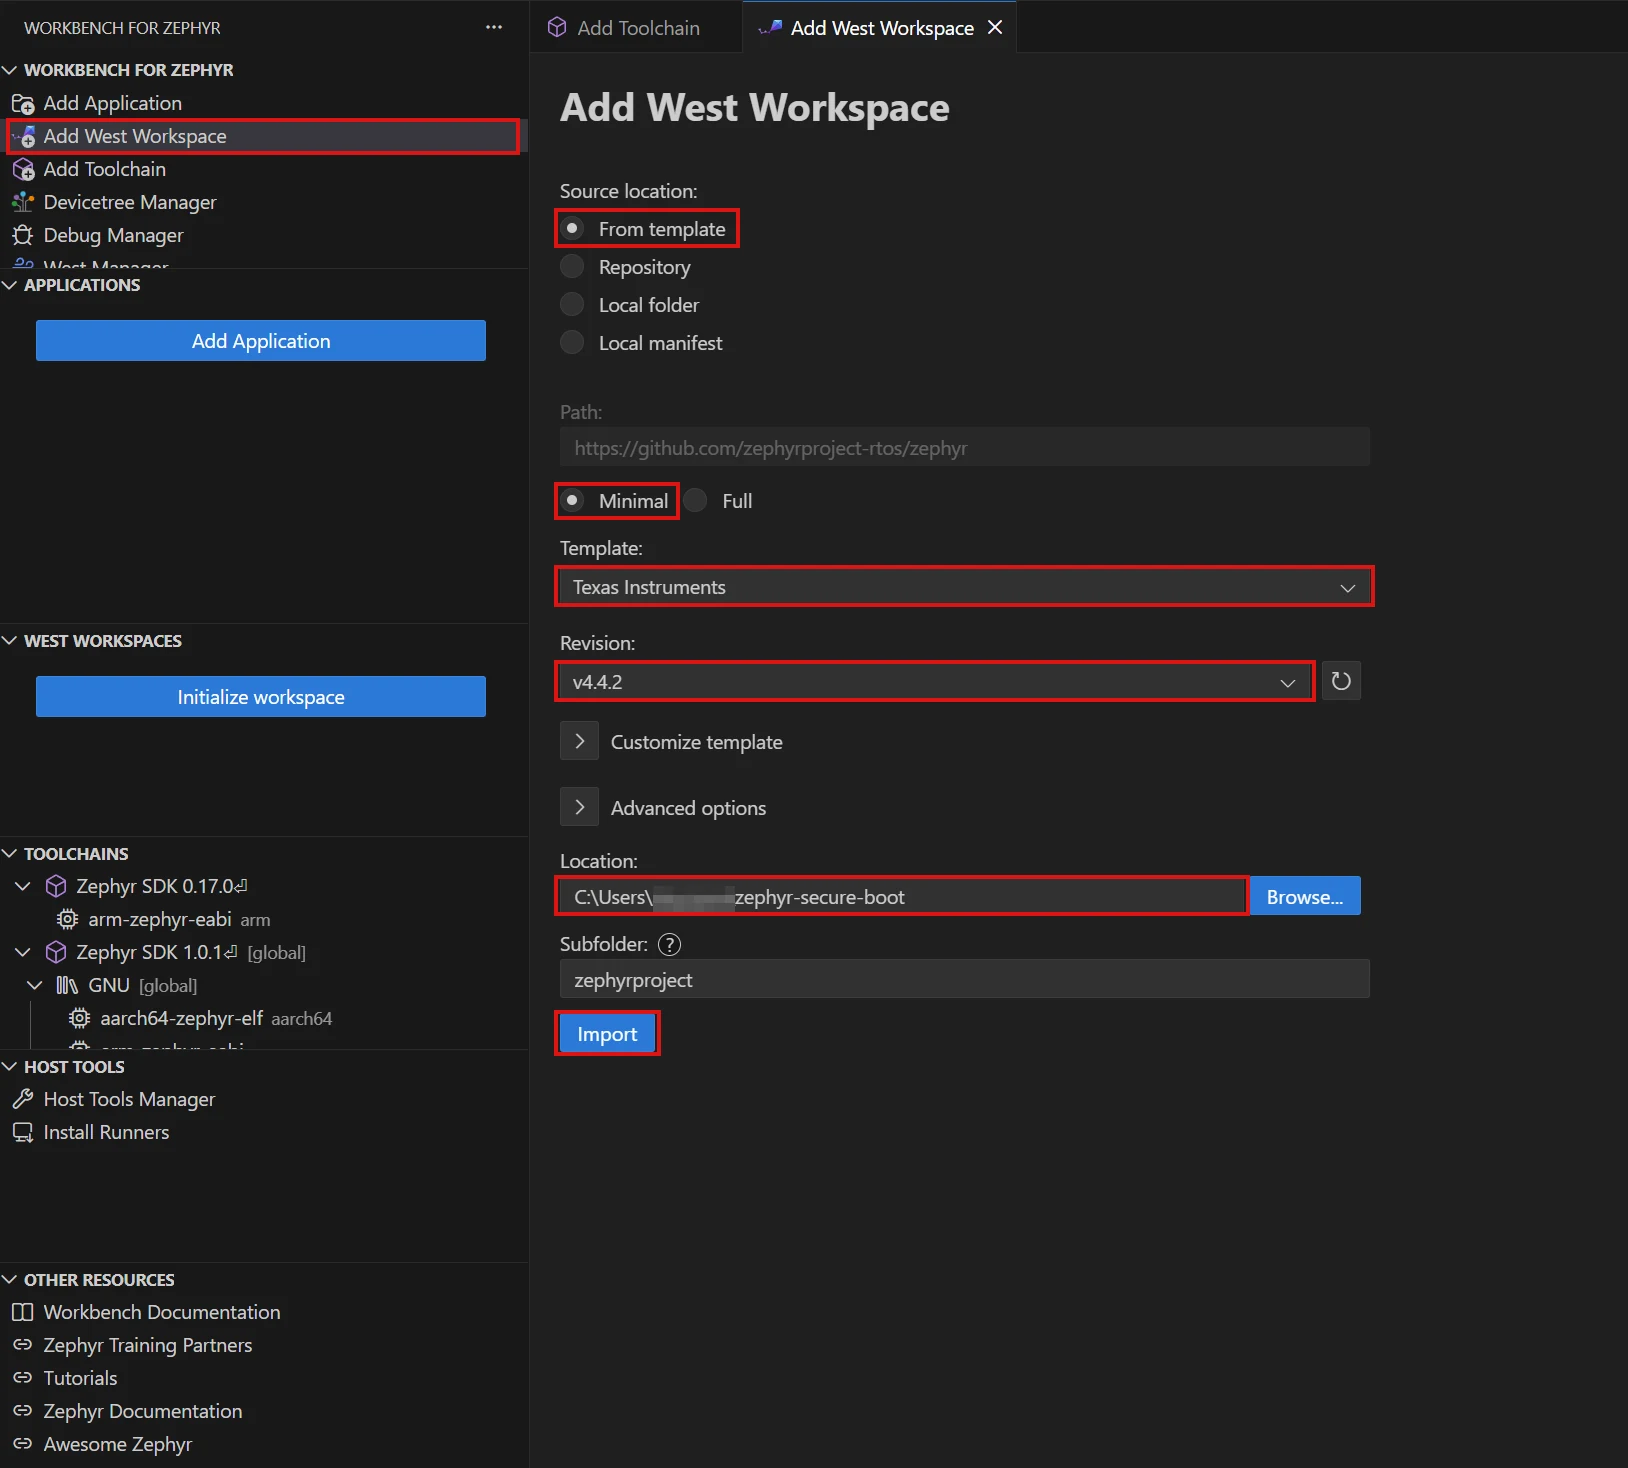
Create a Zephyr 4.4.2 workspace for your chosen target. The same workspace supports QEMU and the AM62L EVM. Select Add West Workspace and fill in the form:
- For Source location, select From template.
- Under Path, select Minimal.
- For Template, select Texas Instruments for either target.
- For Revision, select v4.4.2 or a later 4.x release.
- For Location, specify
$HOME/zephyr-secure-boot(shown expanded, such as/home/ubuntu/zephyr-secure-boot). - For Subfolder, select
zephyrproject.
 Create the Zephyr 4.4.2 workspace
- Select Import.
Workbench downloads Zephyr, the hardware abstraction layer (HAL) from the vendor, and other modules into zephyrproject/deps. This can take several minutes. When it finishes, confirm that zephyrproject appears in the West workspaces view.
Create the application
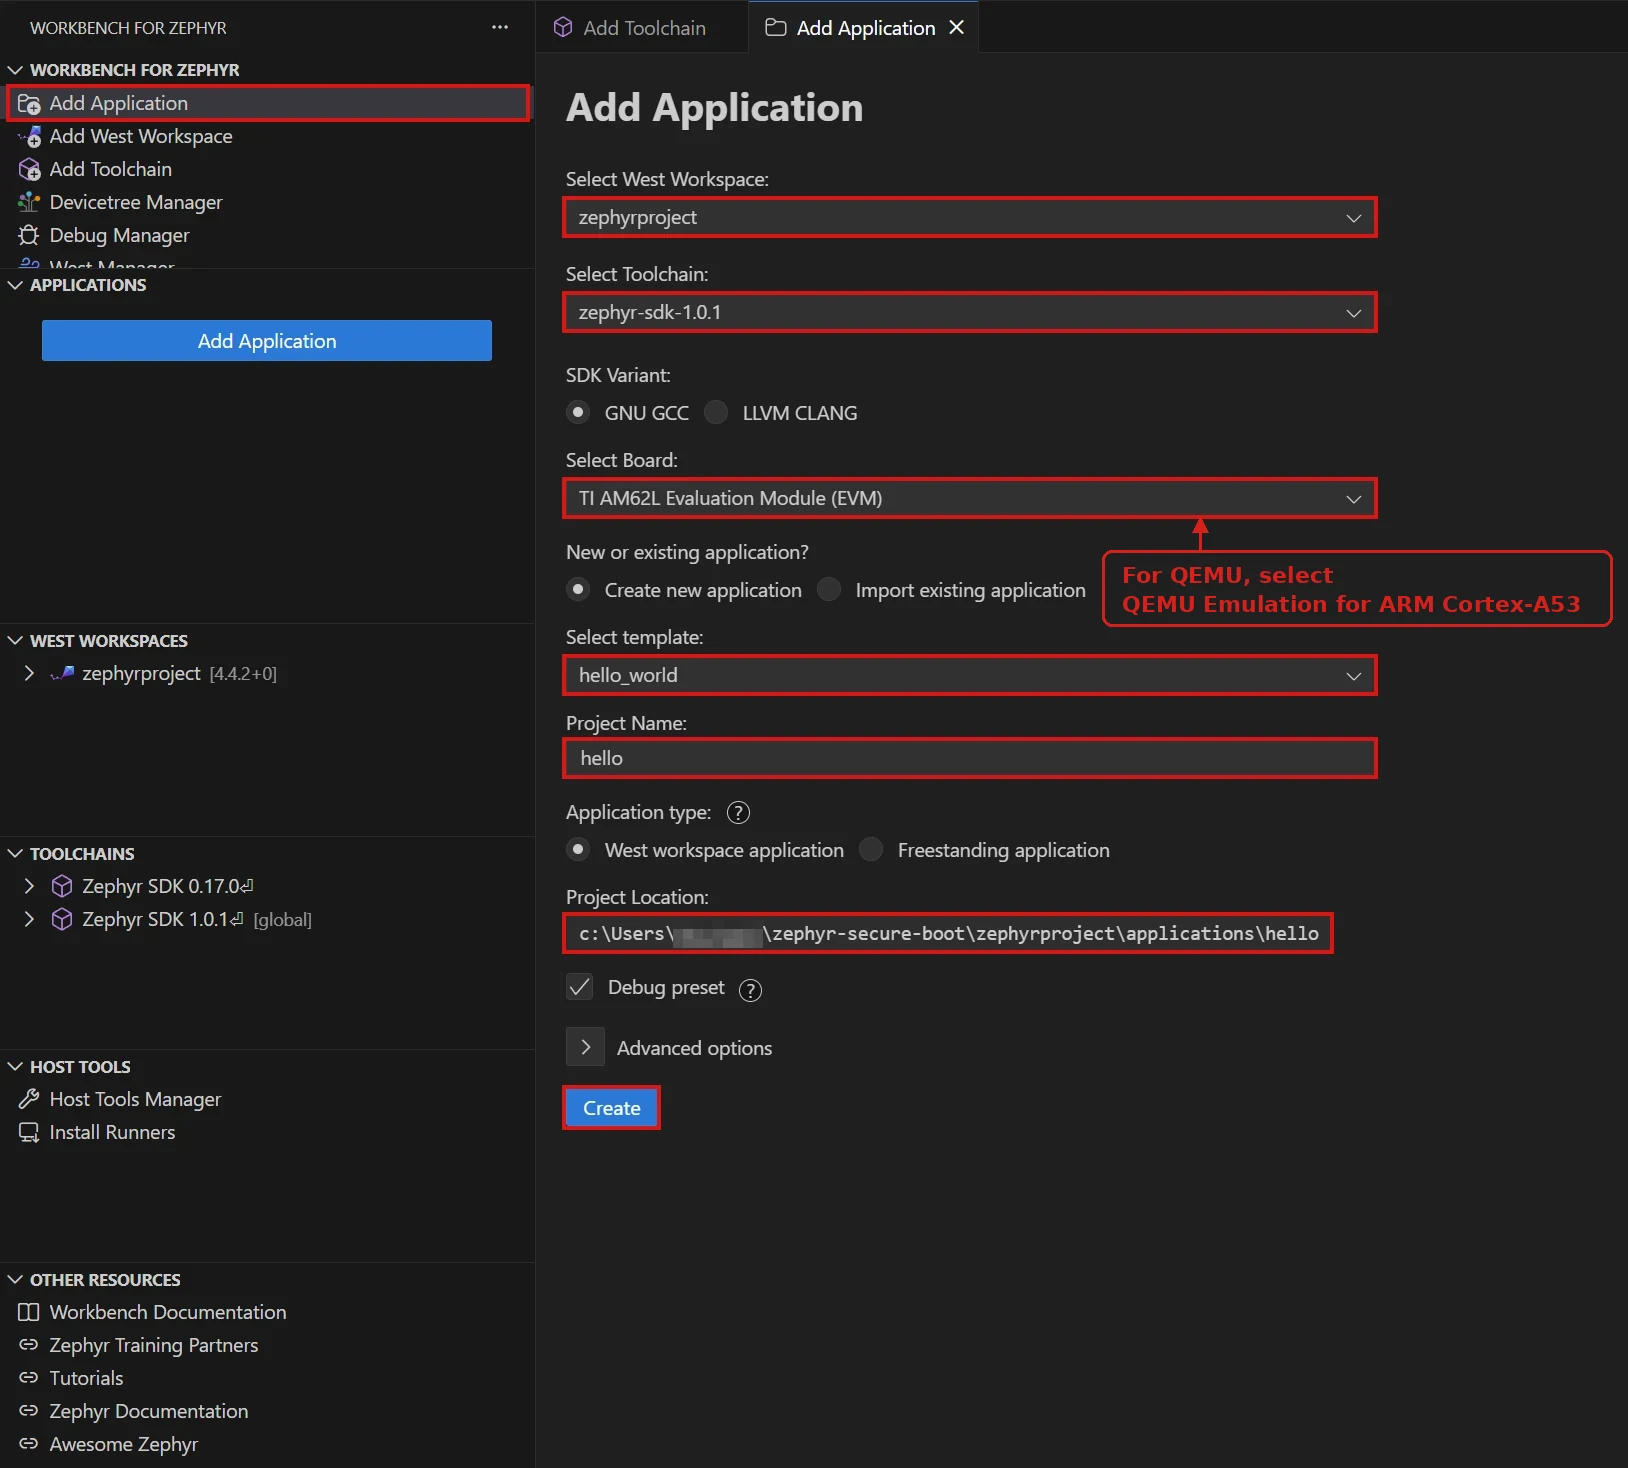
Select Add Application and fill in the wizard:
For Select West Workspace, select
zephyrproject.For Select Toolchain, select
zephyr-sdk-1.0.1.For SDK Variant, select GNU GCC.
For Select Board, enter qemu and select QEMU Emulation for ARM Cortex-A53, or enter am62l and select TI AM62L Evaluation Module (EVM).
For New or existing application?, select Create new application.
For Select template, select
hello_world, underdeps/zephyr/samples/hello_world.For Project Name, enter
hello.For Application type, select West workspace application.
For Project Location, ensure the value is
zephyrproject/applications/hello, filled in by the wizard.Check that the board identifier matches
BOARDin your environment file:qemu_cortex_a53for QEMU oram62l_evm/am62l3/a53for the AM62L EVM.Select Create.
 Create hello for your chosen target
The application hello appears in the Applications view, marked [with zephyrproject]. zephyrproject/applications/hello holds the CMakeLists.txt, prj.conf and src/main.c files for the sample.
Replace files in the sample
Leave CMakeLists.txt as it is and replace the other two files.
Replace the contents of prj.conf with the following four lines:
CONFIG_ARMV8_A_NS=y
CONFIG_PRINTK=y
CONFIG_BOOT_BANNER=y
CONFIG_AARCH64_IMAGE_HEADER=y
CONFIG_PRINTK enables console output with printk(). CONFIG_BOOT_BANNER prints the *** Booting Zephyr OS build ... *** line, confirming that Zephyr has started.
Replace the contents of src/main.c with the following code:
#include <zephyr/kernel.h>
#include <zephyr/sys/printk.h>

int main(void)
{
	printk("\n");
	printk("################################################\n");
	printk("#                                              #\n");
	printk("#   Hello from ZEPHYR IMAGE A                  #\n");
	printk("#   signed with key-a  (TRUSTED by U-Boot)     #\n");
	printk("#                                              #\n");
	printk("################################################\n");
	printk("\n");
	printk("board            : %s\n", CONFIG_BOARD_TARGET);
	printk("arch             : %s\n", CONFIG_ARCH);
	printk("started by       : U-Boot 'go' after FIT signature verification\n");
	printk("this image was verified by U-Boot before it ran.\n");
	return 0;
}
Its banner identifies image A and the key that you’ll use to sign it. This helps you distinguish the images if you run the optional wrong-key and tampered-image tests .
Save both files.
Configure Non-secure execution and the arm64 header
CONFIG_ARMV8_A_NS=y tells Zephyr that it runs in the Non-secure world, the one U-Boot hands it. Without it, the driver of the Generic Interrupt Controller (GICv3) never programs the Non-secure registers. The timer interrupt never arrives, and Zephyr hangs right after its banner.
CONFIG_AARCH64_IMAGE_HEADER=y puts a 64-byte arm64 header at the start of zephyr.bin, in the same format as a Linux kernel image. The first instruction in the header is b __start, a branch to the real entry point of Zephyr. U-Boot needs that branch only at offset 0. Without the header, go jumps into whatever the linker placed there.
The configurations for qemu_cortex_a53 and am62l_evm/am62l3/a53 already set both options. Repeating them in prj.conf protects you on a board whose configuration doesn’t.
Build the application
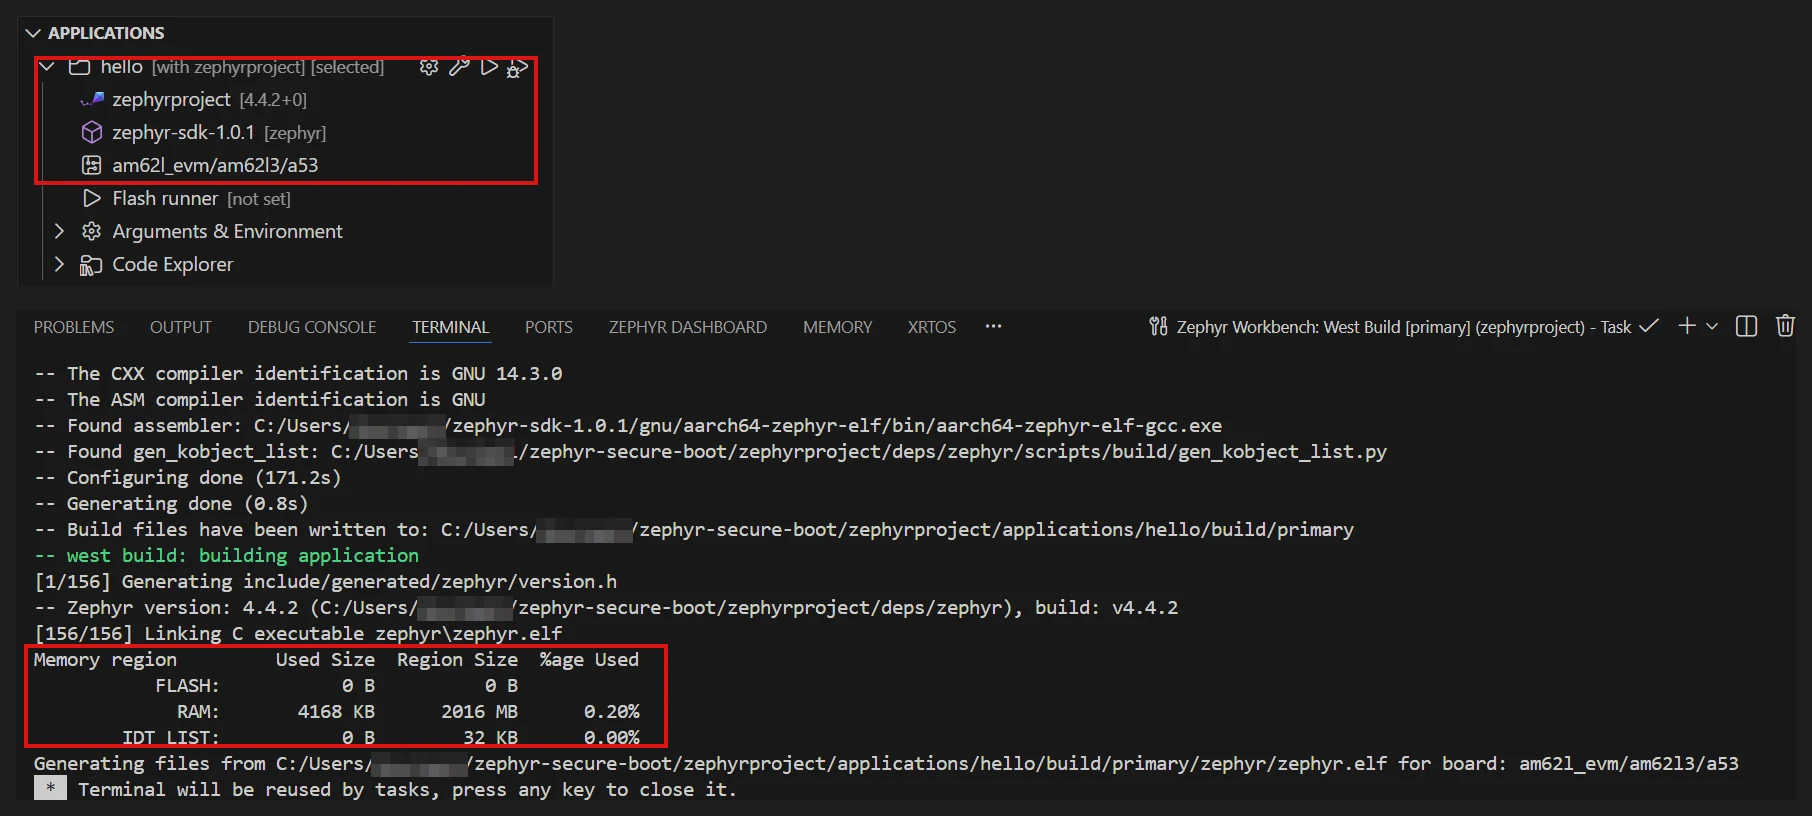
In the Applications view, open the context menu for hello and select Build. Workbench runs west build in the terminal and writes the build outputs to the build/primary directory for the application. Near the end, the linker prints a memory report similar to:
        Memory region         Used Size  Region Size  %age Used
           FLASH:           0 B          0 B
             RAM:       4168 KB      2016 MB      0.20%
        IDT_LIST:           0 B        32 KB      0.00%
 Build hello for the AM62L EVM
The result is $WORK/zephyrproject/applications/hello/build/primary/zephyr/zephyr.bin, a raw binary linked at ZEPHYR_ADDR, the start of the zephyr,sram memory node for the target. The binary is about 37 KB for qemu_cortex_a53, whose memory report shows 128 MB of RAM. It’s about 58 KB for the AM62L EVM, which reports 2016 MB of RAM.
On an aarch64 host, the build can fail with exec format error when it invokes cmake from ~/.zinstaller. Some versions of the Workbench for Zephyr host tools install x86_64 builds of CMake and Ninja, which can’t run on Arm. Verify that Host Tools can also report a misleading error, such as -255 package(s) are not installed, for the same reason.
Confirm the architecture of the installed tools:
file ~/.zinstaller/tools/cmake-*/bin/cmake ~/.zinstaller/tools/ninja/ninja
If the output reports x86-64, point the two tools at the Arm builds on your system, after installing them with sudo apt install -y cmake ninja-build:
ln -sf "$(command -v cmake)" ~/.zinstaller/tools/cmake-*/bin/cmake
ln -sf "$(command -v ninja)" ~/.zinstaller/tools/ninja/ninja
Rebuild the application. The Zephyr SDK compiler is a native Arm binary and doesn’t need this change.
Check the arm64 image header
Open a terminal with Terminal > New Terminal in Visual Studio Code, or use an existing shell. Load the environment file for your target:
- QEMU:
source $HOME/zephyr-secure-boot/env-qemu.sh - AM62L EVM:
source $HOME/zephyr-secure-boot/env-am62l.sh
Print the magic number in the header at offset 0x38:
od -An -c -j 0x38 -N4 $WORK/zephyrproject/applications/hello/build/primary/zephyr/zephyr.bin
The expected output is:
A R M d
ARMd is the arm64 image magic, so the header is in place and the image starts with the branch instruction that go jumps to. If you see anything else, check that $WORK/zephyrproject/applications/hello/build/primary/zephyr/.config contains CONFIG_AARCH64_IMAGE_HEADER=y.
What you’ve accomplished and what’s next
You’ve built a Zephyr image for the Cortex-A53 in your target, linked at ZEPHYR_ADDR, and checked its arm64 header.
Next, you’ll create the signing keys and package the image in a signed Flattened Image Tree (FIT) for U-Boot to verify.