Build an OpenCV YOLOX pipeline to benchmark KleidiCV preprocessing
Introduction
Understand YOLOX and KleidiCV in the detection pipeline
Build OpenCV with and without KleidiCV
Prepare the YOLOX model and test image
Compile and run YOLOX static-image detection
Evaluate KleidiCV preprocessing and pipeline performance
Next Steps
Build an OpenCV YOLOX pipeline to benchmark KleidiCV preprocessing
Download the application source
After setting up the YOLOX model and the test image, you can now run static-image detection.
The example application is stored with the Learning Path. Download the C++ source and CMake project:
cd ~/opencv-kleidicv-lab/static-detection

wget -O yolox_static.cpp \
    https://learn.arm.com/learning-paths/embedded-and-microcontrollers/opencv-onnx-kleidicv-static-detection/yolox_static.cpp

wget -O CMakeLists.txt \
    https://learn.arm.com/learning-paths/embedded-and-microcontrollers/opencv-onnx-kleidicv-static-detection/cmakelists.txt
Find the pipeline in the source
Use the following functions in yolox_static.cpp to connect the pipeline stages to their implementation:
| Function | Role |
|---|---|
runPipeline() | Calls the preprocessing operations, then feeds the tensor to network.setInput() and runs inference with network.forward(). |
postprocess() | Decodes the model output, maps boxes to the original image, and applies non-maximum suppression. |
renderDetections() | Draws the retained boxes, class labels, and confidence scores. |
main() | Loads the inputs, selects the OpenCV CPU backend, runs warm-up and measured iterations, and prints the timing summaries. |
Within runPipeline(), pairs of Clock::now() calls surround each stage and store its elapsed time in StageTimes. The inference timer includes input setup and the forward pass. Model loading, image-file decoding, and the final JPEG write are outside these timers.
Build against the baseline OpenCV installation
Configure the application with the baseline OpenCV package:
cmake -S . -B app-build-baseline -G Ninja \
    -DCMAKE_BUILD_TYPE=Release \
    -DOpenCV_DIR=$HOME/opencv-kleidicv-lab/install-baseline/lib/cmake/opencv4
cmake --build app-build-baseline
Use Release for both application builds, not just for the OpenCV libraries. This enables compiler optimization for application code such as output decoding and postprocessing.
Run one measured iteration after two warm-up iterations:
LD_LIBRARY_PATH=$HOME/opencv-kleidicv-lab/install-baseline/lib \
    ./app-build-baseline/yolox_static \
    --model=object_detection_yolox_2022nov.onnx \
    --image=input.jpg \
    --labels=coco.names \
    --output=result-baseline.jpg \
    --build-name=baseline \
    --warmup=2 \
    --iterations=1
The output is similar to:
        Build label: baseline
OpenCV version: 4.13.0
OpenCV threads: 12
Warm-up iterations: 2
Measured iterations: 1
Detections: 3
Resize:              mean=    0.503 ms  min=    0.503 ms  stddev=    0.000 ms
Padding:             mean=    0.048 ms  min=    0.048 ms  stddev=    0.000 ms
BGR to RGB:          mean=    0.041 ms  min=    0.041 ms  stddev=    0.000 ms
Uint8 to float32:    mean=    1.154 ms  min=    1.154 ms  stddev=    0.000 ms
Tensor packing:      mean=    1.266 ms  min=    1.266 ms  stddev=    0.000 ms
Preprocessing:       mean=    3.012 ms  min=    3.012 ms  stddev=    0.000 ms
DNN inference:       mean=  356.052 ms  min=  356.052 ms  stddev=    0.000 ms
Postprocessing:      mean=    0.484 ms  min=    0.484 ms  stddev=    0.000 ms
Rendering:           mean=    0.149 ms  min=    0.149 ms  stddev=    0.000 ms
End-to-end:          mean=  359.696 ms  min=  359.696 ms  stddev=    0.000 ms
Output image: result-baseline.jpg
Timing values depend on the board and input image. With one measured iteration, the mean and minimum are equal, and the standard deviation is zero.
Inspect the result
The reference output contains three retained detections: two person detections and one sports ball detection. One person box covers a partially visible person in the background.
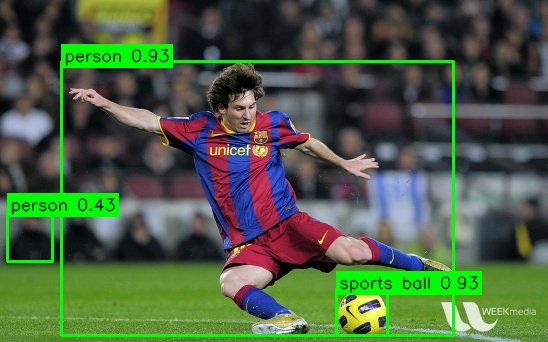 YOLOX detection output with bounding boxes and confidence scores
Check the generated image:
file result-baseline.jpg
ls -lh result-baseline.jpg
Build against the KleidiCV installation
Build the same application source against the default KleidiCV OpenCV package:
cmake -S . -B app-build-kleidicv-default -G Ninja \
    -DCMAKE_BUILD_TYPE=Release \
    -DOpenCV_DIR=$HOME/opencv-kleidicv-lab/install-kleidicv-default/lib/cmake/opencv4
cmake --build app-build-kleidicv-default
Run the functional check:
LD_LIBRARY_PATH=$HOME/opencv-kleidicv-lab/install-kleidicv-default/lib \
    ./app-build-kleidicv-default/yolox_static \
    --model=object_detection_yolox_2022nov.onnx \
    --image=input.jpg \
    --labels=coco.names \
    --output=result-kleidicv-default.jpg \
    --build-name=kleidicv-default \
    --warmup=2 \
    --iterations=1
Both builds report three detections for the supplied image. Open result-baseline.jpg and result-kleidicv-default.jpg and compare the classes and bounding boxes with the reference image. If your board has no desktop, copy the files to your workstation to view them.
The results contain two person detections and one sports ball detection with equivalent bounding boxes. Small numerical and JPEG encoding differences are possible, so byte-for-byte image equality isn’t required. A matching detection count alone isn’t a complete correctness check.
What you’ve accomplished and what’s next
You’ve run YOLOX static-image detection with both OpenCV builds and checked the labeled output images.
Next, you’ll compare image-operation and full preprocessing latency and interpret the pipeline-level effect.