Run MNIST on an Alif E8 Ensemble DevKit using ExecuTorch and Ethos-U85
Introduction
Learn about MNIST and the Alif Ensemble E8 DevKit
Set up the Alif Ensemble E8 DevKit
(Optional) Set up a Docker development environment
(Optional) Export PyTorch model to ExecuTorch format
Prepare the ExecuTorch model and static libraries for the Alif E8 CMSIS project
Create the Alif E8 CMSIS project
Process and copy a sample image into the Alif E8 CMSIS project
Flash and run the project on the Alif Ensemble E8 DevKit
Next Steps
Run MNIST on an Alif E8 Ensemble DevKit using ExecuTorch and Ethos-U85
Introduction
Learn about MNIST and the Alif Ensemble E8 DevKit
Set up the Alif Ensemble E8 DevKit
(Optional) Set up a Docker development environment
(Optional) Export PyTorch model to ExecuTorch format
Prepare the ExecuTorch model and static libraries for the Alif E8 CMSIS project
Create the Alif E8 CMSIS project
Process and copy a sample image into the Alif E8 CMSIS project
Flash and run the project on the Alif Ensemble E8 DevKit
Next Steps
Connect to the Alif Ensemble E8 DevKit
To connect to the Alif Ensemble E8 DevKit:
Unplug all USB cables from the DevKit before changing any jumpers.
Verify that the jumpers are in their factory default positions, as shown in the Alif Ensemble E8 DevKit (DK-E8) User Guide on alifsemi.com .
Connect a USB-C cable from your computer to the PRG USB port on the bottom edge of the DevKit.
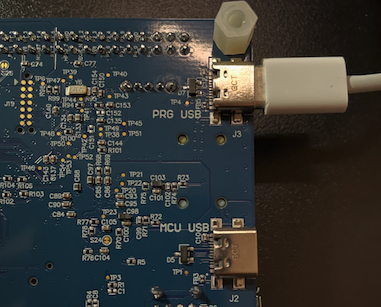 USB-C cable connected to the PRG USB port
- Confirm that a green LED illuminates near the E1 device and the UART switch (SW4).
Leave SW4 in its default position. This routes the on-board USB UART to SEUART, which the Alif Security Toolkit (SETOOLS) uses for programming.
Verify USB connection to the DevKit
Check that your computer recognizes the DevKit:
ls /dev/cu.*
ls /dev/ttyACM* /dev/ttyUSB* 2>/dev/null
Get-CimInstance Win32_SerialPort | Select-Object DeviceID,Name,Description
Close any terminal application that’s connected to SEUART, such as PuTTY, minicom, or screen, before you use the Security Toolkit (SETOOLS). The DevKit exposes only one SEUART interface, so SETOOLS can’t access the port if another application is already using it.
You should see a SEGGER J-Link device. If you’re unsure which entry belongs to the DevKit, run the command before and after connecting the board and compare the output. If no device appears, check that the USB cable is connected to the PRG USB port and that the cable supports data, not only charging.
Create a project directory for the DevKit
Before installing all required tools for ExecuTorch development, create a project directory:
mkdir -p ~/mnist_alif
New-Item -ItemType Directory -Force -Path ~\mnist_alif
Install SETOOLS
Secure Enclave Tools (SETOOLS) is Alif’s toolset for flashing firmware to MRAM through the Secure Enclave.
Download the SETOOLS package from the Alif Ensemble E8 DevKit support page and extract it to
~/mnist_alif, editing the command with the name of your.taror.zipfile:cd ~/Downloads tar xvf <replace_with_your_alif_security_toolkit_download.tar> -C ~/mnist_alifcd ~/Downloads Expand-Archive <.\replace_with_your_alif_security_toolkit_download.zip> -DestinationPath ~\mnist_alifVerify the installation:
The extracted folder name can vary by SETOOLS release. The commands assume the package extracts tocd ~/mnist_alif/app-release-exec-macos ./app-write-mram -h ./app-gen-toc -hcd ~/mnist_alif/app-release-exec-linux ./app-write-mram -h ./app-gen-toc -hcd ~\mnist_alif\app-release-exec-windows .\app-write-mram.exe -h .\app-gen-toc.exe -happ-release-exec-*. Each command should print ausage:message. If either command fails, check that you’re in the extracted SETOOLS directory for your operating system.
On macOS, the system might block the unsigned binary the first time you run it. If this happens, do the following:
  1. Open **System Settings** or **System Preferences**.
  2. Navigate to **Privacy & Security**.
  3. Select **Allow Anyway**.
Then, run the command again. You might need to reapprove for both ./app-* commands.
Install J-Link
SEGGER J-Link provides the debug connection for Real-Time Transfer (RTT) output, which you’ll use later to view inference results.
Install J-Link version 7.94 or later for Alif Ensemble E8 support:
brew install --cask segger-jlink
JLinkExe --version
wget https://www.segger.com/downloads/jlink/JLink_Linux_x86_64.deb
sudo dpkg -i JLink_Linux_x86_64.deb
JLinkExe --version
1. Download the J-Link installer from the [SEGGER website](https://www.segger.com/downloads/jlink/).
2. Run the installer and follow prompts.
3. Verify in Command Prompt: `JLink.exe --version`.
Set up the Alif Visual Studio Code template
Next, you’ll need to set up the Alif Visual Studio Code (VS Code) template.
To start, clone the Alif VS Code template repository and check out a known-working commit:
cd ~/mnist_alif
git clone https://github.com/alifsemi/alif_vscode-template.git
cd alif_vscode-template
git checkout 8b1aa0b09eacf68a28850af00c11f0b5af03c100
git submodule update --init
By checking out a known commit, you can avoid breakage if the template gets updated.
After cloning, open the project in VS Code:
code .
VS Code might prompt you to install the recommended extensions for this workspace. If it does, install the following:
- Arm CMSIS Solution
- Arm Tools Environment Manager
- Cortex-Debug
- Microsoft C/C++ Extension Pack
When prompted, select Always Allow or Allow for Selected Workspace.
The recommended VS Code extensions are listed in .vscode/extensions.json. If you don’t get an automatic trigger to enable them, you can open the Extensions view and look for a Workspace Recommendations section to install or enable them manually.
Restart VS Code if prompted.
Install CMSIS packs
Common Microcontroller Software Interface Standard (CMSIS) is a set of APIs, software components, and metadata that simplifies development on Arm Cortex-M processors. Installing the CMSIS pack will provide the device definitions, startup files, drivers, and middleware components you’ll need for the Alif E8 target.
To install CMSIS packs:
- In VS Code, open the Command Palette using Ctrl+Shift+P on Windows and Linux, or Command+Shift+P on macOS.
- Select Tasks: Run Task.
- Select First time pack installation.
- When prompted, press the A key to accept all licenses.
If the installation task doesn’t appear, run Developer: Reload Window from the Command Palette and try again.
Configure VS Code settings
VS Code needs to know where the external Alif SETOOLS and SEGGER J-Link tools are installed.
To configure the settings on VS Code:
- Open the Command Palette and run Preferences: Open User Settings (JSON).
- Add the following settings, updating the paths for your operating system:
{
  "alif.setools.root": "path/to/your/setools-folder",
  "cortex-debug.JLinkGDBServerPath": "/Applications/SEGGER/JLink/JLinkGDBServerCLExe"
}
If your settings file already contains entries, add only these two settings inside the existing braces.
Verify your toolchain with Blinky
Build and flash the built-in Blinky example to verify your toolchain:
- In VS Code, select the CMSIS icon in the left sidebar.
- Select the gear icon.
- Set Active Target to E8-HE.
- Set Active Project to blinky.
- Select the Build (hammer) icon.
- Open the Command Palette and run Tasks: Run Task.
- Select Program with Security Toolkit (select COM port).
- Choose the DevKit port when prompted.
If the RGB LED blinks, your VS Code setup, CMSIS packs, SETOOLS configuration, and board connection are working.
What you’ve accomplished and what’s next
You’ve now connected the Alif Ensemble E8 DevKit to your computer and installed required tools for the DevKit. The tools include SETOOLS for flashing firmware to MRAM, J-Link for programming and debugging, required VS Code extensions, and CMSIS packs.
Next, if you’re using the provided .pte model, skip to
Prepare the ExecuTorch model and static libraries for the Alif E8 CMSIS project
. If you want to train and export the model yourself, see
(Optional) Set up a Docker development environment
.