Generate human faces with a diffusion model on an Alif Ensemble E8
Introduction
Understand the pico-faces workflow
Set up the development tools and DevKit
Export the pico-faces model for Ethos-U85
Prepare the DevKit for debugging
Generate and validate faces on the DevKit
Next Steps
Generate human faces with a diffusion model on an Alif Ensemble E8
Install the host tools
Install Visual Studio Code (VS Code) and add the following extensions:
- Keil Studio Pack
, extension ID
Arm.keil-studio-pack - Python extension
, extension ID
ms-python.python
To complete the Learning Path, you need CMSIS Solution extension 1.72.0 or later, which is included with Keil Studio Pack. Accept the project’s managed CMSIS-Toolbox 2.15 environment when prompted. Sign in with your Arm account when Keil Studio requests a license. You can complete the Learning Path with the free Keil MDK Community license.
Install two tools for the physical DevKit:
- Download Alif SETOOLS version 1.110.00 or later for your host operating system from the Alif software and tools page . Extract the package. On Linux and macOS, make the SETOOLS programs executable if necessary.
- Install SEGGER J-Link Software version 8.42 or later. The DevKit includes an on-board J-Link probe.
Configure the SETOOLS path
To configure the SETOOLS path:
In VS Code, press Ctrl+Shift+P on Linux or Windows, or Cmd+Shift+P on macOS, to open the Command Palette.
Search for and select Preferences: Open User Settings (JSON).
Add
alif.setools.rootinside the existing JSON object and replace the example value with the directory that containsapp-gen-tocandapp-write-mram:"alif.setools.root": "/absolute/path/to/setools"Keep the comma required by your existing JSON properties. The project uses this setting when it installs the Cortex-M55 debug stubs.
Connect the DevKit
Prepare the board before applying power:
- Disconnect all USB cables before checking or moving a jumper.
- Keep JP5 on pins 1-2 and JP7 on pins 3-4.
- Set SW4 to SEUART, its default position.
- Connect a USB-C data cable to PRG USB, the connector near the corner of the board.
- Leave MCU USB disconnected.
Don’t move jumpers while the board is powered. Disconnect PRG USB before changing a jumper.
Use the following photo to locate the jumpers. JP7 is below the blue potentiometer, and JP5 is beside RESET (SW1). The installed jumper caps connect the required pairs of pins, as shown in the close-ups. For the board layout and pin numbering, see the Alif DK-E8 User Guide .
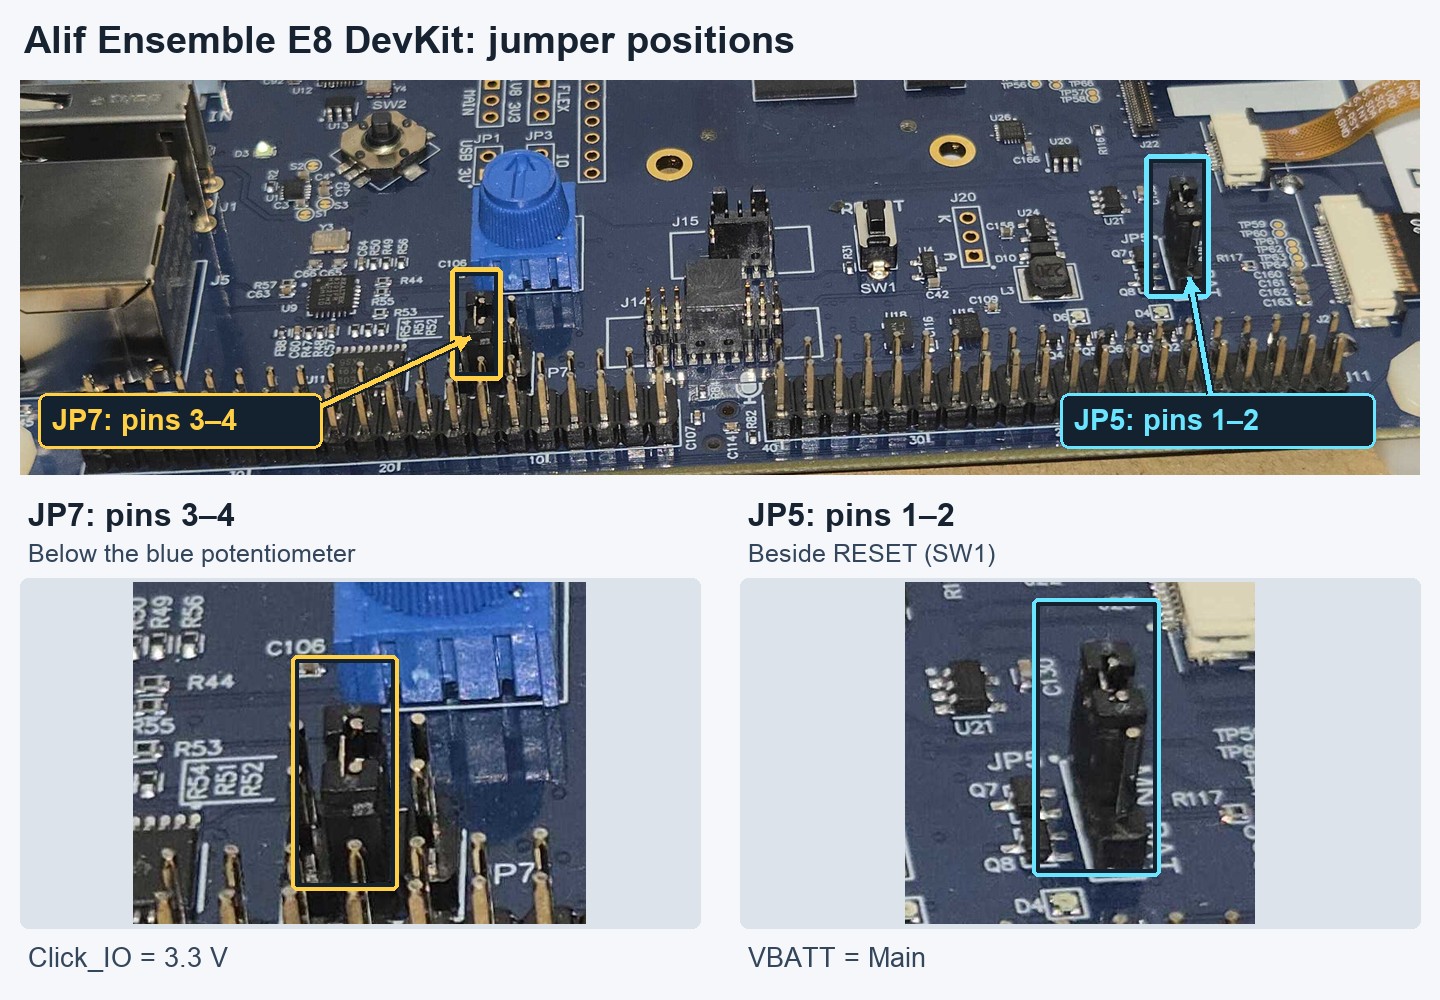 JP7 on pins 3–4 and JP5 on pins 1–2
The PRG USB connection supplies power and exposes both the on-board J-Link probe and the USB-to-UART bridge. SW4 selects which UART signal reaches that bridge:
| SW4 position | Connection | Use |
|---|---|---|
| SEUART | Secure Enclave UART | SETOOLS and initial board provisioning |
| UART4 | Application UART4 at 115200 8N1 | Application logs and image requests |
On macOS, accept Allow accessory to connect if prompted. If the power LED lights but neither J-Link nor a serial port appears, reconnect PRG USB with a known USB data cable and check for that prompt. The macOS serial port name is typically /dev/cu.usbmodem...; Linux typically uses /dev/ttyACM..., and Windows uses a COM port.
Update the board support firmware
Open a terminal in the extracted SETOOLS directory. Run the tools from the SETOOLS directory because they load configuration and supporting files using relative paths:
./updateSystemPackage -d
.\updateSystemPackage.exe -d
Select the DevKit serial port when prompted. The output is similar to:
        [INFO] /dev/ttyACM0 open Serial port success
Bootloader stage: SERAM
[INFO] Detected Device:
Part# AE822FA0E5597LS0 - Rev: A0
Connected target is not the default Revision
Do you want to set this part as default? (y/n): y
Maintenance Mode = Enabled
...
Verify Image
Done
The serial port, package names, progress details, and elapsed time can differ. The default revision message is expected during initial setup. Answer y to make the detected E8 revision the default.
Run J-Link Commander once to update the on-board probe firmware and install its serial drivers. Use JLinkExe on Linux or macOS, or JLink.exe on Windows.
What you’ve accomplished and what’s next
You’ve installed the required host tools, configured the SETOOLS path, and connected the DevKit through PRG USB.
Next, you’ll clone the example and export the diffusion model for Ethos-U85.