Load and screen audio file
You’ll use a sample audio file from an Arm demo repository on GitHub:
test_pattern_url = "https://github.com/ARM-software/VHT-SystemModeling/blob/main/EchoCanceller/sounds/yesno.wav?raw=true"
f = urlopen(test_pattern_url)
filedata = f.read()
Play the audio in your Jupyter notebook:
audio = Audio(data=filedata,autoplay=False)
audio
An audio widget will appear:
 Audio widget
You’ll hear a sequence of the words “yes” and “no” with background noise. The goal of this Learning Path is to design an algorithm that removes that noise.
Convert the Audio to a NumPy array
Convert the audio into a NumPy array so it can be processed with CMSIS-DSP:
data, samplerate = sf.read(io.BytesIO(filedata))
if len(data.shape) > 1:
    data = data[:, 0]
data = data.astype(np.float32)
data = data / np.max(np.abs(data))
dataQ15 = fix.toQ15(data)
The code above does the following:
- Converts the audio to a NumPy array.
- Keeps only one channel if the audio is stereo.
- Normalizes the audio to ensure no value exceeds 1.
- Converts the audio to Q15 fixed-point representation to enable the use of CMSIS-DSP fixed-point functions.
Plot the audio signal
Now, plot the audio waveform:
plt.plot(data)
plt.show()
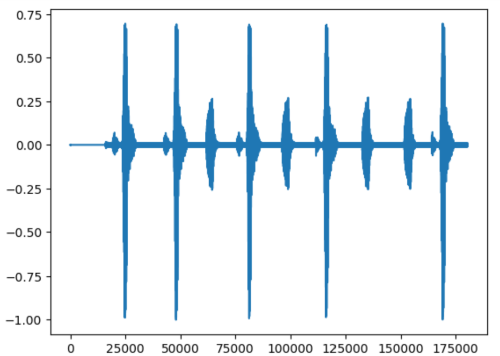
You’ll see:
 Audio signal
The waveform shows a sequence of words. Between the words, the signal is not zero; there is some noise.
Prepare for block-based processing
In real applications, audio streams are processed in real time. Processing can either be sample-based or block-based. For this Learning Path, the processing is block-based.
Before you can move to the next step, this signal must be split into overlapping blocks. The processing will occur on small blocks of samples of a given duration, known as windows.
winDuration = 30e-3 / 6
winOverlap = 15e-3 / 6

winLength = int(np.floor(samplerate*winDuration))
winOverlap = int(np.floor(samplerate*winOverlap))
slices = sliding_window_view(data,winLength)[::winOverlap,:]
slices_q15 = sliding_window_view(dataQ15,winLength)[::winOverlap,:]
Refer to the
NumPy documentation
for details about sliding_window_view. It’s not the most efficient function, but it is sufficient for this tutorial. The signal is split into overlapping blocks: each block reuses half of the samples from the previous block as defined by the winOverlap variable.
By running that last block, you have an audio signal that has been split into overlapping blocks.
The next step is to do some processing on those blocks.