Create a web page with configurable text and color
You’ve already cloned and modified an existing Topo Project. In this section, you’ll create a new project from an empty directory.
The project serves a small web page with configurable text and color, and demonstrates the core parts of a Topo Project:
- A
compose.yamlfile with standard Compose services - An
x-topometadata block - Build arguments exposed as Topo clone-time parameters
- A container image built for Arm Linux targets
Create the project directory
Create a new directory for the project:
mkdir -p ~/topo-message-card
cd ~/topo-message-card
A Topo Project is a normal project directory. At minimum, it needs to contain a compose.yaml file. Most Topo Projects also include a Dockerfile and application source code.
By the end of this section, the directory you created will have the following structure:
        topo-message-card/
├── compose.yaml
├── Dockerfile
└── src/
    └── index.html
Create the source file for the web page
Create the src/ subdirectory and src/index.html:
mkdir -p src
Open src/index.html in a text editor and add the following content:
<!doctype html>
<html lang="en">
  <head>
    <meta charset="utf-8">
    <meta name="viewport" content="width=device-width, initial-scale=1">
    <title>__CARD_TITLE__</title>
    <style>
      body {
        margin: 0;
        min-height: 100vh;
        display: grid;
        place-items: center;
        font-family: Arial, sans-serif;
        background: #f3f6f8;
        color: #17212b;
      }

      main {
        width: min(720px, calc(100vw - 40px));
        border-top: 8px solid __ACCENT_COLOR__;
        background: white;
        padding: 40px;
        box-shadow: 0 18px 40px rgba(15, 23, 42, 0.12);
      }

      h1 {
        margin: 0 0 16px;
        font-size: clamp(2rem, 6vw, 4rem);
      }

      p {
        margin: 0;
        font-size: 1.25rem;
        line-height: 1.5;
      }
    </style>
  </head>
  <body>
    <main>
      <h1>__CARD_TITLE__</h1>
      <p>__CARD_MESSAGE__</p>
    </main>
  </body>
</html>
The values wrapped in double underscores are placeholders. The Dockerfile replaces them with values supplied by Topo.
Create the Dockerfile
Create a file named Dockerfile in the topo-message-card directory with the following content:
FROM nginx:alpine

COPY src/index.html /usr/share/nginx/html/index.html

ARG CARD_TITLE="Hello from Topo"
ARG CARD_MESSAGE="This page was created from a Topo Project."
ARG ACCENT_COLOR="#0091bd"

RUN sed -i "s|__CARD_TITLE__|${CARD_TITLE}|g" /usr/share/nginx/html/index.html
RUN sed -i "s|__CARD_MESSAGE__|${CARD_MESSAGE}|g" /usr/share/nginx/html/index.html
RUN sed -i "s|__ACCENT_COLOR__|${ACCENT_COLOR}|g" /usr/share/nginx/html/index.html
Topo passes configuration values to Topo Projects through Docker build arguments. The ARG lines define the values consumed during the image build.
sed is a command-line text replacement tool. The sed commands replace placeholder text in index.html during the image build. This way, each cloned project can customize the web page without manually editing the source file.
Create the Compose file
Create compose.yaml in the topo-message-card directory with the following content:
# yaml-language-server: $schema=https://raw.githubusercontent.com/arm/topo/refs/heads/main/docs/project-specification/schema/topo-project-specification.json
services:
  message-card:
    platform: linux/arm64
    build:
      context: .
      args:
        CARD_TITLE: "Hello from Topo"
        CARD_MESSAGE: "This page was created from a Topo Project."
        ACCENT_COLOR: "#0091bd"
    ports:
      - "8088:80"

x-topo:
  name: "Message Card"
  description: |
    A minimal web application project that shows a configurable title,
    message, and accent color.
  deployment_success_message: |
    Message Card is running on port 8088.
  parameters:
    CARD_TITLE:
      description: "The title to show on the message card"
      required: true
      example: "Hello from Arm"
    CARD_MESSAGE:
      description: "The message to show below the title"
      required: false
      default: "This page was created from a Topo Project."
      example: "Built once and deployed with Topo"
    ACCENT_COLOR:
      description: "The CSS color used for the card accent"
      required: false
      default: "#0091bd"
      example: "#00a3a3"
This file is both a Compose file and a Topo Project definition.
The services section is standard Compose. The service builds the local Dockerfile, publishes the web server on port 8088, and sets platform: linux/arm64 so the service targets Arm-based Linux systems.
The x-topo section is the Topo metadata block:
namegives the project a human-readable name.descriptionexplains what the project does.deployment_success_messageprints a useful hint after deployment.parametersdefines the values Topo prompts for when someone clones the project.
The argument names in x-topo.parameters match the keys under services.message-card.build.args. When Topo resolves the parameters, it writes the selected values into the build arguments.
The same name appears in three places: x-topo.parameters defines what Topo asks for, build.args passes the value to Docker, and the Dockerfile ARG consumes it.
Clone the local Topo Project
Clone your local Topo Project into a new project directory.
You can choose to answer interactive prompts for the project parameters:
topo clone dir:$HOME/topo-message-card $HOME/message-card-demo
Alternatively, you can include the project parameters in the command:
topo clone dir:$HOME/topo-message-card $HOME/message-card-demo \
  CARD_TITLE="Hello from Arm" \
  CARD_MESSAGE="Created from a new Topo Project" \
  ACCENT_COLOR="#00a3a3"
After using one of the commands to clone the project, inspect the generated project:
cd ~/message-card-demo
cat compose.yaml
The args parameter under build contains the values you provided:
services:
  message-card:
    platform: linux/arm64
    build:
      context: .
      args:
        CARD_TITLE: "Hello from Arm"
        CARD_MESSAGE: "Created from a new Topo Project"
        ACCENT_COLOR: "#00a3a3"
Deploy the new project
Check that your target is ready:
topo health --target user@my-target
Deploy the cloned project to your target:
topo deploy --target user@my-target
When deployment completes, open http://<target-ip-address>:8088/ in your browser. You can also forward the port over SSH:
ssh -L 8088:localhost:8088 user@my-target
Then open http://localhost:8088/ in your browser.
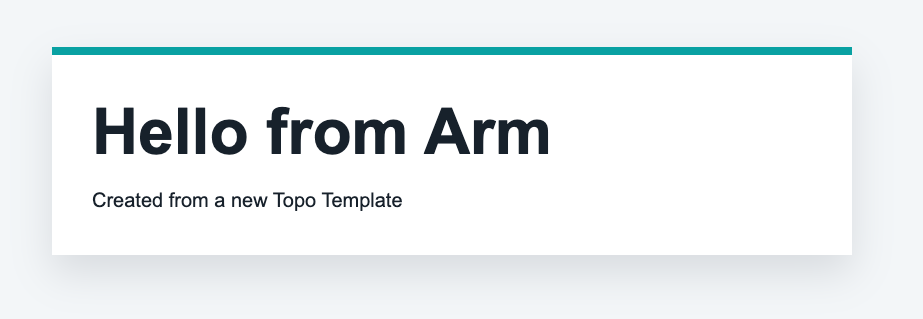 Hello from Arm web page
Confirm that the container is running:
topo ps --target user@my-target
The output includes the message-card service and port 8088.
(Optional) Add hardware requirements
Add features only when your Topo Project needs specific Arm hardware features. For example, a SIMD benchmark that requires SVE can declare that it needs SVE:
x-topo:
  name: "SIMD Visual Benchmark"
  description: |
    Visual demonstration of SIMD performance benefits on Arm processors.
  features:
    - "SVE"
Topo can use these feature requirements when listing projects against a target.
Share the Topo Project
To share your Topo Project, publish the project directory as a Git repository. Other users can then clone it with Topo:
topo clone https://github.com/<user-or-org>/topo-message-card.git
If you want the project to be reused by the wider Topo community, include:
compose.yaml- Any Dockerfiles and source files required by the services
- A
README.mdwith usage instructions - A license file
- Clear
x-topometadata and parameter descriptions
What you’ve accomplished and what’s next
You’ve now created a complete Topo Project from scratch. You created the web page HTML, added a Compose file, described the project with x-topo metadata, supplied clone-time parameters, and deployed the generated project to an Arm-based Linux target.
Next, you’ll learn where to find Agent Skills that can help you create, modify, and review Topo Projects.