Windows Sandbox for Windows on Arm
About this Install Guide
| Reading time: | 15 min |
| Last updated: | 22 Jun 2026 |
| Reading time: |
| 15 min |
| Last updated: |
| 22 Jun 2026 |
This guide shows you how to install and use the tool with the most common configuration. For advanced options and complete reference information, see the official documentation. Some install guides also include optional next steps to help you explore related workflows or integrations.
Windows Sandbox is a lightweight, desktop environment from Microsoft that enables you to safely run and test applications in isolation. Software installed in Windows Sandbox is completely isolated from the host machine. When the sandbox is closed, your installed software is deleted. You can create a new sandbox and start your testing again.
You can install Windows Sandbox on an Arm device running Windows 11, version 22H2, and later.
A number of developer-ready Windows on Arm devices are available.
How do I enable virtualization for Windows Sandbox?
To run Windows Sandbox, you need to make sure that virtualization is enabled on your device.
On a physical machine, virtualization is enabled in the BIOS.
Use the following steps to check the virtualization settings:
Right-click on the Windows Start Menu and select Terminal(Admin)
Enter
systeminfo.exeand press Enter
Details about your system are printed on the terminal.
Check the Hyper-V requirements section at the bottom of the Window.
If you see:
Virtualization Enabled in Firmware: Yes
as shown in the picture below, then you are ready to use Windows Sandbox.

If you see:
A hypervisor has been detected. Features required for Hyper-V will not be displayed.
as shown in the picture below, it also means you are ready to use Windows Sandbox.

If you don’t see any messages about Hyper-V Requirements or you see:
Virtualization Enabled in Firmware: No
then you need to enable virtualization in your BIOS.
The BIOS settings for Virtualization vary depending on your device, but are generally found under Advanced settings.
With virtualization now enabled, you can install Windows Sandbox.
How do I install Windows Sandbox on Windows on Arm?
You must enable Windows Sandbox on a physical Windows on Arm device. It cannot be enabled on a virtual machine such as an Azure Arm instance running Windows 11.
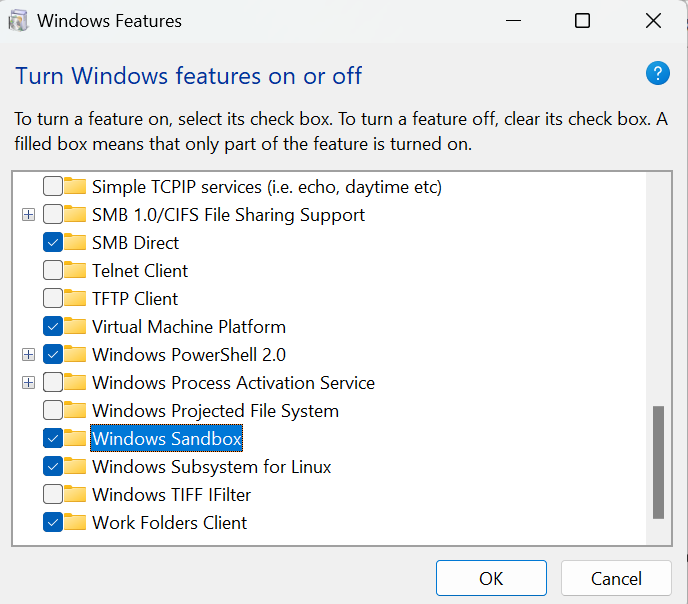
On the Windows search bar type “turn windows features on or off” and open the Control panel.
From the Windows Features list, select Windows Sandbox and then click OK.
If prompted, Restart your computer.
After your computer restarts, click on the Start menu and select Windows Sandbox.
It will take a few minutes for Windows Sandbox to launch.
You are now ready to use Windows Sandbox on your computer.
You can install software and perform any other testing activities in the temporary sandbox.
When you exit Windows Sandbox, the software you installed and any changes you made in the sandbox are gone.
More information is available about the Windows Sandbox architecture .
Give Feedback
How would you rate this tool quick-install guide?
What is the primary reason for your feedback ?
Thank you! We're grateful for your feedback.
- Have more feedback? Log an issue on GitHub.
- Want to collaborate? Join our Discord server.