Multipass
About this Install Guide
| Reading time: | 30 min |
| Last updated: | 22 Jun 2026 |
| Ecosystem dashboard: | View |
| Reading time: |
| 30 min |
| Last updated: |
| 22 Jun 2026 |
| Ecosystem dashboard: |
| View |
| Author: | Jason Andrews, Arm
|
| Official docs: | View |
| Tags: |
| Author: |
| Official docs: |
| View |
| Tags: |
This guide shows you how to install and use the tool with the most common configuration. For advanced options and complete reference information, see the official documentation. Some install guides also include optional next steps to help you explore related workflows or integrations.
Multipass provides cloud-style virtual machines (VMs) on a variety of platforms and host operating systems. Multipass is popular among developers for efficient local testing. When run on macOS with Apple Silicon or on Linux with a Raspberry Pi 5, Multipass provides a similar experience to cloud instances. A local, software-compatible equivalent of an Arm cloud instance with good performance is an important option for developers.
Multipass provides a clear command line interface (CLI) to easily start virtual machine instances, do development tasks, and clean the VMs from your computer.
Multipass uses the terms virtual machine and instance synonymously. In this guide, you’ll learn how to create a compatible Ubuntu Linux environment for working on cloud instances.
A computer running macOS with Apple Silicon or an Arm Linux computer with Kernel-based Virtual Machine (KVM) enabled is required to complete the installation.
Download Multipass for macOS
Download Multipass for macOS from GitHub:
The following commands use Multipass version 1.16.2. The same commands work with other versions. Replace the file used in these steps with the file for your version of choice. To find the latest version, see Multipass releases .
wget https://github.com/canonical/multipass/releases/download/v1.16.2/multipass-1.16.2+mac-Darwin.pkg
Install Multipass on macOS
Install the download using the package command:
sudo installer -pkg multipass-1.16.2+mac-Darwin.pkg -target /
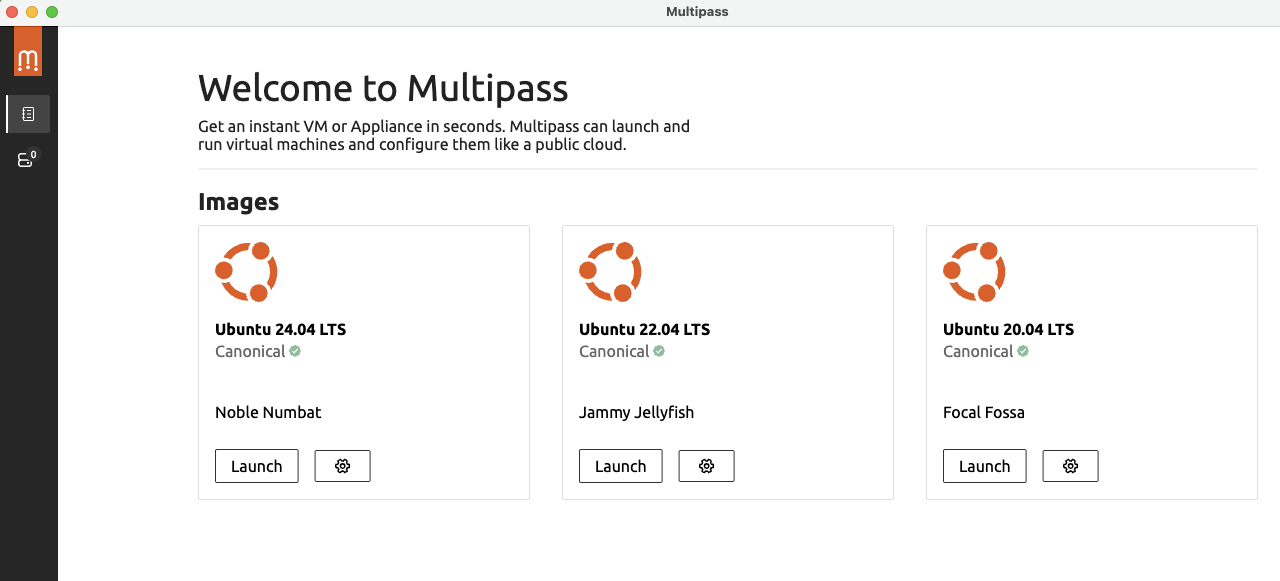
The following getting started instructions use the command line interface. If you prefer to use the graphical interface, start it from the macOS Launchpad. The following image shows the initial screen. You can use the UI to create, start, and stop virtual machines.
Multipass is now installed. You can now get Started with Multipass .
Install Multipass on Arm Linux
Multipass can be used on Arm Linux computers such as the Raspberry Pi 5.
Running Multipass on Linux requires the KVM hypervisor. KVM does not typically work on virtual machines. It requires bare metal.
The following instructions have been tested on a Raspberry Pi 5 running Raspberry Pi OS and Ubuntu.
Check if KVM is available
Install and run the kvm-ok command to confirm KVM is available.
Install kvm-ok on Debian-based Linux distributions:
sudo apt install cpu-checker -y
To check if KVM is available, run:
sudo kvm-ok
If KVM is available, the output is similar to:
        INFO: /dev/kvm exists
KVM acceleration can be used
If KVM is not available, the output is similar to:
        INFO: /dev/kvm does not exist
HINT:   sudo modprobe kvm
INFO: For more detailed results, you should run this as root
HINT:   sudo /usr/sbin/kvm-ok
If KVM is available, proceed with the install.
Install the Snap daemon on Arm Linux
You might need to install the Snap daemon, snapd, before installing Multipass.
If you aren’t sure if it is running, execute the command:
snap version
If the command is found and version information is printed, then snapd is running.
If you need to install snapd, run:
sudo apt install snapd -y
You can select from three Multipass releases: stable, beta, or edge. The default version is stable.
Add --beta or --edge to the following install command to select these more recent versions.
sudo snap install multipass
Get started with Multipass
Multipass is now installed. You can try it out.
Confirm Multipass is installed
To confirm multipass is installed, run:
multipass version
If the multipass command is not found, add /snap/bin to the Bash search path:
export PATH=$PATH:/snap/bin
List available Ubuntu images
Multipass runs Ubuntu images. The last three long-term support (LTS) versions are available. A Docker environment with Portainer is also available, as well as a few other images.
To see the available images, run the find command. Any of the listed images can be used to create a new instance.
multipass find
The output from find is similar to:
        Image                       Aliases           Version          Description
22.04                       jammy             20251001         Ubuntu 22.04 LTS
24.04                       noble,lts         20251001         Ubuntu 24.04 LTS
25.04                       plucky            20251003         Ubuntu 25.04
daily:25.10                 questing,devel    20251015         Ubuntu 25.10

Blueprint (deprecated)      Aliases           Version          Description
anbox-cloud-appliance                         latest           Anbox Cloud Appliance
charm-dev                                     latest           A development and testing environment for charmers
docker                                        0.4              A Docker environment with Portainer and related tools
jellyfin                                      latest           Jellyfin is a Free Software Media System that puts you in control of managing and streaming your media.
minikube                                      latest           minikube is local Kubernetes
ros2-humble                                   0.1              A development and testing environment for ROS 2 Humble.
ros2-jazzy                                    0.1              A development and testing environment for ROS 2 Jazzy.
Launch a Multipass instance
The default values for launching instances allocate 1 CPU, create a small disk (5 Gb), and limited memory (1 Gb). By default, the name of the instance is automatically assigned.
Use the following command to launch a virtual machine instance with non-default values.
multipass launch lts --name m1u --cpus 4 --disk 16G --memory 4G
After the instance is launched, the command prompt returns and the instance is running in the background.
Connect to a Multipass instance
Use the list command to identify created instances. Note the instance names as the name is used in other commands.
multipass list
To start a command line shell on a running instance, use the shell command:
multipass shell m1u
Execute a command on a Multipass instance
To run a specific command from the host on the instance, use the exec command. The command to be run comes after the --:
multipass exec m1u -- uname -a
The uname output is similar to:
Linux m1u 6.8.0-36-generic #36-Ubuntu SMP PREEMPT_DYNAMIC Mon Jun 10 13:20:23 UTC 2024 aarch64 aarch64 aarch64 GNU/Linux
Print instance information
The info command prints information about the instance, including the IP address.
multipass info m1u
The output is similar to:
        Name:           m1u
State:          Running
Snapshots:      0
IPv4:           192.168.73.29
Release:        Ubuntu 24.04.1 LTS
Image hash:     e380b683b0c4 (Ubuntu 24.04 LTS)
CPU(s):         4
Load:           0.00 0.03 0.01
Disk usage:     2.0GiB out of 15.4GiB
Memory usage:   355.3MiB out of 3.8GiB
Mounts:         --
Mount a host directory into a Multipass instance
To access a large number of files on the host machine without copying or transferring them into the instance, use the mount command. This command makes a host directory visible in the instance and all files can be accessed. Modifications made from inside the instance will directly change the files on the host.
For example, to mount a host directory called dev and have it appear in the instance, use the mount command:
multipass mount dev m1u:/home/ubuntu/dev
There are also options to adjust the user and group IDs as needed to avoid permission problems.
Unmount a host directory from a Multipass instance
Use the umount command to unmount the directory:
multipass umount m1u:/home/ubuntu/dev
Directories can be dynamically mounted and unmounted without stopping the instance.
Stop and start a Multipass instance
Multipass instances can be stopped and started quickly.
Stop the instance:
multipass stop m1u
After stopping the instance, the state will change to Stopped on the list command.
Start the instance:
multipass start m1u
Clean up Multipass instances
Use the delete command to delete the instance:
multipass delete m1u
After deletion, the state will change to Deleted. There is one extra level of protection to recover deleted instances before they are fully deleted.
Use the recover command to recover the deleted instance:
multipass recover m1u
Use the purge command to permanently remove all deleted instances:
multipass purge
Purged instances are no longer recoverable.
You’re now ready to use Multipass.
Give Feedback
How would you rate this tool quick-install guide?
What is the primary reason for your feedback ?
Thank you! We're grateful for your feedback.
- Have more feedback? Log an issue on GitHub.
- Want to collaborate? Join our Discord server.