CMSIS Developer Assistant
About this Install Guide
| Reading time: | 30 min |
| Last updated: | 10 Nov 2026 |
| Reading time: |
| 30 min |
| Last updated: |
| 10 Nov 2026 |
This guide shows you how to install and use the tool with the most common configuration. For advanced options and complete reference information, see the official documentation. Some install guides also include optional next steps to help you explore related workflows or integrations.
The CMSIS Developer Assistant is a Model Context Protocol (MCP) Server. It connects your AI coding agent to CMSIS tools in Visual Studio Code (VS Code). Your agent can use it to configure projects, build and program firmware, and inspect Arm Cortex-M targets and Ethos-U accelerators.
You’ll install the tool and learn how to get the most value out of it. You’ll verify the installation with the provided use-cases and prompts.
You can use CMSIS Developer Assistant for the following tasks:
| Capability | What you can ask the connected agent to do |
|---|---|
| Learning and tutoring | Explain unfamiliar code, project settings, and peripheral behaviour. Ask follow-up questions, request a step-by-step walkthrough, or have the tool check your understanding. |
| Project creation and board setup | Find board and device support. Start from a compatible example, configure a compiler and debugger, or add targets and board layers to an existing project. |
| Application development | Propose a design, write or adapt application code, and integrate drivers or software components using support for the selected platform. |
| Building and deployment | Build firmware, investigate compiler errors, program a supported board, or run an application on a Fixed Virtual Platform (FVP). |
| Live debugging and verification | Set breakpoints and step through code. Inspect variables, memory, registers, and call stacks. Investigate faults and verify a repair on the target. |
| Documentation lookup | Search available device manuals, datasheets, and errata. Explain peripheral settings with references to the relevant pages. |
| Build analysis | Inspect memory usage, linker sections, and symbols to understand the generated application. |
| Serial communication | Read application output and exchange data with the target through its serial port. |
| Test automation | Create GitHub Actions workflows for CMSIS solution builds and supported FVP tests. |
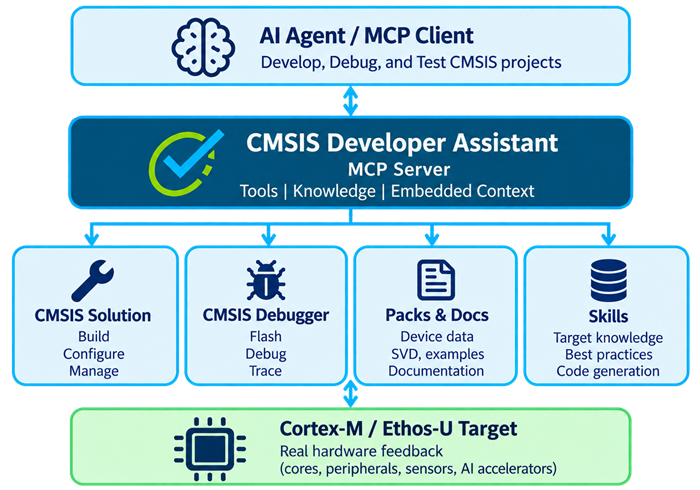 CMSIS Developer Assistant connects the agent to development tools and the target
Before you begin
Install desktop VS Code 1.109.0 or later from the VS Code download page . Select your host operating system and architecture.
Your host computer runs VS Code, the assistant, and the CMSIS tools. The Arm Cortex-M device or FVP is the target that runs your firmware. CMSIS-Toolbox provides host packages for Windows and Linux on x86-64 or Arm64, and macOS on Apple silicon.
Ensure that the compiler for your project, debug probe software, and FVP support your host. For more information, see CMSIS-Toolbox supported platforms . Toolbox availability alone doesn’t establish support for every project tool.
For optional FVP workflows on macOS, use the Docker wrapper described in AVH FVPs on macOS .
Install and sign in to an MCP-capable coding agent. The extension was tested with Codex CLI , Claude Code , GitHub Copilot , and Kimi Code.
Install the extension
Use the shortcut for your operating system to open the Command Palette in VS Code:
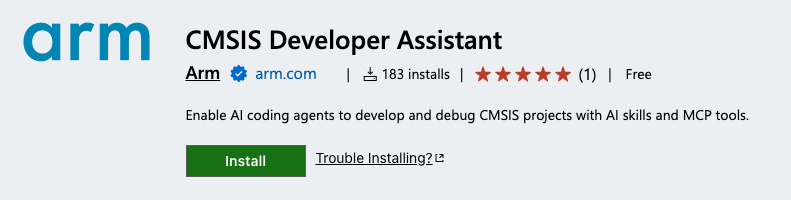
Open the VS Code Extensions view. Find CMSIS Developer Assistant, published by Arm , and install it.
Alternatively, if the VS Code code command is on your path, you can install using the command line.
Run the following in PowerShell on Windows, or a terminal on Linux or macOS:
code --install-extension arm.cmsis-developer-assistant
Reload VS Code when prompted. Confirm installation from the same host environment:
code --list-extensions
The list should contain the extension identifier, ignoring capitalization:
arm.cmsis-developer-assistant
Install the CMSIS tools
With Developer Assistant installed, install the Arm Keil Studio for VS Code extension pack . It provides CMSIS Solution, CMSIS Debugger, and Arm Tools Environment Manager for creating, building, and debugging projects.
Follow the extension-pack installation steps. After installing the extensions, resume Developer Assistant setup. When you create or open a CMSIS project, complete any tool installation and licence prompts shown by Arm Tools Environment Manager. The required tools depend on the project.
Connect your coding agent
Open a project folder that you intend to use and trust it when VS Code prompts you. From the Command Palette, run CMSIS Developer Assistant: Configure Agent and choose your agent. Review the configuration and agent-rule changes offered by the extension before accepting them.
Restart the agent session so that it can load the updated configuration. Leave VS Code running while using Developer Assistant.
In the agent chat, enter:
/cmsis-help
If the agent doesn’t expose slash commands, enter the following prompt:
Check my CMSIS Developer Assistant setup. Report whether you can reach its MCP tools and find the procedure for creating a project for a supported board.
/cmsis-help checks the connection and helps the agent find guidance for your task. Describe your goal in plain language. The agent searches the knowledge base for relevant procedures. To explore that guidance yourself, run CMSIS Developer Assistant: Open Knowledge Browser from the Command Palette.
Prompt your coding agent to list the VS Code windows through Developer Assistant and identify your workspace. If several windows are open, select the intended one using CMSIS Developer Assistant: Select Target Window, or ask the agent to pin it.
The setup check passes when the agent can complete the following tasks:
- Reach the MCP tools
- Identify the intended workspace
- Retrieve the project-creation procedure from the knowledge base
If any check fails, use the guidance provided in the troubleshooting table to troubleshoot before continuing.
How to use CMSIS Developer Assistant
A good way to use CMSIS Developer Assistant is to start by describing your goal and constraints. Ask the agent to propose an approach and measurable test criteria, then review them before implementation. The agent can build, run, and inspect the application through the CMSIS tools. It can use target observations to investigate failures, and verify changes against the agreed criteria.
Review any source changes and results before accepting the application. Ask the agent to support its explanations and conclusions with source references, available documentation, and target observations.
Verify CMSIS Developer Assistant installation
You can try the following prompts and use cases to verify that the installation of CMSIS Developer Assistant was successful.
Create a Blinky project on a Cortex-M FVP
An Arm FVP simulates a target system on the host. The Corstone-320 FVP includes Cortex-M85 and Ethos-U85.
Follow the Arm FVP installation guide for your chosen FVP and host. On macOS, use AVH FVPs on macOS for the Docker wrapper and its prerequisites.
Complete the installation and licence steps before continuing. Give the agent the FVP executable path and indicate whether it runs directly on the host or in a container. Ask the agent to use the FVP setup procedure available through /cmsis-help to configure the CMSIS debugger connection.
Then, prompt your agent to use CMSIS Developer Assistant and create a Blinky example:
Use CMSIS Developer Assistant to create a Blinky example for the installed FVP. Ask me if you are unsure which FVP or where it is installed. Configure the simulation debugger through CMSIS Solution, build and start the model, and stop at main. Then verify the example's LED state changes through a supported model display or debugger-visible peripheral state. Report the selected example, target, breakpoint and observed state. If this model/example combination or debug connection is unsupported, report the missing requirement.
The agent should create and build a Blinky project for your FVP, start the simulation, and stop at main. After continuing, the simulated LED state should change as described in the prompt. The agent should confirm this and report what it observed.
Create a Blinky project on a Cortex-M board
If you’re using a physical Cortex-M board, the steps are very similar.
Complete initial setup steps, including any required firmware, debug-access configuration or provisioning. Connect your board and probe.
Indicate to the agent which board you’re using, and how you’ve connected it. Then, enter the following prompt:
Using CMSIS Developer Assistant, create a Blinky example for my board. Ask me if you are unsure which board you should be using. Create the project in a suitable workspace, and ask me to confirm where if necessary, reusing the vendor's board support and startup code. Confirm the selected example and target before programming. Build, load and debug through the CMSIS tools, stop at main, then run the application. Verify the actual LED behaviour against the example's expected behaviour, and report the build result, breakpoint location and what you observed. Ask me to handle any tool download, licence or workspace-trust prompts.
Answer any required setup questions. Finish by prompting the agent to clear its breakpoints and stop debugging.
Explore your project with the assistant
After either Blinky check, keep the project open and prompt the agent to explain how it works:
Using CMSIS Developer Assistant, identify the device, board or FVP, and software packs configured in this project. Explain which peripherals Blinky uses and how the code changes the LED state. Use the project source and available target documentation, and cite the relevant files and manual sections. Tell me if any required documentation is unavailable.
The answer should identify your configured target and connect the explanation to its source code and documentation. Check the cited files and references. This verifies that the assistant can retrieve project and device information as well as build and debug.
Continue the conversation as you would with a tutor. Prompt for a simpler explanation, question an assumption, or request a walkthrough of a function. For example:
Walk me through the path from main to the LED update, one step at a time. Explain how the update interval is set and how I could verify it with the debugger. Ask me a question to check my understanding before suggesting changes.
Run an inference example on an Ethos-U target
Use an Ethos-U-equipped Cortex-M board or a supported Corstone FVP. Start with the CMSIS-Ethos-U Test-Ethos-U application , which supplies small models, test inputs and reference outputs.
The application includes solutions for Ethos-U55, Ethos-U65, and Ethos-U85. Prompt the agent to select the solution and supported target that match your hardware, following the application README and the CMSIS-Ethos-U integration guide .
| Target | Required information |
|---|---|
| FVP | The agent needs to identify the model executable, supported CMSIS example, accelerator variant and MAC configuration, and simulation debugger connection. Corstone-320 provides an Ethos-U85 target. |
| Physical board | The agent needs to identify the exact board, core, Board Support Pack (BSP), and Device Family Pack (DFP). The agent also needs to confirm probe and accelerator, as well as configuration, accessible memory, and any vendor provisioning. |
A model compiled for one target isn’t automatically suitable for another, even when both use the same Ethos-U variant. The compiled model, driver, linker placement, and memory configuration need to be compatible. The agent should reuse verified platform support and report any missing support. It shouldn’t guess register addresses or reuse the binary of another board.
Indicate to the agent which board or FVP you’re using, and how to find it.
Then, submit the following prompt:
Use CMSIS Developer Assistant to set up the CMSIS-Ethos-U Test-Ethos-U application from https://github.com/ARM-software/CMSIS-Ethos-U/tree/main/examples/Test-Ethos-U in a new folder. Ask me to confirm my board or FVP and its connection if needed. Identify the Cortex-M core, Ethos-U variant, MAC configuration and memory setup. Read the example's README and select the matching solution and supported target. Reuse its platform support, runtime, models, test inputs and reference outputs. Propose any configuration changes and test criteria for my review before making changes. If the example lacks support for my target, explain what is missing and stop before attempting a new board port. Compile the models for this target if required, configure the debugger, build, and deploy or start the simulation. Run the supplied tests and compare the complete outputs with the reference outputs using their documented tolerances. Repeat an input to check consistency. Inspect accelerator submission and successful completion to confirm NPU execution. Report the selected solution, target configuration, changes, build result and observed test results. Ask me to handle required tool, licence, provisioning or workspace-trust steps.
Answer required questions and review the changes and programming actions according to your agent settings. Workspace trust, tool downloads, and licence acceptance can still require your input.
Ensure that the following criteria are met:
- The selected board or FVP and Ethos-U configuration match your request.
- The application builds and runs on that target.
- Model outputs match the supplied references within their documented tolerances.
- Repeating an input produces consistent output.
- Live target evidence confirms successful NPU execution.
If a check fails, prompt the agent to investigate the live target and verify its repair. Successful build and inference return codes alone are insufficient.
Keep this check to targets supported by the example. Developing a new board port is beyond the scope of the install guide. After the reference tests work, you can prompt the agent to adapt the application to your own model and inputs.
After this is working, you can try creating a new application by providing a model and use-case. Prompt your agent to use CMSIS Developer Assistant and the Test-Ethos-U project as an example.
Use an existing application
You can also use Developer Assistant to investigate and debug an existing CMSIS application. Open its solution, select the correct target window, and describe the observed failure and expected behavior. The agent can use breakpoints, variables, memory, and peripheral inspection to collect evidence, propose a repair, and verify it on the target.
Troubleshoot installation issues
Use the following guidance to troubleshoot issues with installing and using CMSIS Developer Assistant:
| Symptom | What to check |
|---|---|
| The extension command is missing | Confirm that the active VS Code instance is version 1.109.0 or later, confirm extension installation, and reload the window. |
| The agent can’t see CMSIS tools | Run CMSIS Developer Assistant: Configure Agent again for that agent, then restart its session. Use /cmsis-help to check the connection. |
| A new project window is absent from the agent window list | Check Workspace Trust and tools prompts in that window. Allow its extensions to activate before retrying. |
| Calls target another project | Select or pin the intended target window and confirm the reported workspace. |
| The wrong FVP solution is active | In directories containing several solutions, select the solution for your accelerator and confirm its target. Wait for tool installation to finish before retrying. |
| Build works but debugging does not | Check the selected probe and target, board power, and vendor setup. Prompt for session status and recent problems before retrying. |
| A continuously running FVP won’t pause or stop | If stopping through CMSIS fails, stop only that test model container in Docker Desktop before relaunching. |
| The debugger remains unresponsive | Stop debugging. If needed, reconnect the board or probe. After reconnecting, reload the workspace. Collect CMSIS Developer Assistant: Copy Recent Problems for a report. |
Next steps
You’re now ready to start using the CMSIS Developer Assistant.
For additional workflows and configuration details, see the Developer Assistant documentation .
Give feedback
How would you rate this tool quick-install guide?
What is the primary reason for your feedback ?
Thank you! We're grateful for your feedback.
- Have more feedback? Log an issue on GitHub.
- Want to collaborate? Join our Discord server.