Deploy a pre-optimized YOLOv8s object detector from Arm AI Portal
Earlier in this module, you used the full ahead-of-time (AOT) path for MobileNetV2. You prepared a
PyTorch model, lowered it to ExecuTorch with XNNPACK, quantized it using the PyTorch 2 Export (PT2E) quantization workflow, copied
the .pte artifact to the Raspberry Pi, and measured latency and classification output on the target.
In this section, you will use a pre-optimized and quantized YOLOv8s object detection model
packaged for ExecuTorch with XNNPACK. Instead of exporting and quantizing the
model yourself, you will download the prepared .pte artifact from the Arm AI Portal, run it on the Raspberry Pi, and focus on application integration: camera input, letterbox pre-processing, detector post-processing, box drawing, and latency measurements.
What is the Arm AI Portal?
The Arm AI Portal provides pre-optimized models, performance data, deployment code and workflows, and optimization tools for Arm-based systems. Its model catalog can be filtered by task, target hardware, runtime, precision, format, and execution backend. Model pages report quality, latency, memory use, and artifact size so you can compare packages before testing them.
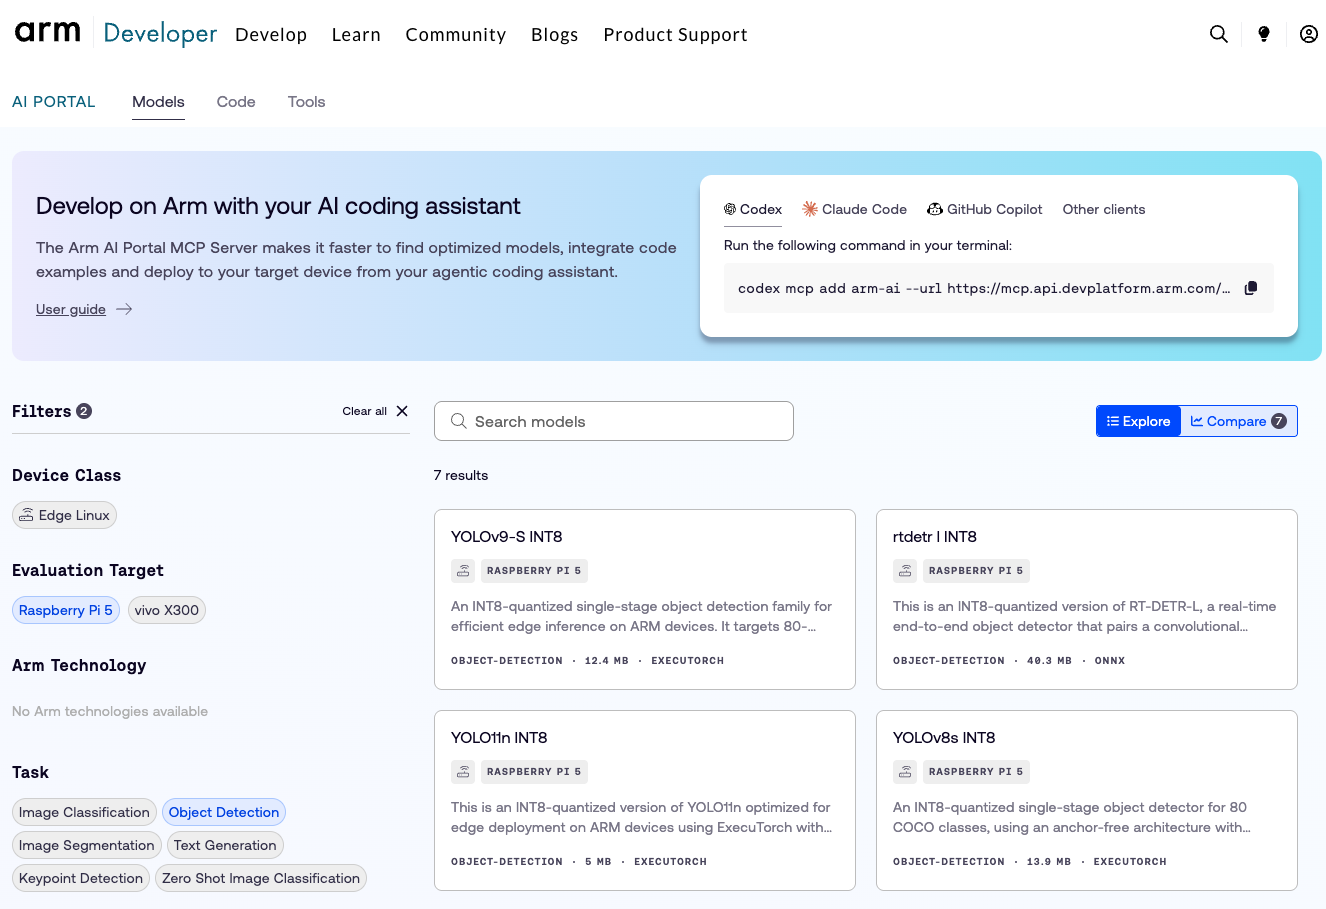
The model you will use is:
- Model: YOLOv8s INT8
- Runtime: ExecuTorch
- Delegate: XNNPACK
- Target: Raspberry Pi 5, Edge Linux,
arm64 - Package:
Arm/yolov8s-int8-xnnpack-executorch - Model card: YOLOv8s INT8 ExecuTorch with XNNPACK
| Workflow step | How this workflow differs |
|---|---|
| Model preparation | Download a pre-optimized AI Portal package instead of exporting from PyTorch |
| Quantization | Use the packaged INT8 model instead of running PTQ calibration locally |
| Application work | Add camera input, YOLO pre-processing, post-processing, and box drawing |
YOLO and object detection
YOLO stands for “You Only Look Once.” It is a family of object detection models that predicts object locations and classes in one forward pass. YOLOv8s is the small variant of YOLOv8, so it is a practical choice when you want object detection on an edge CPU.
Object detection is more complex than image classification because the model output is not a single class score vector. A detector returns boxes and class scores, and the application must apply confidence filtering, box conversion, and non-maximum suppression before the output is useful.
This model expects a fixed 640 × 640 input. Letterbox preprocessing scales each camera frame uniformly to fit that input, then adds padding to the unused rows or columns. This preserves the original aspect ratio instead of stretching the image, which could distort objects and reduce detection accuracy.
Inspect the model card
The Arm AI Portal reports the following quality and performance measurements for the INT8 model optimized for Raspberry Pi 5 with ExecuTorch and XNNPACK:
Mean average precision (mAP) summarizes detection quality across the evaluation dataset.
mAP@0.50:0.95averages results across several intersection-over-union (IoU) thresholds.Latency is the median measured latency.
Frames per second (fps) reports throughput.
Delegation reports the percentage of exported operators assigned to XNNPACK. It does not mean that the same percentage of execution time runs in XNNPACK.
| Metric | AI Portal value |
|---|---|
mAP@0.50:0.95 | 43.86% |
mAP@0.50 | 60.39% |
mAP@0.75 | 47.49% |
| Frames per second | 2.19 fps |
| Latency | 457.03 ms |
| Delegation | 95.43% |
| Peak memory | 90.28 MB |
| Model size | 13.2 MB |
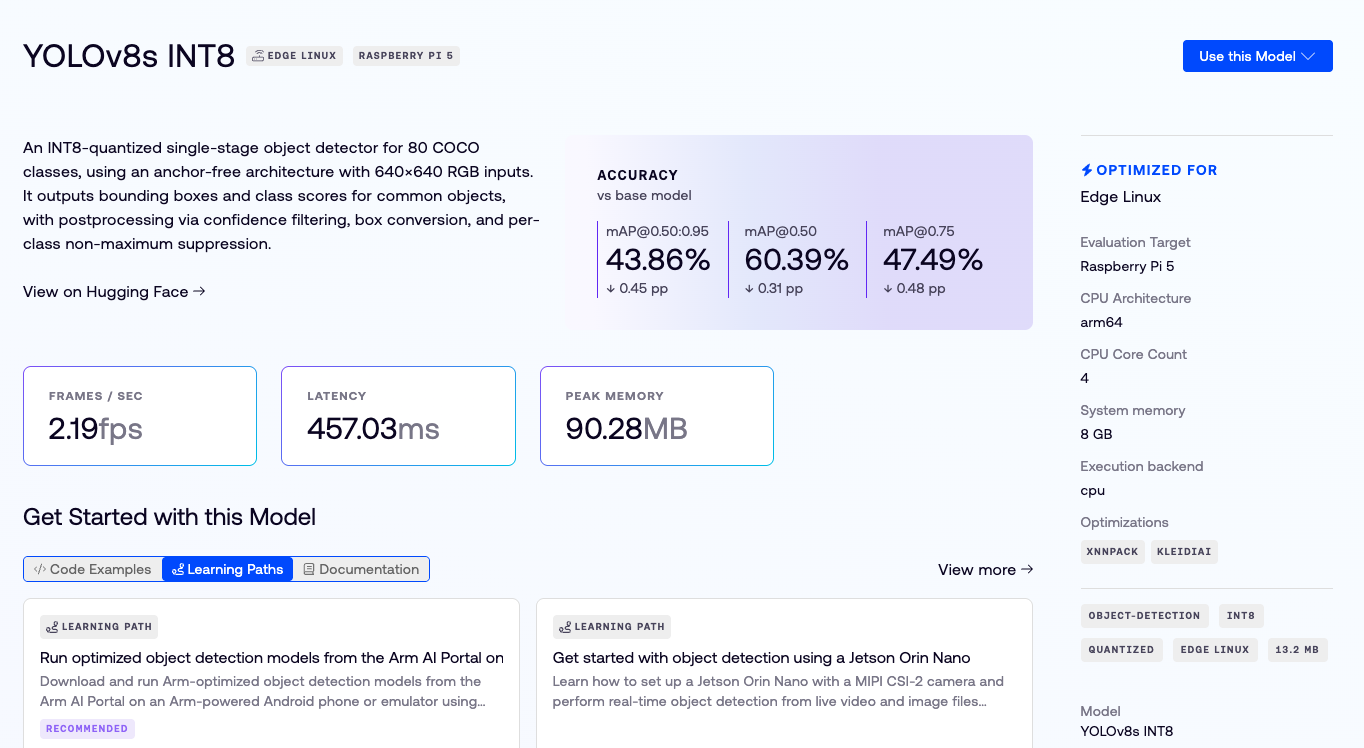
These values are not a production guarantee. They help you decide whether the package is worth testing on your target setup. You still need to measure behavior in your own application because camera input, lighting, object distance, postprocessing thresholds, and system load can change the observed result.
Set up the Raspberry Pi environment
Connect to the Raspberry Pi over SSH and forward the Object Detection app port:
ssh -L 8094:localhost:8094 <user>@<pi>
This keeps the YOLOv8s web app available at http://localhost:8094 on your
development machine while the server runs on the Raspberry Pi.
Use the same Raspberry Pi environment as earlier in this module:
cd ~/executorch_on_arm
source .cpu_lab_venv/bin/activate
sudo apt update
sudo apt install -y libgl1 libglib2.0-0t64
python -m pip install -r module-2-cnn-inference-with-quantization/requirements.txt
The two system packages provide the OpenGL and GLib libraries used by the OpenCV wheel on Raspberry Pi OS Trixie.
Download the pre-optimized model to the Raspberry Pi
Download the AI Portal model package from Hugging Face directly on the Pi:
module-2-cnn-inference-with-quantization/scripts/pi/download_yolov8s_ai_portal_model.py \
  --repo-id Arm/yolov8s-int8-xnnpack-executorch \
  --revision 1a77e7aa86df18d1db1e0c74e40000c665fbd5d9 \
  --out module-2-cnn-inference-with-quantization/artifacts/yolov8s_int8_xnnpack
The script does three jobs. First, it downloads the model package from Hugging Face:
snapshot_path = Path(
    snapshot_download(
        repo_id=args.repo_id,
        revision=revision,
        allow_patterns=["*.pte", "*.json", "*.txt", "*.md", "*.yaml", "*.yml"],
    )
)
The revision pins the package used for this course. The allow_patterns list
keeps the download focused on files the application needs: ExecuTorch .pte
artifacts, JSON and YAML metadata, labels, and documentation. It does not
download training checkpoints or unrelated repository files.
Next, the script copies those files into the local artifact folder:
for path in source.rglob("*"):
    if path.suffix.lower() not in {".pte", ".json", ".txt", ".md", ".yaml", ".yml"}:
        continue
    shutil.copy2(path, out / path.name)
The download script creates model_spec.json. This file records the selected .pte artifact and the model input and output settings used by the demonstration application:
{
  "model_variant": "yolov8s",
  "task": "object_detection",
  "runtime": "executorch",
  "backend": "xnnpack",
  "precision": "int8",
  "inputs": [
    {
      "shape": [1, 3, 640, 640],
      "color": "rgb",
      "value_range": [0.0, 1.0]
    }
  ]
}
The script selects yolov8s_raspberry_executorch_optimized.pte and records that filename in
model_spec.json.
It also
writes coco_labels.json if the package does not include one. COCO stands for Common Objects in Context. Those labels are
needed to turn YOLO class IDs into names such as person, chair, or laptop.
The downloaded config.yaml records the package’s input shape, value range,
letterbox settings, output layout, and post-processing thresholds.
Run the YOLOv8s webcam detector
Attach a USB webcam to the Raspberry Pi. The app
uses OpenCV camera index 0, which is usually the first connected camera. The
--camera argument can also accept a different OpenCV camera index, such as
1, or a video file path if you want to test without a live camera.
Start the app on the Raspberry Pi:
module-2-cnn-inference-with-quantization/scripts/pi/serve_yolov8s_webcam.py \
  --spec ~/executorch_on_arm/module-2-cnn-inference-with-quantization/artifacts/yolov8s_int8_xnnpack/model_spec.json \
  --camera 0 \
  --host 0.0.0.0 \
  --port 8094
Open http://localhost:8094 on the development machine.
The app displays the camera frame, detected objects, model inference latency, and per-frame processing time.
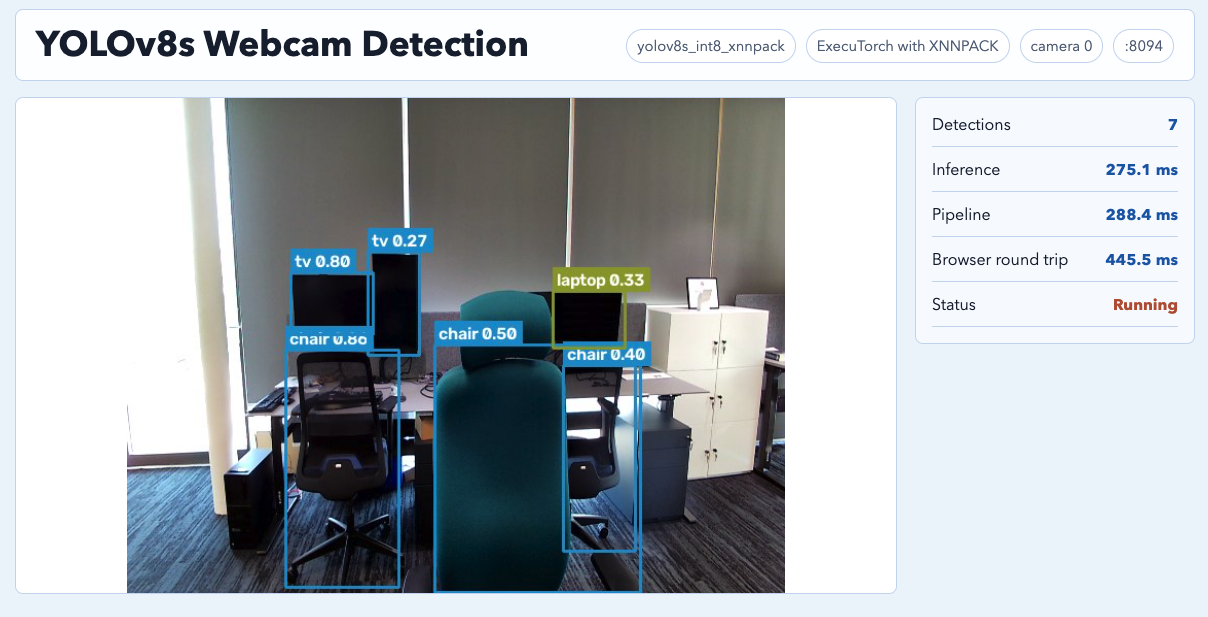
Model inference latency measures the ExecuTorch forward pass. End-to-end pipeline time also includes camera capture, letterbox pre-processing, post-processing, drawing, and web serving.
Check application behavior
After running the webcam detector, answer:
| Application-fit question | Your conclusion |
|---|---|
| Did the detector run at an acceptable latency or frame rate for the intended interaction? | |
| Were the detected boxes and labels useful for the scene you tested? | |
| Did camera input, lighting, or object distance affect results? | |
| What would you validate before using this detector in production? |
Understand the object detection application code
The app follows the same high-level pattern as the MobileNetV2 web demo: create a runner, accept input from an application source, call the ExecuTorch runtime, and convert the raw model output into something the user can read.
The server entry point creates a YoloV8Runner from the downloaded
model_spec.json:
runner = YoloV8Runner(args.spec)
The runner uses the .pte artifact recorded in model_spec.json.
from executorch.extension.pybindings.portable_lib import _load_for_executorch

model_path = spec_path.parent / self.spec["pte"]
self.model = _load_for_executorch(str(model_path))
_load_for_executorch() loads the prepared .pte artifact through the
ExecuTorch Python bindings. The runtime call itself is small:
with torch.inference_mode(), suppress_stderr():
    raw_output = self.model.forward((input_tensor,))[0]
The tuple around input_tensor is intentional. ExecuTorch programs receive
their inputs as a tuple, even when the model has only one input tensor. The
[0] selects the first output tensor from the returned output tuple.
The difference from MobileNetV2 is the data around the model call. MobileNetV2
converted one image into a normalized tensor and then used softmax plus top-k.
YOLOv8s converts each camera frame into a 1x3x640x640 tensor, runs the
detector, and turns raw detector output into boxes:
input_tensor, scale, pad = self._preprocess(frame_bgr)
raw_output = self.model.forward((input_tensor,))[0]
detections = self._postprocess(raw_output, frame_bgr.shape[:2], scale, pad, 0.25, 0.7)
Pre-processing uses letterboxing, which resizes the image without changing its aspect ratio and pads the remaining area:
scale = min(self.input_size / height, self.input_size / width)
resized = cv2.resize(image_rgb, (resized_w, resized_h), interpolation=cv2.INTER_LINEAR)

canvas = np.full((self.input_size, self.input_size, 3), 114, dtype=np.uint8)
canvas[pad_y : pad_y + resized_h, pad_x : pad_x + resized_w] = resized

tensor = torch.from_numpy(canvas).permute(2, 0, 1).contiguous().float().unsqueeze(0) / 255.0
The final tensor shape is [1, 3, 640, 640], matching the input shape recorded
in model_spec.json. The application converts the image from OpenCV’s blue-green-red (BGR) camera format to
red-green-blue (RGB). It then arranges the data in NCHW (batch, channels, height, width) order. Finally, it converts the values to floating point, and scales them [0.0, 1.0].
Post-processing reverses the letterbox padding and scale so the boxes line up with the original camera frame. This is where object detection differs most from classification:
- confidence filtering removes low-confidence candidate boxes
- box conversion changes YOLO center-format boxes into corner-format boxes
- per-class non-maximum suppression removes overlapping boxes that refer to the same object
- drawing code overlays labels and boxes on the frame
The core box handling looks like this:
boxes_xywh = predictions[:, :4]
class_scores = predictions[:, 4:84]

class_ids = class_scores.argmax(axis=1)
scores = class_scores[np.arange(class_scores.shape[0]), class_ids]
keep = scores >= conf_thres

boxes = xywh_to_xyxy(boxes_xywh[keep])
selected = nms_by_class(boxes, scores[keep], class_ids[keep], iou_thres)
When inspecting the code, try to answer these questions
- What input shape does the model expect?
- Which steps happen before the ExecuTorch forward pass?
- Which steps happen after the ExecuTorch forward pass?
- Which steps affect user-visible latency but are not part of the
.ptemodel?
Decide when to use a pre-optimized AI Portal model
The MobileNetV2 workflow showed how to create an optimized .pte artifact yourself. The YOLOv8s workflow shows a different deployment path: start from a prepared model package and focus engineering effort on integration and validation.
Use a pre-optimized AI Portal model when:
- the model task matches your application closely
- the package targets your runtime, backend, precision, and hardware
- the published latency, memory, and accuracy metrics are close to your requirements
- you want to prototype application integration before investing in your own export and quantization flow
Use the local AOT workflow instead when:
- you need to modify the model architecture or training data
- you need control over calibration, quantization, or backend choices
- the model package does not match your target hardware or deployment constraints
Course complete
Nice work
You completed Optimize and deploy AI inference with ExecuTorch on Arm.